
Tools
Specialized trail tools can help make your trail work more enjoyable.
Remember:
- Your most important tool is your brain—use it.
- Always use proper personal protective
equipment, such as hardhats, gloves, and
safety glasses. Make sure a job hazard analysis has
been approved and a safety plan is being followed.
- Select the right tool for the job. Carefully inspect each tool.
Make sure the handles are sound, smooth, and straight, and
that the heads are tight.
- Pace yourself. Take rest breaks, drink plenty of water, and
keep your mind on your work. Crewmembers should trade off
on work tasks occasionally for relief from repetitive stresses.
- Keep cutting tools sharp. A dull tool makes your work harder
and more dangerous.
- Before you start, clear away any brush or limbs that might
catch a swinging tool.
- Posture is important. Stand comfortably in balance. Adjust
your stance and tool grip continually to prevent slipping and
to avoid glancing blows. Be especially careful when working
in wet, slippery conditions.
- Be thinking about the consequences of every move. If you
are working with a rock or log, think ahead so you are not
standing in the wrong place when it moves. Be ready to toss
your tool aside and jump free. Avoid cutting toward any part
of your body, and watch out for your coworkers. Use skill, not
brute force.
- When carrying, loading, or storing a cutting tool, cover the
blade with a sheath to protect both the sharp edge and yourself.
In vehicles, make sure tools are fastened down.
- Maintain at least 3 meters (10 feet) between workers as a safe
operating distance when using individual chopping and cutting
tools.
- Carry sharp tools at your downhill side. Grasp the handle at
about the balance point with the sharpened blade forward and
down. If you fall, throw the tool clear.
- At the work site, lay tools on the uphill side of the trail with the business end farthest uphill. Make sure the handles are far enough off the edge of the trail so they are not a tripping hazard. Never sink double-bit axes, McLeods, Pulaskis, mattocks, or similar tools into tree trunks, stumps, or the ground where the exposed portion of the tool will present a hazard.
Clinometers—A clinometer, called a clino by trail workers, is a simple, yet useful, instrument for measuring grades. Most clinometers have two scales, one indicating percent of slope, the other showing degrees. Percent slope, the relationship between rise or drop over a horizontal distance, is the most commonly used measure. Percent readings are found on the right hand side of the scale. Don't confuse percent and degree readings. It is easy to do! Expressed as an equation:
Percent of Grade = Rise/Run x 100 percent
A section of trail 30 meters (100 feet) long with 3 meters (10 feet) of difference in elevation would be a 10-percent grade. A 100-percent grade represents 45 degrees.
Traditionalists often prefer an Abney level to a clinometer. They are easier to see through and there are no measurements to read.
Global Positioning Systems (GPS)—Most trail surveyors are using GPS receivers for accurate trail location, inventory, and contract preparation. Real-time correction is no longer necessary and prices have fallen. GPS is becoming the norm for locating trails.
Tape Measures—Get a tape measure with metric units. Mark off commonly used measurements on your tool handles. Know the length of your feet, arms, fingers, and other rulers that are always handy on the trail. Calibrate the length of your pace over a known course so you can easily estimate longer distances.
Bow Saws—These saws are useful for clearing small downfall and for limbing. They consist of a tubular steel frame that accepts replaceable blades. The blades can be removed by loosening a wing nut or releasing a throw clamp.

Chain Saws—A chain saw can make short work of your cutting tasks—but it is not for wilderness use. Specialized instruction and certification are required, so make sure you are certified before operating a chain saw.
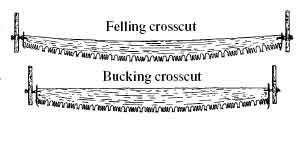
Crosscut Saws— Symmetric crosscut saws, those designed for a sawyer at either end, follow two basic patterns. Felling crosscuts are light, flexible, and have concave backs that conform easily to the arc of the cut and the sawyer's arm. The narrowed distance between the teeth and back leaves room for sawyers to get wedges into the cut quickly. Bucking crosscuts have straight backs and are heavier and stiffer than felling saws. Bucking saws are recommended for most trail work because they are more versatile.
Bucking saws also are available as asymmetric saws, with a handle at one end that can be used by a single sawyer.
Cover the blades with sections of rubber-lined firehose slit lengthwise. Velcro fasteners make these guards easy to put on and take off. When carrying a saw, lay it flat across one shoulder with a guard covering the teeth. The teeth need to face away from the neck. Don't leave a wet guard on a saw.
A sharp crosscut saw is a pleasure to operate, but a dull or incorrectly filed saw is a source of endless frustration, leading to its reputation as a misery whip. Never sharpen a saw without a saw vise and the knowledge to use it. Field sharpening ruins crosscut saws.
Warren Miller's classic, the "Crosscut Saw Manual" (revised 2003), provides information on sharpening techniques. David E. Michael's "Saws That Sing: A Guide To Using Crosscut Saws" (2004) tells you everything else you will need to know. Both are available from the Federal Highway Administration's Recreational Trails Web site: http://www.fhwa.dot.gov/environment/fspubs/.
A saw's teeth are needle sharp. Wear gloves when sawing and keep your hands clear of the cut and the blade. Carry bow saws by your side with the blade pointed down. Cover the blade with plastic blade guards or small-diameter fire hose secured with Velcro fasteners. Always carry spare parts and plenty of replacement blades.
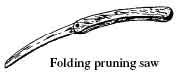
Pruning Saws—Pruning saws are useful for limbing, some brushing, and removing small downfall, especially where space is limited and cutting is difficult. Folding pruning saws are handy.
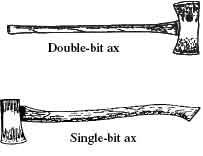
Axes—Axes are of two basic types: single or double bit. Double-bit axes have two symmetrically opposed cutting edges. One edge is maintained at razor sharpness. The other edge usually is somewhat duller, because it is used when chopping around rocks or dirt. Mark the duller edge with a spot of paint.
Before chopping with an ax, check for adequate clearance for your swing. Remove any underbrush and overhanging branches that might interfere. Be sure your footing is stable and secure. Chop only when you are clear of other workers.
Stand comfortably with your weight evenly distributed and both feet planted shoulder-width apart. Measure where to stand by holding the handle near the end and stretching your arms out toward the cut. You should be able to touch the blade to the cut.
Begin chopping by sliding your forward hand within 150 millimeters (6 inches) of the axhead. As you swing, your forward hand slides back down the handle to the other hand. Just after impact, give the handle a slight twist to pop severed wood out of the cut.
Proficiency with axes requires practice. Inexperienced users and dull axes can cause serious accidents. In general, the force of the swing is not as important as accurate placement. Always chop away from your body. Stand where a glancing blow will not strike you. If you must cut toward yourself, "choke up" on the handle with both hands and use short swings for more control.
"An Ax to Grind–A Practical Ax Manual" (Weisgerber and Vachowski 1999) is a good reference.
Combination Tools— The combination or combi tool is basically a military entrenching tool on a long handle, developed for firefighting. It serves as a light-duty shovel and scraper.

Fire Rakes (Council Tools)—The fire rake is another fire tool widely used for trail work, especially in the East.

Hoes—Use an adze hoe, grub hoe, or hazel hoe to break up sod clumps when constructing new trail or when leveling an existing trail tread. These hoes also are useful in heavy duff. They generally work better than a Pulaski.

Mattocks—The pick mattock is often recommended as the standard tool for trail work. For many applications, it is much better than a Pulaski. It has a pointed tip for breaking rocks and a grubbing blade for working softer materials. The grubbing blade also may be used to cut roots or remove small stumps. With the edge of the tool, you can tamp dirt and loose rocks or smooth a new tread.

A pick mattock can be used to pry rocks without fear of breaking a handle. Two people working with pick mattocks may not need to carry rock bars.
Maintain good cutting edges on mattocks. Sharpen grubbing blades to maintain a 35-degree edge bevel on the underside. Sharpen pick ends as you would a pick, and maintain factory bevels on cutter blades.
McLeods—The McLeod combines a heavy-duty rake with a large, sturdy hoe. McLeods work well for constructing trails through light soils and vegetation or for reestablishing tread when material from the backslope sloughs onto the trail. A McLeod is essential for compacting tread and is helpful for checking outslope. If you hate leaving a bolt impression in your compacted tread, remove the bolt that secures the toolhead and weld the head to the mounting plate. McLeods are inefficient in rocky or unusually brushy areas.

Picks—Pick heads have a pointed tip that can break up hard rock by forcing a natural seam. They also have a chisel tip for breaking softer materials.

Work the pick as you would the hoe on a Pulaski with short, deliberate, downward strokes. Avoid raising the pick overhead while swinging. Always wear safety goggles while using a pick to protect yourself from flying rock chips.
Use a grinder or mill bastard file to sharpen the pointed tip to a 3-millimeter (1⁄8-inch) square. When sharpening the chisel tip, maintain the factory bevel.
Pulaskis—The Pulaski combines an ax and a grub hoe into a multipurpose firefighting tool. It isn't as good as a hoe or mattock for grubbing, nor is it as good as an ax for chopping. It is a popular trail tool, mostly because it is widely available and easier to carry than several singlepurpose tools.

When using the hoe end of a Pulaski, stand bent at the waist with your back straight and parallel to the ground, knees flexed, and one foot slightly forward. Hold the handle with both hands so the head is at an angle to your body, and use short, smooth, shallow swings. Let the hoe hit the ground on its corner. Use the ax end to chop large roots after the dirt has been cleared by the hoe. Always wear safety goggles while grubbing to protect yourself from flying chips of rock and dirt.
Carry the Pulaski at your side. Grip the handle firmly near and point the ax end away from your body and down.
Sharpen the cutting edge of the Pulaski's ax as you would any other ax. When sharpening the Pulaski’s hoe end, maintain the existing inside edge bevel. Never sharpen the top of the hoe.
Stump Grinders—If you have lots of stumps to remove, consider buying or renting a gasoline-powered stump grinder. These portable grinders are powered by a chain saw motor and have carbide teeth that can be sharpened or replaced. They grind through a stump in much less time and with a whole lot less frustration than would be needed to dig the stump out.

Stump grinder
Digging and Tamping Bars—A digging and tamping bar is about the same length as a rockbar, but much lighter. It is designed with a chisel tip for loosening dirt or rocks and a flattened end for tamping. These bars are not prying tools.

Shovels—Shovels are available in various blade shapes and handle lengths. The common, or round-point, shovel weighs between 2.3 and 2.7 kilograms (5 and 6 pounds). Its head measures about 200 by 300 millimeters (8 by 12 inches). If a shovel feels too heavy or large, choose a smaller version—remember, you have to lift everything the head holds. The square shovel is a flat-bottomed model intended for shoveling loose materials, not digging.

When scooping materials, bend your knees and lift with your legs, not your back. Push the shovel against your thigh, which serves as a fulcrum. This makes the handle an efficient lever and saves your energy and your back. Don't use the shovel to pry objects out of the trail—that's a job for a pick and a pry bar.
Bank Blades and Brush Hooks—Bank blades and brush hooks are designed specifically for cutting through thickets of heavy brush or saplings. Use them for clearing work that is too heavy for a scythe and not suited for an ax.

Lopping Shears and Pruning Shears—Lopping and pruning shears are similar in design and use. Lopping shears have long handles and may have gears to increase leverage for thicker stems. Pruning shears are small enough to fit in one hand and are designed to cut small stems and branches. Cutting edges vary, but generally one blade binds and cuts a stem against an anvil or beveled hook. We recommend the hook and blade shear for overhead cuts because the curved blades transfer the weight of the shears to the limb. Lopping and pruning shears do a better job of making a nice clean cut than hand saws or axes.

Power Weed Cutters—Several manufacturers make "weed whackers," motorized weed cutters that use plastic line to cut weeds. Some have metal blades that substitute for the line. These can be a good option for mowing grass and weeds on trails. Follow the manufacturer's instructions for safe use and operation. Eye protection is especially important.
Swedish Brush (Sandvik) Axes—These clearing tools work well in brushy thickets or in rocky or confined areas.

Weed Cutters (Grass Whips)—Weed cutters are used for cutting light growth like grasses and annual plants that grow along trails. They are lightweight and durable and usually are swung like a golf club.

Tools for Pounding and Hammering
Hand-Drilling Hammers—Hand-drilling hammers are used to drill steel into rock or to drive wedges and feathers into cracks or drilled holes. There are two types of hand-drilling hammers—single jacks and double jacks. For more information on hand drilling, read "Hand Drilling and Breaking Rock For Wilderness Trail Maintenance" (Mrkich and Oltman 1984).


Sledge Hammers—Sledge hammers have heads forged from heat-treated high carbon steel; they weigh from 3.6 to 9 kilograms (8 to 20 pounds).
Driving sledges are used to set heavy timbers and drive heavy spikes or hardened nails. Stone sledges are used to break boulders or concrete. Because of differences in tempering, these tools are not interchangeable.

Block and Tackle—A block and tackle is a set of pulley blocks and ropes used for hoisting or hauling. They come in different styles, sizes, and capacities.
Canvas Bags—Heavy-duty canvas bags sold to carry coal are great for dirt, small rocks, and mulch. They are more durable than similar-looking shopping bags.

Canvas coal bag
Motorized Carriers—If your budget and regulations allow, consider a motorized carrier. They come in various configurations and typically feature a dump body. A trailer pulled behind an all-terrain vehicle may be an alternative to a motorized carrier.

Motorized carrier

ATV trailer
Packstock Bags and Panniers— Fabric bags or hard-sided panniers with drop bottoms work well when packstock are used to carry trail construction materials. A design available for fabric bags is included in "Gravel Bags for Packstock" (Vachowski 1995).

Packstock bag
Rockbars—Use a rockbar (also called pry bar) for lifting or skidding large, heavy objects. These bars are heavy duty. They have a chisel tip on one end. The other end can be rounded or pointed.

Place the tip of the chisel under the object to be moved. Wedge a log or rock between the bar and the ground to act as a fulcrum. Press the handle down with your weight over your palms. Never straddle the bar when prying. When the object raises as much as the bite allows, block it and use a larger fulcrum or shorter bite on the same fulcrum to raise the object farther.
The rounded end of a rockbar is great for compacting material into rock cracks when armoring trail. You can use the pointed end to break large rocks by jabbing the point into a crack and twisting.
Bark Spuds (Peeling Spuds)—Use a bark spud to peel green logs. Have the log about hip high. Hold the tool firmly with both hands and push the dished blade lengthwise along the log under the bark. Always peel away from your body. Its three sharpened edges make this tool unusually hazardous to use and transport.

Drawknives—A drawknife works best to peel dry logs. Position the log about waist high, and grasp both handles so the beveled edge of the blade faces the log. Begin each stroke with arms extended and pull the tool toward you while keeping even pressure on the blade. Keep your fingers clear of the blade's corners.

Inspect all tools before use. Sharpening makes tools last longer. A small scratch that is ignored could lead to a serious crack or nick in the blade.
Use a file or grindstone to remove metal from a dull edge. If there are no visible nicks, a touchup with a whetstone will restore a keen cutting edge. In these instances, you need only restore the edge bevel. Whetting the edge removes very small bits of metal from the blade and causes the remaining metal to burr slightly on the cutting edge. This burr is called a feather, or wire edge. Remove this weak strip by honing the edge on the other side. The correctly honed edge is sharp, does not have a wire edge, and does not reflect light or show a sharpening line. Wear gloves when sharpening cutting edges.
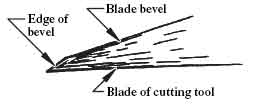
Restoring the blade bevel requires coarser grinding tools to reshape worn cutting blades. Reshape blades with hand files, sandstone wheels, or electric grinders. Remove visible nicks by grinding the metal back on the blade. Remember that the correct blade bevel must be maintained. If the shape can't be maintained, have a blacksmith recondition the toolhead or discard it.

A hand-tool sharpening gauge that gives you all the correct angles can be ordered from the General Services Administration (NSC No. 5210-01-324-2776).
If a cutting edge is nicked by a rock, it may be work hardened. A file will skip over these spots and create an uneven edge. Use a whetstone or the edge of a bastard file to reduce the work-hardened area, then resume filing. Alternate using a whetstone and the file until the file cuts smoothly over the entire length of the edge.
Files—Files come in single or double, curved or rasp cuts. Single-cut files have one series of parallel teeth angled 60 to 80 degrees from the edge; they are used for finishing work. Double-cut files have two series of parallel teeth set at a 45-degree angle to each other; they are used for restoring shape. Curved files are used for shaping soft metals. Rasp-cut files are used for wood.

Files are measured from the point to the heel, excluding the tang (the tip used to attach a handle). File coarseness is termed bastard, second cut, or smooth. The bastard will be the coarsest file available for files of the same length. A 254-millimeter (10-inch) mill bastard file is good for all-around tool sharpening. Before filing, fit the file with a handle and knuckle guard. Always wear gloves on both hands. Secure the tool so both hands are free for filing. Use the largest file you can. Remember that files are designed to cut in one direction only. Apply even pressure on the push stroke, then lift the file up and off the tool while returning for another pass.
Store or transport files so they are not thrown together. Protect them from other tools as well. An old piece of fire hose sewn shut on one end makes a great holder for several files, a guard, and a handle.
Mechanized Trail Building Equipment
Grading Equipment—Several types of graders that can be pulled with ATVs work well for maintaining wider trails used by motorized traffic. MTDC has designed a rock rake to fit on an ATV for trail work.
An experienced operator can use small mechanized equipment to make wonderful singletrack trails. Such equipment also is great for constructing wider trails for motorized traffic and packstock.
A Web site showing a variety of small mechanized equipment and attachments for trail work can be found at: http://www.fhwa.dot.gov/environment/equip/.

Rock rake designed by MTDC
Mini Excavators—Mini excavators can excavate tread and move material and rocks from place to place. They are even more popular with trail contractors than dozers, because dozers can only push material. Excavators can dig and move material. Mini excavators are available from many manufacturers.

Mini excavator
Trail Dozers—Trail-sized dozers are becoming more common for cutting singletrack trail. When an experienced operator follows a good design, the trails built by a dozer are impressive.

Sweco 480