
Chapter 12—Providing Signs and Public Information
Trail and recreation site signs inform, warn, guide, and educate users. For best compliance, provide just enough signs to convey the required messages. Too many signs clutter the landscape and prevent signs with critical messages from receiving the attention they deserve. Design, install, position, and maintain signs and posters so they:
- Fulfill a legal requirement or an important need
- Command attention
- Convey a clear, positive, friendly, simple message
- Look professional
- Allow users enough time to follow the instructions
Most agencies and jurisdictions have their own guidelines regarding signs, or they follow national standards. This chapter provides a basic overview of sign requirements for recreation sites.
Sign Plans
A sign plan provides the framework for an effective sign program. Planning is essential for accomplishing signing objectives in an orderly, consistent, and cost-effective manner. Develop sign plans to meet the requirements of governing agencies and the specific conditions of the site, road, or trail.
Recreation sign considerations may include:
- Safety
- User information needs
- Resource protection
- Liability considerations
- Law enforcement
- Vandalism
Engineers and landscape architects should collaborate to determine how best to sign roads, campgrounds, trailheads, and in many cases, trails. When roads are involved, engineers must conduct an analysis or exercise engineering judgment to determine appropriate signs. Emphasize the needs of first-time recreationists when making a sign plan, and analyze travel in both directions to determine the minimum number of signs required. Figure 12–1 illustrates a thorough sign plan for a campground.

Figure 12–1—A sign plan for a campground.
Reevaluate existing and planned signs annually and compare them against applicable standards and guidelines. The results form the basis for an action plan. Action plans address:
- Ordering and installing new or replacement signs
- Removing obsolete signs
- Maintaining signs
- Planned actions
- Schedules
- Responsibilities
- Estimated costs
- Available funding and workforce
Resource Roundup
Signs for the Times
Sources for recreation sign information include:
- Sign and Poster Guidelines for the Forest
Service, EM–7100–15 (U.S. Department
of Agriculture, Forest Service 2005a). This
information is not available on the World
Wide Web; request electronic copies from
Forest Service regional sign coordinators.
- Signs and Posters Toolbox (Wilderness.
net 2005). This information is available
at http://www.wilderness.net/index.cfm?fuse=toolboxes&sec=signsPosters
- Manual on Uniform Traffic Control Devices (FHWA 2004a). Chapter 2H addresses signs
for recreational and cultural interest areas
as they apply to road users. The manual
is available at http://mutcd.fhwa.dot.gov/HTM/2003r1/part2/part2h.htm.
- Standard Highway Signs (FHWA 2004b). This document contains some frequently used signs that are not found in the MUTCD. It is available at http://mutcd.fhwa.dot.gov/ser-shs_millennium.htm.
Sign Design Factors
When designing signs consider size, contrast, color, shape, retroreflectivity, and the use of standard Federal recreation symbols. The MUTCD standardizes most design specifications for road signs, including signs for recreational interest areas. Many land management agencies establish their own guidelines or standards for signs that are not regulated by another authority.
Sign Types
Signs of particular interest to riders include those used at:
- Highways or roads, including recreation site
roads—Regulatory, warning, and guide signs
- Recreation sites (nonroad signs)—Site
identification signs, interpretive signs, and signs at
visitor information stations
- Trails—Regulatory, warning, and guide signs; site identification signs, interpretive signs, and signs at visitor information stations
Regulatory signs, warning signs, and guide signs that govern traffic on roads are known as traffic control devices (TCDs). All TCDs on roads open to public travel must conform to the standards in the MUTCD. Many agencies also have their own requirements that supplement the MUTCD standards. For example, Forest Service TCDs must meet the MUTCD standards and follow the Sign and Poster Guidelines for the Forest Service, EM–7100–15 (U.S. Department of Agriculture Forest Service 2005a). Paved bicycle trails with shared use fall under AASHTO guidelines and the MUTCD standards. Visitor information stations and site identification signs are subject to governing agency guidelines.
Lingo Lasso
Traffic Control Devices
Traffic control devices include all signs, signals, and markings used to regulate, warn, or guide traffic. The agency having jurisdiction authorizes placement of the signs on, over, or adjacent to a street, road, highway, pedestrian facility, or bikeway. The purpose of TCDs is to promote road safety through orderly and predictable movement of motorized traffic.
Regulatory Signs
Regulatory signs inform users of traffic laws or regulations and indicate legal requirements that are not readily apparent. Stop signs, yield signs, and speed limit signs are regulatory signs. These signs also inform users of nontraffic regulations that protect resources and ensure user safety and enjoyment. Signs stipulating weed-free hay use, food storage requirements, or shooting regulations fit in this category. Limit regulatory signs to the minimum needed to:
- Ensure consistent protection of trails, recreation sites, and adjacent resources
- Enhance user safety and enjoyment
- Provide a basis for enforcing regulations
Regulatory signs also may be used to direct equestrian parking at trailheads, especially shareduse trailheads. Figure 12–2 shows a regulatory sign for a trailhead parking area.

Figure 12–2—Regulatory signs have black type on a white
background. They inform travelers of nontraffic regulations.
Warning Signs
Riders are especially interested in warning signs regarding motorized traffic on the route or other hazards. Figure 12–3 is a road warning sign for an equestrian crossing. On horse trails, warning signs often indicate road intersections and shared uses. When trails intersect roads, sight and stopping distances may be limited for all users. It is critical to incorporate road signs that warn vehicles of an upcoming horse crossing. Consult Chapter 4—Designing Trail Elements in this guidebook for more information regarding rider sight distance requirements and speeds. AASHTO (1999) addresses distance requirements on shared-use trails that also include bicyclists.
Lingo Lasso
Advanced Warning
Warning signs give drivers and recreationists advanced notice of unexpected conditions on or adjacent to a road or trail, and of situations that might not be readily apparent. Warning signs indicate the need for caution. They may call for a reduction in speed or a maneuver that is not consistent with user expectations. Before using a warning sign on a trail, consider changing trail grade, alignment, or location, or take other measures to mitigate the hazard.

Figure 12–3—Road warning signs have black type on a yellow
background. Equestrian crossing signs use symbol RL110 from
the MUTCD.
Carefully place advance warning signs for gates, cattle guards, bridges, or underpasses. Because these passages may be new to horses or mules, they could balk. If the animal rears, a nearby sign mounted on a post may pose a danger. Locate advance warning signs at least 15 feet (4.6 meters) ahead of these constricted passageways (figure 12–4). The MUTCD addresses warning signs for cattle guards across roads, but has little guidance regarding warning signs for gates. Consult agency guidelines and directives for more information regarding gate signs.
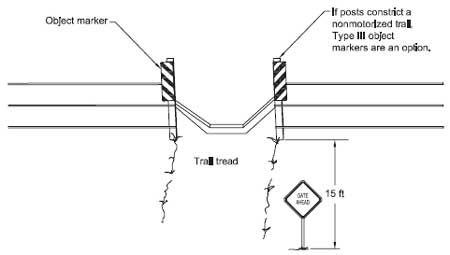
Figure 12–4—Preferred sign placement for advance warning of gates
or constricted areas. This trail gate is not accessible to people with
disabilities if the bar across the opening is higher than 2 inches.
Paved roads and trails—especially in urban areas—often have pavement markings to reinforce sign messages. The MUTCD and AASHTO (1999) address these situations. If trails are not paved, flashing lights may be appropriate, but only in urban or highly developed areas. Because flashing lights may alarm stock, use low-glare light fixtures. An option for highly developed areas is placing the lights in a wall. Lights also may be incorporated into a bollard. Follow the appropriate land management agency's lighting standards.
Lingo Lasso
Markings
Markings are special types of warning signs that include object markers (figure 12–4), barricade markers, end-of-roadway markers, delineators, and pavement markings. For example, object markers warn of cattle guards that constrict roads. Object markers are used on trails that are shared with motorized traffic or bicyclists. They are an option for shared-use nonmotorized trails. However, some stock are wary of object markers and may shy away or refuse to walk past them. Markings can supplement regulations or other TCDs, such as pavement arrow markings that provide guidance in campgrounds and parking areas.
Guide Signs
Guide signs convey essential travel information—such as direction or distance—allowing travelers to easily reach their destinations. Some agencies refer to guide signs as destination signs. Use guide signs on highways near the approaches to recreation sites, in recreation sites, and on trails.
Horse Sense
Reliable Signs
Guide signs help guide road and trail users to and from destinations, such as campgrounds, trailheads, trails, and other points of interest. Guide signs include route markers, destination signs, and reference location signs. Up-to-date recreation, visitor, and travel management maps also are important. Information on maps and signs should be consistent.
Road Guide Signs
Road guide signs inform drivers about recreation sites. Destination and approach guide signs help prepare drivers for the slowing, braking, and turning maneuvers necessary for safe entry to recreation sites. Equestrian vehicles frequently tow large trailers, and their drivers need plenty of clear, advance notice of intersections. Figure 12–5 shows some site destination and approach signs. Road guide signs must be compatible with vehicle speed, traffic pattern, and the driver's response time.

Figure 12–5—Examples of site destination and site approach signs.
In recreation sites, road guide signs direct travelers to trailheads, campgrounds, single-party camp units, and group camps (figure 12–6). Road guide signs, and sometimes trail guide signs, mark individual camp units. Place signs for individual camp units in a consistent manner, using small, retroreflective signs, posts, or markers with the unit number. It may be beneficial to include a horse symbol on the marker to reinforce the rule that campers must have stock. Mark several-party units so others know they are for more than one party. Camp units accessed from a trail, rather than from a road, don't need retroreflective camp unit signs. Figure 12–7 shows a routed wood guide sign at a camp unit accessed from a trail.

Figure 12–6—Road guide signs give basic directions.

Figure 12–7—Nonretroreflective guide signs, such as this camp
unit marker, can be used when sites are accessed from trails. Sites
accessed from roads must have retroreflective signs.
Lingo Lasso
Retroreflective Signs
Signs that must be seen by motorists at night should be retroreflective, or they must be illuminated to show the same shape and color by day and night. Retroreflective signs reflect light directly back, no matter what angle the light comes from, unlike a mirror which must be exactly perpendicular to the light to reflect it directly back. For more information, consult the MUTCD and managing agency sign manuals. Although some horses and mules may be leery of retroreflective surfaces, the MUTCD requirements were established to ensure motorist and pedestrian safety.
Trail Guide Signs
On trails, guide signs:
- Give directions—Directional guide signs identify
the trail, show the trail's direction, or guide trail
users to destinations (figure 12–8). Directional
signs usually include the trail name, trail number,
and direction arrows.
- Identify junctions—In a trail system where junctions are designated with numbers or letters, a junction identity sign (figure 12–9, top) may be used. Provide trail maps or You are here signs (figure 12–9, bottom) at trail access points or along the trail. Place the junction identity signs so they can be seen at or before the junction. Junction identity signs are often used with other trail guide signs at trail junctions.

Figure 12–8—Trail guide signs
direct trail users. An arrow
clarifies this sign.
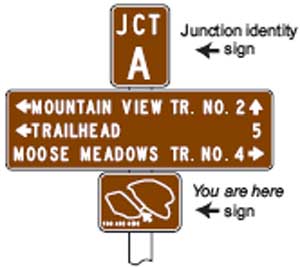
Figure 12–9—Trail guide sign
with a junction
identity sign and a
You are here sign.
- Offer reassurance—Reassurance or confidence markers reconfirm the identity, location, or route of the trail. Trail markers, guide poles, blazers, and cairns are reassurance markers. Figure 12–10 shows a reassurance marker that also identifies the trail. Use reassurance markers in areas where travelers may be unsure whether they are still on the trail. Place a minimum number of reassurance markers along the trail, at road crossings, and past trail junctions.
Select a marker that is appropriate for the level of development, as shown in table 12–1. Don't use reassurance markers in areas where the trail is well defined, except when needed at openings and road or trail crossings. On trails that are poorly defined, reassurance markers need to be intervisible—within sight of each other— during normal use conditions. Baughman and Serres (2006) recommend placing reassurance markers at least every ¼ mile (0.4 kilometer) in open country.
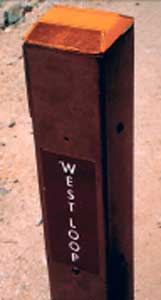
Figure 12–10—The reflector on
the top of this reassurance marker
facilitates night rescue operations.
This photo has been digitally
altered for clarity.
| Level of
development |
Route
marker |
Guide pole |
Blazer | Rock
cairn |
|---|---|---|---|---|
| Low | X | X | ||
| Moderate | X | X | X | X |
| High | X | X |
Trail Sign Placement
Place signs high enough so that they are visible without posing safety hazards for riders and stock. Table 12–2 shows recommended installation distances and heights for signs on horse trails.
Trail Talk
Multipurpose Markers
Trail markers may serve more than one function. The simple reassurance marker shown previously (see figure 12–10) also provides trail identification and serves as a ground reference point. The marker consists of a square metal post with a trail label on each side and a reflector on the top. The reflector is visible to search and rescue groups at night. To facilitate emergency operations, the marker locations are entered in a GPS database. Emergency responders in helicopters or aircraft flying overhead can see the reflectors and identify the precise location of the trail marker.
Shared-Route Signs
Occasionally, trails and roads share the same route. Place signs along such routes before shared use occurs, based on engineering judgment or an engineering study. The optional Share the Road sign shown in figure 12–11 warns motorists about shared use on a road. Agencies or jurisdictions may have specific sign and management standards and guidelines for shared routes. More information is available in the MUTCD.

Figure 12–11—Combining an equestrian
trail
warning sign with
a Share the Road
message alerts
motorists and riders that
they are
sharing the road. A Share the Trail
message can
be used for trails.
Identification Signs
Identification signs assure recreationists they are in the right place or on the right trail (figures 12–12 and 12–13). Generally, install identification signs at site entrance roads, host sites, and trails with special designations. Identification signs at the entrance to a campground or trailhead confirm the destination as the driver turns off the main road. These signs are not traffic control devices and are inappropriate for use as destination and site approach guide signs. Designs for entrance signs vary with the setting, level of development, and agency requirements. Install site identification signs up to 30 feet (9.1 meters) outside the clear zone—the safety area for vehicles straying beyond the edge of the road.

Figure 12–12—When identification signs for recreation sites
are along roads, the signs must be placed outside the clear zone,
be shielded by a barrier such as a guard rail, or meet MUTCD
breakaway standards.

Figure 12–13—Recreation sites with a high level of development
often incorporate more elaborate identification signs than areas
with a low level of development.
Visitor Information Stations
Visitor information stations—sometimes called information kiosks—are useful at campgrounds and trailheads. They contain information that:
- Familiarizes recreationists with the site or trail
- Discusses facility use, trail conditions, and safety
- Provides instructions regarding rules, regulations, and etiquette
Information station design must be appropriate for the level of development and the amount of information provided. Permanent sign panels or bulletin boards with one to three panels usually are adequate. If the information changes frequently, bulletin boards allow the land manager to post new items easily. Figure 12–14 shows an information station suitable for a campground with a moderate level of development. It would not be safe for riders to lead or ride their stock under a roof. If there is a roof over the information station, provide a hitch rail nearby so riders can dismount and tie their stock to the hitch rail while viewing signs.

Figure 12–14—This information station is appropriate for an area
with a moderate to high level of development. The information is
displayed in an attractive, uncluttered manner.
Write sign text clearly and concisely, because riders may have to keep their stock on the move. Mounted riders may just take a quick glance. Make important messages obvious, and communicate more detailed information in brochures or printed handouts. Brochure boxes (figure 12–15) can provide such material at the site. Visitor information stations often provide safety information and display instructions regarding recreation site fees and trail registration.
Figure 12–15—Detailed information, such
as maps or regulations, can be provided in
weather-resistant brochure boxes.
On visitor information stations without a roof, mount posters so they can be read from horseback by placing the poster's center about 5 feet (1.5 meters) above the ground. To increase readability, size the text according to the distance between the viewer and the poster. Add 1 inch (25.4 millimeters) of letter height for every 10 feet (3 meters) of viewing distance. For example, use letters that are at least 1 inch (25.4 millimeters) high on a poster that is 1 to 10 feet (0.3 to 3 meters) from the reader. Make sure posters are made from weather-resistant materials.
Maps posted at visitor information stations familiarize recreationists with the site's facilities so they can select a camp unit or find a trail access point. Figure 12–16 shows a simple and effective recreation site map. Similarly, maps posted at trail access points familiarize riders with the trail routes. Consider having printed handouts with more specific details. Figure 12–17 is a trail map handout that has clear and concise information. Table 12–3 lists suggested locations for visitor information stations. Locate information stations a safe distance from vehicle and horse traffic.

Figure 12–16—A simple site map is easy to understand.

Figure 12–17—Trail map handouts provide specific information
that can help trail users before and during a recreation visit.
—Courtesy of the Arizona Trail Association.
Visitor Information Stations at Recreation Sites
Some information is useful to recreationists before their arrival at a recreation site, and some information is beneficial once they are onsite. For information relevant to all users, refer to the land agency's sign guidelines. Table 12–4 lists information beneficial to riders recreating at trailheads or campgrounds.
Along with the standard recreation site rules, provide riders with the rules pertaining to horses and mules. Two important subjects are the disposal of animal manure and the use of weed-free feed. For more information and resources on these topics, consult Chapter 13—Reducing Environmental and Health Concerns.
Trail Talk
By the Rules
Rules appropriate for an equestrian recreation site vary by location. The following rider-oriented information appeared on a handout provided by the Prescott National Forest:
Welcome to Groom Creek Horse Camp and the Prescott National Forest
Notice: This campground was built for the exclusive use of the equestrian camper. Camping without a horse is prohibited.
This campground is serviced in part by citizen volunteers. Your help is needed to keep this camp clean. Your campground host will help you find a camp unit or provide information regarding camping rules and local recreation opportunities.
- Horses
- No horses or gear will be tied to trees or other
places not designated.
- Tether lines are provided for two horses only.
Two horses may be tied to horse trailer for a
total of four horses per site. Portable corrals
may be used under tether line or behind
trailers.
- Please remove all manure. Manure may be
deposited in the campground dumpsters or
hauled to a sanitary landfill.
- Restore all areas where horses are tied to as
natural appearance as possible. Contact host
for rakes, shovels, etc. as needed.
- Hitching rails are provided at convenient
locations for watering horses. Do not water
horses at faucets.
- All horses must be under physical control at
all times.
- Keep horses on roadways. No cross country
travel will be allowed in campground as this
destroys the vegetation and causes erosion.
- Horses will be ridden at a walk at all times in
campground.
- No horses or gear will be tied to trees or other
places not designated.
- Pets (other than horses)
- Pets are welcome, but must be under physical
restrictive control at all times. This means
being caged or on a leash no longer than six
feet.
- Pets are welcome, but must be under physical
restrictive control at all times. This means
being caged or on a leash no longer than six
feet.
- Vehicles
- Each site is intended to accommodate one
vehicle with horse trailer and one other
vehicle, if needed for carrying people.
- Sites are designed for 5 people; a maximum of
10 people is allowed only to accommodate a
single large family.
- Trailers longer than 35 feet are prohibited in campgrounds.
- Each site is intended to accommodate one
vehicle with horse trailer and one other
vehicle, if needed for carrying people.
Visitor Information Stations at Trail Access Points
Visitor information stations at trail access points are similar to those in recreation sites. These information stations (figure 12–18) familiarize riders with trail conditions, etiquette, and hazards. Table 12–5 lists suggested information to display at trail information stations and in trail handouts. Riders want to know trail conditions because the conditions determine the kind of ride they can expect. Provide updated information to help them make informed decisions. Figure 12–19 is an example of trail information suitable for a printed handout.

Figure 12–18—This trail information station is
near a wilderness
entrance.
Horse Sense
Post It Here
Many riders appreciate a message board for posting notes and activity announcements. This can be a simple bulletin board at the visitor information station or in a group gathering area. Notes left on a message board can guide late arrivals to the appropriate camp unit or trail location and can let them know whether their friends arrived earlier.

Figure 12–19—Effective trail handouts contain just
enough information to be useful.
—Courtesy of the
Arizona Trail Association.
One of the most important messages to convey to users on shared-use trails is who has the right-of-way. The philosophy varies across the country and with land management agencies. In many regions, hikers and mountain bikers yield to riders, and mountain bikers yield to hikers (figure 12–20). Yielding the right-of-way is a courtesy—generally it is not enforceable by law. No matter who has the right-of-way, all users need to know who is expected to yield. Post right-of-way information at the trail access point and along the trail. To be effective, the sign and the information on it must be large enough to be seen at a distance, and the message must be easy to understand. Follow the guidelines established by the land management agency.
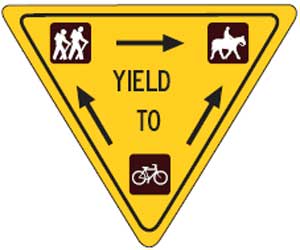
Figure 12–20—Trail right-of-way etiquette is usually based on
courtesy—not regulation—and varies from region to region.
Horse Sense
Critical Call
It helps if mountain bikers call out as they approach a horse or mule. If bicyclists approach quietly at a rapid speed, stock may be surprised and become frightened. If an area is heavily traveled by mountain bikers, signs explaining mountain bike etiquette (figure 12–21) are critical.

Figure 12–21—Post local etiquette rules where many
visitors will see them. This list is posted at a shared-use
trailhead.
Interpretive Signs
Interpretive signs communicate messages that can change behavior, educate, or evoke emotion (figure 12–22). These signs may be used for self-guiding trails or wayside exhibits at cultural, natural, or geographical points of interest. Seek assistance from specialists when planning interpretive signs at trail access points, in a campground, or along a trail. In addition to conveying information effectively, interpretive signs must meet accessibility guidelines. (See the Accessible Signs Resource Roundup on page 234.)

Figure 12–22—Interpretive signs communicate a variety
of
messages. This artistic sign educates riders
about appropriate
recreation behavior.
Exhibit Structures
Shelters often protect viewers, printed literature, or interpretive signs from the weather and they can be inviting. Because it is dangerous to lead or ride a trail animal under a shelter, design the structure to discourage entry while on horseback. Install a hitch rail nearby to encourage riders to dismount and tether stock before reading the information.
Resource Roundup
Exhibit It
Signs, Trails, and Wayside Exhibits: Connecting People and Places, Third Edition (Trapp and others 1996) has more information regarding interpretive signs. The book and several related publications can be ordered from the University of Wisconsin at http://www.uwsp.edu/cnr/schmeeckle/Handbooks/Signs.
Viewing Areas
To help users read signs with detailed text, include a viewing area at visitor information stations or interpretive signs. A viewing area is an open, cleared space in front of the sign for up to three riders on horseback. The extra space allows riders to read the information while trail traffic keeps moving a safe distance away from stock. If visitor information stations are near roads in a recreation site, the viewing area provides separation from motor vehicles.
A clear space of 24 feet (7.3 meters) wide by 16 feet (4.9 meters) long accommodates three animals. One or two animals need an area 16 feet (4.9 meters) square (figure 12–23). If substantial vegetation or restrictive slopes make it impossible to provide a large enough cleared space for stock, place a hitch rail in a clearing near the sign.
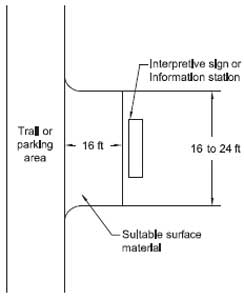
Figure 12–23—A sign viewing area.
Accessibility Information
Some riders have difficulty using trails that require dismounting for obstacles or negotiating steep or uneven terrain. Provide maps, signs, or handouts to help trail users make informed choices. Standard posted messages include the trail name, number, destination, and distance. If pedestrian trails have been evaluated for accessibility, post the following additional information:
- Typical and maximum trail grade
- Minimum trail width
- Typical and maximum cross slope
- Trail surface—type and firmness of surface
- Any major obstacle—such as boulders in the trail tread
Resource Roundup
Accessible Signs
Many signs must comply with ADA/ABAAG Section 703, which contains requirements for print lettering, raised lettering, Braille, mounting heights and locations, and other considerations. Raised lettering and Braille are only required at buildings. The ADA/ABAAG Section 216 (Section F216 for Federal facilities) lists sites where compliant signs must be posted.
Forest Service employees should consult the FSTAG and FSORAG regarding signs for recreation sites and trails. The Accessibility Guidebook for Outdoor Recreation and Trails (Zeller and others 2006) summarizes the information.
At a campground, let campers know which equestrian camp units and related facilities are accessible and provide information concerning barriers to facilities or trails. Show accessible camp units on the site map with wording such as:
Sites 2, 4, 6, and 10 are accessible. If no one in your group needs accessible facilities, please do not use these sites unless all other sites are filled.
Don't place signs indicating accessibility at the individual camp units. Such signs tend to draw needless attention to campers with a disability.
Accessible camp units are generally available to all on a fill last basis if they are a small portion of total units. If all or most units are accessible, they're generally available with no restrictions.
Horse Sense
The Accessibility Symbol
Signs provide key information concerning the accessibility of facilities and programs. The International Symbol of Accessibility (ISA)—the familiar person-seated-in-a-wheelchair logo (figure 12–24)—indicates the facility is in compliance with applicable State or Federal accessibility requirements. According to the ADA/ABAAG, the ISA must be posted in only four outdoor places:
- Accessible parking spaces, where there are five
or more parking spaces.
- Accessible rest rooms and bathing facilities.
- Accessible loading zones.
- Accessible entrances to a building. If the main entrance is not accessible, an arrow is posted to direct users to the closest accessible entrance.

Figure 12–24—When the
international symbol of
accessibility (ISA) is posted
on a facility, it designates
compliance with all applicable
State or Federal accessibility
requirements. Therefore, this
symbol must be used with
caution.
Accessibility requirements call for the ISA to have high contrast colors. In areas where State or local law enforcement officers will be enforcing parking restrictions, the familiar blue and white combination must be used. In other outdoor settings, colors such as brown and white would be better choices.
Riders, Signs, and Safety
If riders must dismount to read a sign or use facilities, provide a hitch rail nearby. The hitch rail should be located where riders can monitor their stock. It is a good idea to provide a mounting block as well.
Try to leave more than enough room for stock to pass safely when installing signs. It is easy for a sign or post to catch a leg, stirrup, or tack. A horse or mule can scrape its side. Besides causing injuries, such encounters may startle stock, especially if part of the saddle catches. Reduce the possibility of injury by rounding all sign corners and removing sharp objects from posts.
Vehicles towing horse trailers are relatively large and drivers can have difficulties maneuvering them at trailheads and campgrounds. Avoid placing signs near areas where towing vehicles travel, turn, or back, or near entries to back-in or pullthrough parking pads. To avoid damage by bored stock, install signs at least 7 feet (2.1 meters) from areas where stock are confined.
