
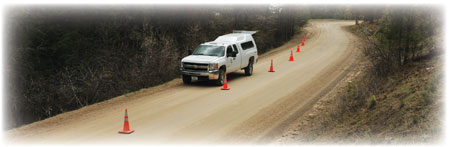
Traffic Cone and Flare Placement
Application Notes
Traffic cones and flares can help define the work area and provide another level of visibility. Cones and flares should be placed while facing oncoming traffic at all times. Wear high-visibility safety apparel that meets the Performance Class 2 or 3 requirements of ANSI/ISEA 107–2004 (or current edition) when placing cones or flares. Place a FIRE ACTIVITY AHEAD sign before placing cones or flares (see page 25).
To establish a taper using a ratio of 10:1 for cones (or flares):
- Walk along a safe pathway on the road shoulder. Place a cone on the shoulder
every 10 paces until you reach the farthest location where cone 1 is to be placed.
Distance should be approximately 40 paces or 120 feet.
- Set cone 1 on the shoulder while standing in a safe area.
- Move back 10 paces toward the incident scene along the shoulder. When
safe to enter the road, take one pace or 3 feet into the road and place cone 2.
Immediately return to the shoulder.
- Move back 10 paces toward the incident scene along the shoulder. When safe
to enter the road, take two paces or 6 feet into the road and place cone 3.
Immediately return to the shoulder.
- Move back 10 paces toward the incident scene along the shoulder. When safe to
enter the road, take three paces or 9 feet into the road and place cone 4. Return
to the shoulder.
- Move back 10 paces toward the incident scene along the shoulder. When safe
to enter the road, take four paces or 12 feet into the road and place cone 5.
Immediately return to the shoulder. The final cone should be near the rear of the
responder vehicle or the beginning of the buffer space.
- The spacing between cones should not exceed a distance in feet equal to 1.0 times the speed limit in miles per hour (mi/h) when used for the taper.
Additional cones or flares may be used to establish a tangent along the incident area. The spacing between tangent cones and flares should not exceed a distance in feet equal to two times the speed limit in mi/h.

Traffic Cone and
Flare Placement
*Obtain distance from table 1 (page 8).
(Click here for long description)
Flaggers
Flaggers must be trained and certified by a State- or Federal-approved training and certification agency in safe traffic control practices and public contact techniques.
Flaggers should demonstrate the ability to:
- Receive and communicate specific instructions clearly, firmly, and courteously.
- Move quickly to avoid danger from errant vehicles.
- Control signaling devices to provide clear guidance to approaching drivers.
- Apply safe traffic control practices in stressful or emergency situations.
- Recognize dangerous traffic situations and warn workers quickly enough so they can avoid injury.
High-Visibility Safety Apparel
Flaggers must be clearly visible to approaching traffic. Flaggers shall wear high-visibility safety apparel that meets the Performance Class 2 or 3 requirements. For nighttime activity, flaggers should wear safety apparel meeting Class 3 risk exposure (see pages 2 and 3).
Buffer Space
Flagger stations should be located in advance of the actual work area so that approaching road users will have enough visibility distance to stop safely. Guidelines for buffer space distances are shown in table 3 and are based on stopping sight distances. Distances may be increased for downgrades and other conditions that affect stopping distances.
| Speed mi/h |
20 | 25 | 30 | 35 | 40 | 45 | 50 | 55 | 60 | 65 | 70 | 75 |
|---|---|---|---|---|---|---|---|---|---|---|---|---|
| Distance feet |
115 | 155 | 200 | 250 | 305 | 360 | 425 | 495 | 570 | 645 | 730 | 820 |
Use posted speed, 85th-percentile speed prior to work area, or the anticipated operating speed.
Except in emergencies, flagger stations shall be preceded by advance warning signs to alert road users and shall be illuminated at night.
At a spot constriction, the flagger may have to take a position on the shoulder opposite the closed section to operate effectively. At spot lane closures where adequate sight distance is available for safely handling traffic, one flagger may be enough. Vehicle activity or storage of equipment, vehicles, or materials should not occur in a buffer space.
Communication
When two flaggers are used, they can communicate verbally or visually if they are close enough and visible to each other. One of the flaggers should be designated as the coordinator. Where either end of a one-lane section is not visible from the other end, the flaggers may maintain control using such methods as:
- Radio or field telephone.
- An official car that follows the last road user proceeding through the section.
- A pilot car to guide a queue of vehicles through the temporary traffic control zone or detour. The pilot car shall have a sign (PILOT CAR FOLLOW ME) mounted on the rear of the vehicle.
STOP/SLOW Paddle—Preferred Method
The STOP/SLOW paddle should be the primary hand-signaling device.
It shall meet the following standards:
- It shall be an octagonal shape.
- It shall be a minimum 18 inches wide with 6-inch letters.
- The STOP face shall have white letters and border on a red background.
- The SLOW face shall have black letters and border on an orange background.
- It shall be retroreflective when used at night.
- It shall be fastened to a rigid staff that is tall enough that when the end of the staff is resting on the ground, the message is high enough to be seen by approaching or stopped traffic.

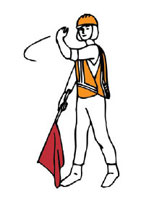
Flagging Procedures
Face road users at all times.
Hold STOP/SLOW paddle stationary with arm
horizontally away from the body.
To Stop Traffic:
Use STOP side.
Hold free arm with palm of the hand above shoulder.

To Let Traffic Proceed:

Use SLOW side.
Use free arm to motion for
road users to proceed.
To Alert and Slow Traffic:
Use SLOW side.
Motion up and down with the free hand, palm down.
Temporary Traffic Control—Flagging
Flags – Emergency Situations Only
Flags should only be used in emergencies. When used, flags shall be:
- Red or fluorescent orange/red in color
- A minimum of 24 inches square
- Securely fastened to a staff that is about 36 inches in length
- Retroreflective red when used at nighttime
The free edge of a flag should be weighted so the flag will hang vertically, even in heavy winds.

Flagging Procedures
Face road users at all times.
To Stop Traffic:
Hold red flag stationary with arm horizontally
away from the body.
Hold free arm with palm of the hand above shoulder.
To Let Traffic Proceed:
Do not use flag. Lower flag from view.
Use free arm to motion for road users
to proceed.

To Alert and Slow Traffic:
Hold red flag with arm horizontally away from the body.
Slowly wave flag down and back to horizontal.
Keep free hand down.