

Riparian Restoration
APPENDIXES
Appendix E: Split Rail Fences and Barriers
From memo to Park Superintendent written by Kari Bown 1990.
The National Park Service [NPS], at Yosemite National Park published the following split rail fence designs in 1990. The fences were to be made from hazard incense cedar trees to keep the costs down, but fences may be made from whatever is appropriate on a particular forest. The split rail and post diameters may vary depending on the timber available and on information in The Built Environment Image Guide.
[A caution was included in the design:] . . . concern was raised that this fence might get disassembled for firewood in campground areas. It might be worthwhile to build a pilot fence near one . . . to examine the feasibility of this application.
The National Park Service has built some fences out of recycled plastic lumber. [A number of companies manufacture plastic lumber out of recycled plastic. Post size can be customized, fabricated in a wood grain, and dyed to match other lumber. Yosemite and Yellowstone National Parks use plastic lumber for posts on their post-and-cable fences. The Walt Disney Company uses plastic lumber throughout its theme parks to simulate many different woods and bamboos.
Plastic lumber has some advantages. It does not rot, stain, or make good firewood, and it is not attacked by bugs. Make sure the plastic lumber is 100 percent plastic with no wood additives. One company guarantees it for 50 years. It costs more initially, approximately $53 for one 4 by 4-inch by 6-foot piece. If plastic lumber is a viable option, seek a partnership with a company to eliminate or reduce the initial investment.]
For instructions and drawings for building a buck-and-pole fence, see www.fs.fed.us/r6/uma/aspen/buckandpole.htm
Double Post/2 Rails
This fence looks like the rails are stacked between posts. They [sic] rails are pinned to the posts with rebar. Two feet of each post is buried. [See figure E1.]

Figure E1—Double post 2-rail fence.
Materials Required:
- 6-ft posts
- 12-ft rails
- 9 by 2-in rebar pins [spikes]
Tools Required: portable generator, drill motor with 12-in long 2-in bit, posthole digger, level, line, hand sledge, tape measure, hatchet, pick
Double Post with Stacked Rails
The rails are stacked between two posts. The rails are pinned to the posts with rebar. Two to 3 feet of each post is buried. [See figure E2.]

Figure E2—Double post with stacked-rail fence.
Materials Required:
- 6-ft posts
- 12-ft rails
- 6-in spikes
Tools Required: portable generator, drill motor with ½-in long 2-in bit, posthole digger, hatchet, hand sledge, level, line, tape measure, pick
Over/Under and Parallel Zigzag
There are two types of zigzag fences. They are differentiated by how the rails are stacked.
This fence takes a 4-foot swath. Because it does not require any fenceposts, it is perfectly designed for archeological sites. Depending on the message desired, it could be two, three, or four rails high. This is an easy fence to build well, requiring minimal skills.
A wide range of rail size and quality can be used. It is not appropriate on steep slopes or where only a narrow swath is available. [See figures E3, E4, and E5.]

Figure E3—Under/over zigzag fence.
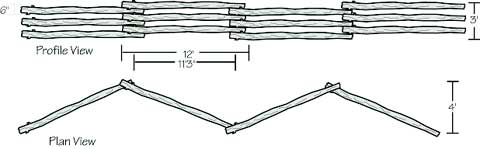
Figure E4—Parallel zigzag fence.

Application criteria:
- oak woodlands
- fern understory areas
- riparian areas
- archeological sites
Materials required:
- 12-ft rails
- 6-in spikes
- 3-ft rebar
Tools required: hand sledge, tape measure line, drill with a long 2-in bit The design is securely spiked together, but concern was raised that this fence might be disassembled for firewood in campground areas. It might be worthwhile to build a pilot fence near one campground to determine the feasibility of this application.
Hetch Hetchy Design
Written by Yosemite staff.
This style is a single post-and-rail construction using hand-split cedar. The hand-split treatment gives it a rustic appearance and cedar will hold up for many years due to its rot resistance. It is sturdy, low-maintenance fencing that is relatively easy to install.
The specifications for the split rails and posts are important to attaining a quality finished product. A minimum rail size of 4 by 5 inches and 6 by 8 inches for the posts is essential for the sturdy construction required at high visitor-use areas and or heavy snow-load locations. The posts should be 60 inches long with approximately 29 inches in the ground for optimal stability in varying soil types. The ideal rail length is 12 feet where snow loading is not an issue. This minimizes the posts required, however, it increases the material costs due to higher prices for 12- versus 10-foot rails. When snow loading is present, the ideal rail length is 6 to 8 feet, depending on snow depth. The materials should have a minimal amount of rot or bug damage.
The posts and rails are purchased without any tapering or holes for fitting the fence together. The finish work for the rails is done with a small chainsaw to taper the ends. The posts have rectangular holes to allow the rails to fit smugly. To fabricate the posts this way requires some specialized tools. Use a Milwaukee 3-foot self-feeding drill bit with a 5½-foot extension and a drill press capable of a 9-inch boring depth. The drill, a Milwaukee electromagnetic portable drill press, is ideal for field use with sufficient power to go through 8 inches of wood. Specialized sawhorses for chain saw work on the rails and a custom-built stand for the drill press is also necessary. A 2- inch wood chisel will square up the notches left from drilling. [See figures E6 and E7.]


Figure E7—Short Hetch Hetchy fence.
Application criteria:
- timbered areas
- steep slopes
- along meadows (short version only)
Materials required:
- 6- by 8-inch by 6-foot squared posts
- 10-foot straight rails
Tools required: chain saw, level, line, posthole digger, tape measure, pick, Milwaukee 3-foot self-feeding drill bit
Wood Barrier Post
This substantial wood barrier is made of telephone poles. It was developed by the California Department of Transportation (Caltrans 1994 page 7-36, as seen in Griggs and Stanley 2000). See figure E8.

Rock Barrier
Indigenous rock can serve as barriers where appropriate. Do not import rock to an area where large rocks are not part of the natural landscape. To create an effect with rock that blends into the landscape, it is important to mimic nature; plant rocks in groups of two, three, or four, varying spaces between them. Rock doesnt naturally occur regularly spaced. One-third of the rock is buried. Placing rocks along roadsides prevents people from parking off the pavement and/or outside of designated parking areas. See figure E9.
