

Riparian Restoration
APPENDIXES
Appendix F: Campsite Monitoring Instructions
Compiled by Chris Smith, Lead Wilderness Ranger, Petersburg Ranger District, Tongass National Forest. Based on publications of David N. Cole and Jeffery L. Marion.
Introduction
A campsite is defined as any area exhibiting evidence of recreational use, either through day or overnight activity. Evidence of this activity might include, but is not limited to trampled vegetation, fire rings, human waste, broken tree limbs, and litter. In general, areas of untrampled vegetation will separate sites, but, in some instances, individual sites may include islands of undisturbed vegetation. These islands are not considered part of the total area and are also disregarded when conducting the impact analysis. Careful attention to discrete changes in vegetation and soils will be necessary to differentiate one site from another within a camp area. Measurements will only be taken in areas that are above the high tide line. Upland areas that are subject to physiographic changes from season to season should be excluded. These sites can include gravel washes, gravel bars, and nonvegetated alluvial fans.
Getting Oriented
When you arrive at a site, take stock of the area. Walk around the site and determine, through careful observation, the boundaries of the site. Note areas of absent, flattened, or damaged vegetation and contrast these with areas that remain pristine. On rare occasions, when an area may be naturally devoid of vegetation, attention to discrete changes in organic litter will be necessary to delineate site boundaries. And on some occasions, in a pristine area, some damage to vegetation will be from animals, evidenced by scat, hair, matted or browsed vegetationdo not confuse this with recreational use.
Determine Site Boundaries
The Variable Radial Transect Method will be employed to measure the dimensions of sites (Marion 1991). When walking the boundary of a site, place pieces of flagging or flag pins at various points along the boundary. We have allowed for the use of up to 15 boundary points, which should reflect the actual boundaries of the site, and will form a polygon from which the area of the site can be calculated. In many instances you will not require all 15, but in others it will be necessary to balance areas of use and non-use to most effectively use the points. (Refer to Illustration 1.0.) [See figure F1.]

Locating the Primary Pin
After selecting the boundary points, locate a primary point from which bearings and distances can be measured to boundary points (transects). [See figure F2.] Generally, the primary point will be located in the center of the sitemake sure that it is placed in a position where most boundary points can be seen. For the time being, place a spike, which will function as the primary point, in the ground but do not bury it all of your transects (measurements) will radiate from this spike. Reference the primary point with three reference points, which can later be triangulated when remeasurement occurs. Choose reference points that are not only unique to the site, but also not easily removed, damaged, or destroyedlarge rocks and trees work well. Describe the reference points in as much detail as possible. If trees are chosen as reference points, then record the [diameter breast height] dbh, indicate the species, and note any distinguishing features that might aid in remeasurement. If a GPS unit is available, record the location of the primary pin. By photographing the reference points, carefully describing the photo points, and recording the location of the primary pin with a GPS, you will go a long way toward ensuring that the site will be relocated and effectively remeasured in the future.
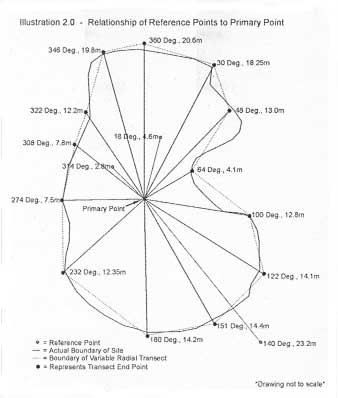
After choosing and describing your reference points, record the distance and bearing from the primary point to the reference points. Make sure that the tape is kept level; record distances from the dbh of the tree and the face closest to the primary pin. Taking these steps will ensure a level of consistency and reduce the range of variability in the measurements over time.
Measure Site Boundaries
From the primary point, measure your transects. Starting from the boundary point closest to north, work your way around the site in a clockwise direction. Making sure that the tape is kept level and the end over the primary pin, shoot the bearings and record the distances to the site boundary points, which are marked with flagging. Its essential that all measurements and bearings are doublechecked, for inaccurate measurements will not only distort data, but also make an accurate remeasurement of the site impossible. If the tape measure must bend around a tree or other obstruction (rock, structure, etc.) to complete a measurement, then take the shortest distance around the obstruction. Do not remove any boundary flag until you have completed the survey and rechecked any doubtful measurements.
Measure Undisturbed Islands
Due to various ecological or physiographic conditions, many sites include islands of undisturbed vegetation that have escaped impact. These islands of trees, shrubs, plants, rocks, or hummocks are often too difficult for the visitor to utilize as campsites. If an undisturbed island is encountered, indicate in the transect notes at what distance from the primary point it was encountered and then where the transect departed. (Refer to Illustration 3.0.) [See figure F3.] In the office, by superimposing a polygon upon the island, the area can be calculated and subtracted from the area of the impacted site.

Completion of Measurement
At this point it is appropriate to bury the spike. Make sure that the spike is driven 4 inches below the surface of the site; this allows for easy relocation but reduces the chance that it could be removed.
Site Remeasurement
When the time comes to remeasure a site, make sure that it is measured at the same time of the year. [See figure F4.] To relocate the site, it will be necessary to use aerial photos, GPS coordinates, the legal description, photo points, and reference points to locate the primary point, which is buried beneath the ground. The first four should get you close to the point, but the reference points should help narrow your search. After locating the reference points, shoot the three back bearings and measure their respective distances to the primary point. To confirm the location of the primary point, it will be necessary to carefully dig, using a trowel, until the spike is found.

Once the primary point is relocated, then the boundary of the site can be laid out using the original transect information. Place flagging or flags at the end of each transect. If the boundary of the site has changed, then it will be necessary to adjust the boundary. Place a different colored piece of flagging or pin on the new boundary point. Make sure that the boundary is carefully evaluated, do not change the boundary points and bearings unless necessary. On a new form, in the boundary point section, record any new boundary points and re-record any old boundary points that were retained. Evaluate all inventory and impact parameters within the new site boundaries. Repeat any photo points and add new ones if necessary.
Inventory and Impact Form Directions
- Inventoried
by: List the persons responsible for the inventory.
- Date Inventoried:
This is the date the campsite was assessed.
- GPS Coordinates: After entering
the
points into the GPS unit, determine the longitude and latitude in the office.
- Map Coordinates: Record the location of the site on a topographical map
by township, range, section, and quarter section. If several sites are located
within
a cluster, then draw lines away from these points so that their names can
be clearly read. If it will assist in the relocation of the site, sketch
the relationship
of these sites to one another, on the back of the inventory form. Attach
a copy of the topo and sketch (if needed) to the monitoring form.
- Map
Name:
List
the map name (Ex. Petersburg D-2).
- Camp Name/Number: Use the most common
name associated with a local area or topographic feature. For example, two
sites located
in Rowan Bay could be referred to as Rowan
Bay 1, Rowan Bay 2, but two sites along Rowan Creek, which feeds Rowan Bay,
might
more appropriately be named: Rowan Creek 1 and Rowan Creek 2.
- Beach
Aspect: Indicate the aspect of the beach with a compass direction.
- VCU:
In the office,
after the monitoring trip, locate the site within its appropriate value
comparison unit [specific to R10; R8 calls them compartments] and list
this number within
the box provided on the Monitoring Form.
- Island: Indicate the applicable
area within the appropriate box.
- Aerial Photo: In the field, place
a dot and the
name of the site on an aerial photo; this will assist future personnel
with relocation of the site. In the office, make a color copy of the
aerial and
attach to the
Monitoring Form.
- Site Location Description: Describe the site
location using geographic features (such as points, bays, inlets, creek
mouths, islands, harbors,
coves, lakes, creeks, aids to navigation, and other distinctive
or recognizable features or landmark(s) and measurements. Measurements can
be
estimated
by reading the map (especially in the case of longer measurements),
taken with
a tape, or
paced. Know the length of your pace and periodically verify it
so
that you can make accurate measurements. Remember: Remeasurement of the
site might not occur
for
several more years, so an accurate description
of the site is essential.
- Vegetation Type: Select the type that
most
clearly reflects the characteristics of the site.
Example: If the site is located on the beach but
in the grasses along the beach fringe, then place
a mark in beach (vegetated).
- Photo Point Descriptions: Select photo points
that will indicate changes to the site over time and assist relocation. When
documenting photo points, indicate what type of camera, film speed, and lens
was used in the photo point
descriptions. Take photos that not only include the site, but also broader views
of the surrounding area. Avoid close up shots because they lack landmarks, reveal
little of the site, and make relocation difficult. Select prominent landmarks
(a unique tree, rock, or feature), reference points, or boundary points. To help
replicate the
photo point, indicate the compass bearing in
the photo point descriptions. Thoroughly describe the photo point and its view
of the site and surrounding country, if applicable. Taking a photo point of another
photo point can also assist relocation. Develop a system to keep track of your
photos, so that after your film has been processed you can properly label the
backs of your photos. The name of the site, the date, and the number of the photo
point should be marked on the back of the photo. If your camera has a date and
time setting, activate it to help identify your photos.
- Exotic Plants Present:
Familiarize yourself with plants considered exotic to (your) Petersburg Ranger
District. Record whether exotic species are present and, if they are, list
the names of the species. Several of the more obvious species include: Conunon
Dandelion
(Taraxacum officinale), White Clover (Trifolium
repens), . . . .
- Substrate
of the Landing Area: Indicate the appropriate substrate in the box provided.
- Substrate of the Camping Area: Indicate the appropriate substrate in
the box provided.
- Vegetative Ground CoverOnsite/Offsite: Vegetative ground cover is defined
as any live moss, plant, shrub, or tree under 2 meter in size. Using the scale
provided, estimate percentage of cover onsite (excluding the undisturbed islands)
and in the offsite control. When selecting an offsite control area, make sure
that the site is similar in slope, aspect, tree cover, and species composition.
Reference the coverage class chart, included in appendix 1.0, to assist with
the visualization of these percentages.
- Organic DuffOnsite/Offsite: Organic duff is defined as any organic debris
such as needles, leaves, twigs, etc., as, well as the thick organic mat found
in many sites, but not covered by vegetation. Using the coverage class chart,
estimate the percentage of organic duff onsite and in the offsite control. Make
sure that the undisturbed islands are excluded from these calculations.
- Mineral
Soil Exposure Onsite/Offsite: Defined as any nonorganic soil, mineral soil
includes bedrock, cobble, sand, and soil. This is mineral soil not covered
by either vegetation
or organic duff. Using the coverage class chart, estimate the percentage
of mineral soil exposure onsite and in the offsite control. Make sure that
the undisturbed
islands are excluded from these calculations.
- Litter: This evaluation
is based upon the amount of time necessary for one person to clean up the
site. Keep track
of the time required to rehabilitate the site and record the value in
the appropriate box. Exclude litter that appears to have washed up on shore
and
is not related
to recreational use of the site.
- Fire Scars, Number: Fire scars are
defined as any fire ring, charcoal, ashes, or blackened area contained
within site boundaries.
- Fire Scars, Total Square Miles: Using a measuring tape, determine
the total square miles of affected area within the site boundaries.
- Camp
Developments:
This evaluation is also based upon the amount of time necessary
for one person
to clean up the site. Keep track of the time needed to rehabilitate
the site and record the value in the appropriate box.
- Human/Dog Waste:
Human
waste
is most frequently found outside site boundaries. While walking
the periphery of the site and any trailleaving the site, look for evidence
of human/ dog waste. Unfortunately, human waste is often
accompanied by toilet paper, evidence that can
assist with the location of unburied piles.
- Root Exposure: Using the values
provided, record the number of trees with roots exposed
located within the site boundaries.
- Tree and Shrub Damage: Using the values provided, record the number which best represents human caused damage to trees and shrubs located within the site.
Materials/Gear List:
- Topographical maps 1: 63,360 scale [no degree
here]
- Aerial photos
- Silva ranger compass
- Clinometer
Tape measure (meters)
- Flagged wire pins or Flagging (2 separate colors for
site remeasurement)
- Camera35 mm
Film
- Tatum:
- forms and directions on Write-In-The-Rain Paper
- pencils
- Video camera
- Loggers (dbh) tape
References
Cole, David N. 1989. Wilderness Campsite Monitoring Methods: A Sourcebook. Research Paper INT-259. Ogden, UT: U.S. Department of Agriculture, Forest Service, Intermountain Forest and Range Experiment Station. 57p.
Marion, Jeffrey L. 1991. Developing a Natural Resource Inventory and Monitoring Program for Visitor Impacts on Recreation Sites: A Procedural Manual. Natural Resources Report NPS/NRVT/ NRR-9)/06. Denver, CO: U.S. Department of the Interior, National Park Service, Cooperative Park Studies Unit. 59p.
Marion, Jeffrey L. 1996. Campsite Monitoring Manual for Gwaii Haanas National Park Reserve. Queen Charlotte City, British Columbia, Canada. 11p.
Campsite Monitoring Form
| 1) Inventoried by: |
| 2) Date Inventoried: |
| 3) GPS Coordinates: Lat.: Long.: |
| 4) Map Coord: T: R: Sec.: ¼ |
| 5) Map Name |
| 6) Camp Name |
| 7) Beach Aspect: |
| 8) VCU: |
| 9) Island: Kuiu: Kupreanof: Mitkof: Mainland: Other: |
| 10) Aerial Photo: Year: Line: Number: |
| 11) Site Location Description: |
12) Vegetation Type: Beach (Non-Veg): Woodland: Muskeg: Beach
(Veg): |
13) Photo Point Descriptions:
|
14) Exotic Plants Present: Yes: No:
|
| 15) Substrate of Landing Area (B = bedrock, C = cobble, S = sand, O = soil) |
| 16) Substrate of Camping Area (B = bedrock, C = cobble, S = sand, O = soil) |
17) Vegetative Ground Cover Onsite: 1 = 0-5% 2 = 6-25% 3 = 26-50% 4 = 51-75% 5 = 76-95% 6 = 96-100% 17) Vegetative Ground Cover Offsite: 1 = 0-5% 2 = 6-25% 3 = 26-50% 4 = 51-75% 5 = 76-95% 6 = 96-100% |
18) Organic Duff Onsite: 1 = 0-5% 2 = 6-25% 3 = 26-50% 4 = 51-75% 5 = 76-95% 6 = 96-100% 18) Organic Duff Offsite: 1 = 0-5% 2 = 6-25% 3 = 26-50% 4 = 51-75% 5 = 76-95% 6 = 96-100% |
19) Mineral Soil Exposure Onsite: 1 = 0-5% 2 = 6-25% 3 = 26-50% 4 = 51-75% 5 = 76-95% 6 = 96-100% 19) Mineral Soil Exposure Offsite: 1 = 0-5% 2 = 6-25% 3 = 26-50% 4 = 51-75% 5 = 76-95% 6 = 96-100% |
20) Litter: 0 = None |
| 21 - 22) Fire Scars: Number (Includes fire rings) Total square meters |
23) Camp Developments: 0 = None |
24) Human/Dog Waste: 0 = None |
25) Root Exposure: 0 = None |
26) Tree and Shrub Damage: 0 = None |
| Primary Pinpoint Location Coordinates: |
| Latitude: |
| Longitude: |
Reference Points: Description Bearing
Distance (m) |
Boundary Points: Bearing Distance
(m) |