
Finishing Details
Although constructing the basic structure right is most important, often the mark of craftsmanship is most evident in the finishing details. Most of the following discussion applies to boardwalks. However, some finishing work can be used with other construction techniques.
Decks
Plank used for a deck often contains heartwood and sapwood. If the plank is placed with the heartwood face up, alternating moisture and drying—and the effects of freezing and thawing—will cause knots and some of the annual rings in the wood to lift. To reduce tripping hazards and future maintenance, deck plank should be placed "green side up" (the heart face down and the bark face up) (figure 55).

Figure 55—Place decking with the growth rings facing down to help
prevent cupping. Cupping causes the wood to decay faster and
creates a tripping hazard.
Posts
A pedestrian railing system may be needed along the edge of a deck to prevent visitors from falling off. Various building and highway codes call these railing systems "handrails," "guardrails," or "railings." If you are planning to install a pedestrian railing, the details of the installation of the posts need to be thought out before placing the deck. Railing posts need to be sturdy. They are a potential liability. Flimsy railings installed as an afterthought are the ones most likely to fail. Usually, it is the connectors, not the railing, that fail. The deck, posts, and handrail are all closely related in their construction. As a minimum, 4 by 6 timbers should be used to support handrails. Actually 4 by 4s that are surfaced on all four sides are only 3½ by 3½ inches. They make a flimsy post.
The deck should extend beyond the stringers to the back of the post, or at least 4 inches. If this is not done, people standing on the deck and leaning on the railing will have their feet sticking out beyond the deck (figure 56). In addition, the decking helps keep water off the stringers, reducing decay.

Figure 56—When the handrail post is attached to the stringer below the
deck, the
decking should extend at least 4 inches beyond the stringer.
There are two ways to install railing posts. The most common requires the deck to be in place. The posts are toenailed to a deck plank. By itself, this is a weak connection and requires an angle brace for support. Therefore the plank supporting the post must extend beyond the edge of the rest of the deck. If the plank is too short, the angle brace will be too close to vertical to provide much support (figure 57).
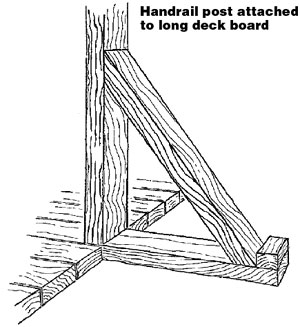
Figure 57—Attaching the handrail post directly to the decking requires
long deck pieces to support an angle brace.
The second method is to attach the posts to the outside of the stringers. It is much easier to bolt the post in place before attaching the adjacent deck plank. To provide solid support, 12 inches of post should contact the stringer. The posts can be accurately cut and drilled in a shop and brought to the site. To avoid the awkward and time-consuming work of notching the planks, the width of the post should match the width of the deck planking (figure 58).

Figure 58—To provide proper support, at least 12 inches of the post
needs to be in contact with the stringer.
The top of each post or pile should be cut at an angle to shed water and to help prevent decay. To avoid a sharp corner at the top of the post, a narrow 1-inch area closest to the handrail should be cut level, and the sloping portion should be pitched away from the boardwalk (figure 59). For esthetic and safety reasons, the posts should not extend above the top of the handrail (figure 60).
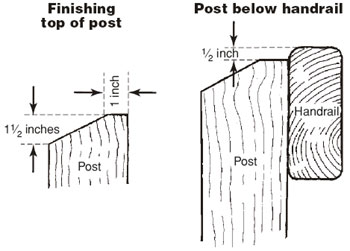
Figures 59 (left) and 60 (right)—Cut the top of the post at an angle,
but leave
1-inch flat on the inside edge. The post should not extend above the
top of the handrail.
Inadequate railing systems have high potential for failing and injuring visitors. We recommend engineering review of railings and their connections.
Pedestrian Railing Types
Safety must be the first consideration in selecting a railing system. Safety requirements are primarily determined by the relative accessibility of the trail. Railing types must fit the appropriate Recreational Opportunity Spectrum class. Railings are of three basic types:
- Railings attached to buildings (visitor centers, for example),
must meet building code requirements such as those
listed in the International Building Code (IBC). This code
requires a railing at least 42 inches high that a 4-inch sphere
will not pass through.
- Handrails on bridges need to meet the American Association
of State Highway and Transportation Officials (AASHTO)
Standard Specifications for Highway Bridges. Although most
of the structures described in this book are not bridges, we
offer these specifications for information. AASHTO requires
42-inch-high guardrails on all pedestrian highway bridges.
Bridges on fully accessible trails usually need this type of
railing. This code requires handrail at least 42 inches high for
pedestrian traffic and at least 54 inches high for bicycle or
equestrian traffic. A 6-inch sphere must not pass through the
railing in the bottom 27 inches, and an 8-inch sphere must
not pass through the area above 27 inches.
- Handrails for more remote trail bridges must be at least 42 inches high for pedestrian traffic and at least 54 inches high for bicycle or equestrian traffic. These handrail systems must also have at least one intermediate rail so that vertical distances between rails do not exceed 15 inches. Three-fourths of all Forest Service trail bridges fall in this category.
Not all wetland trail structures need railings. If the trail itself has more hazardous drops than the trail bridge would have without a handrail, a handrail is probably not required. Other considerations, such as convenience, may justify installing a handrail. Although IBC requirements and AASHTO specifications do not govern trail construction, they can serve as guidelines. As a general rule, any fully accessible trail with a drop of 3 feet or more, or a more remote trail with a drop of 8 feet or more, should have a pedestrian railing system. All accessible trails require a curb. A wheelchair handrail is required for any accessible trail bridge on a grade of 5 percent or steeper. Document your decisions with a design warrant retained in your files.
Railing Installation
Install the railings after the posts and deck are complete. Most railings consist of a top and bottom rail, usually 2 by 6s, although 3 by 6s make a better splice and a stronger rail. The stronger rail permits posts to be spaced more widely than if 2 by 6s were used for rails. The rail can also be cut and drilled in a shop where the splices can be cut accurately and more efficiently.
Often there is no clear direction regarding splicing the railings if the span exceeds 16 feet, the longest lumber that is readily available. It is difficult to butt splice a railing to the surface of a post that is less than 6 inches wide without an awkward splice or a maintenance problem (figure 61).
Walking on the top rail is a potential problem. Round logs or poles have been used to discourage visitors from walking on them, as well as 4 by 4s and 6 by 6s laid diagonally with one corner up. Another technique is to cut the tops of all posts at an angle and place a 2 by 6, or 2 by 8, on the cut surface. This helps to shed water and prevent decay.

Figure 61—Four methods of splicing rails. It is best to cut the rails
in
the shop. Use carriage bolts with the round end on the inside of the
railing to prevent users from snagging themselves.
The edges of all rails should be "edges eased." Edges eased is a trade term indicating that the corners along the edges of the piece of wood are rounded. To reduce splinters, the radius of the handrail edge should be ½ inch or more.
Installing a handrail on a curved bog bridge or angled boardwalk can be a challenge. One way to do this is to use steel angles. Measure the distance between posts and cut the rail to that length. Nail or screw the angles at the ends and to the outside of a 2- by 4-inch or 2- by 6-inch rail. The angles will have to be bent slightly to conform to the different alignment of the posts. Hold the rail in place and nail or screw the angle to the side of the post with the inside face of the board flush with the inside face of the post. Measure the distance between the centerline of the two posts and cut a 2 by 6 to that length. Round the ends slightly and bolt the 2 by 6 to the 2 by 4. The result will be a stronger rail than a single piece of material. This technique may also be used for straight sections of railing to avoid nailing or screwing into the face of the post (figure 62).

Figure 62—One method of installing rails on curving
boardwalks
using
steel angles bent to accommodate
the curvature of the
structure.
For rails on curved trails, short wedge-shaped pieces of lumber can be used as shims between the posts and the rails. The wedges should be oak or cedar. Wedges are difficult to cut in the field. You could notch posts to the correct angle to accept the rails, but this is also difficult.
Cable or wire rope can be used as a railing system in some specialized applications (figure 63). Often the posts are close, 4 to 6 feet, and the cable is strung through holes drilled in the posts or through screw eyes. A single piece of cable may be strung through all the holes in the upper part of the posts, down the last post to the next lower hole and continuing this process back to the beginning through the lower holes, reducing the need for many splices. Use cable tensioners as needed.

Figure 63—Wire rope is used here as part
of the railing system.
Curbs (Bull Rails)
Curb and bull rail are two names for the same thing. If the drop from a boardwalk is about 36 inches or less, a curb is usually installed. A curb is required for accessible trails. Curbs help to delineate the trail tread (figure 64).

Figure 64—Typically, curbs (bull rails) are used when the deck is no
more than 36 inches off the ground.
Curbs placed directly on the surface of a wood deck can cause the deck planking to decay. Leaves, needles, and dirt accumulate against the curb, absorb water, and cause additional decay. During the winter, ice and snow will build up on the deck, causing a hazardous condition.
To keep the deck from decaying, place the curbs on blocks. A finished block of 2 by 4 lumber is only 1½ inches thick. Leaves and dirt can still build up against the curb and under it. With just 1½ inches of space between the curb and the deck, it is difficult to get a shovel under the curb, making this area almost impossible to clean. A better solution is to use two blocks of 2 by 4 lumber, one on top of the other, or one block of 4 by 4 lumber (figure 65) to eliminate the opening under the curb. Litter will not be trapped, and melting ice and snow will run off more quickly. These openings underneath the curbs sometimes are called scuppers, an old nautical term.

Figure 65—Having at least 4 inches of
clearance under the curb is
best.
Bulkheads (Backwalls, End Dams, Faceplates)
Bulkheads must be installed where wood construction meets the earth trail at each end of a puncheon, bog bridge, or boardwalk. They function as retaining walls to support the earth. They also protect the end grain of the stringers from decay and insect damage (figure 66). Bulkheads should always be treated timber.
Install the top of the bulkhead level with the top of the stringers, covering the gap with a piece of deck plank. This is the best way to keep moisture away from the stringer.
Extend the backwall 1 to 2 feet on each side of the structure to keep wet soil away from the sides of the stringers.

Figure 66—Bulkheads serve as retaining walls to support the earth,
and they protect the stringers from decay and insect damage.