
Additional Trail Elements
Switchbacks, climbing turns, retaining walls, and similar trail elements are common in trail construction. They are often relatively difficult to design and construct correctly. Inadequate maintenance greatly shortens their useful lives. However, a well-designed trail with elements that are built properly can last for decades and be quite unobtrusive.
The best way to learn how to build trail elements is to seek someone who has a reputation for designing and building well-thought-out switchbacks, climbing turns, or walls. Have that expert conduct a seminar for your crew or actually participate in the construction of a trail you're working on.
Switchbacks and climbing turns are used to reverse the direction of travel on hillsides and to gain elevation quickly (figure 65). What is the difference between the two? A climbing turn is a reversal in direction that maintains the existing grade going through the turn without a constructed landing. Climbing turns have a wider turn radius and are used on gentle slopes, typically 15 percent or less. Ideally, 7-percent sideslopes are best.
A switchback is also a reversal in direction, but it has a relatively level constructed landing. Switchbacks are used on steeper terrain, usually steeper than 15 percent. Switchback turns have pretty tight corners because of the steeper grades. Usually, special treatments such as approaches, barriers, and drainages need to be considered. Both of these turns take skill to locate. Choosing when to use each one is not always easy.
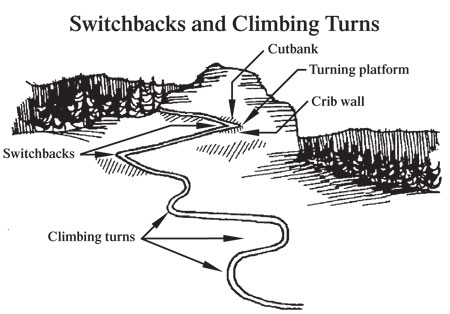
Figure 65—Climbing turns should be built on gentler
sideslopes, usually 15
percent or less. Ideally, 7-percent
sideslopes are best.
Understanding user psychology (human or animal) is more important to the success of climbing turns and switchbacks than to the success of any other trail element. The turns must be easier, more obvious, and more convenient than the alternatives. Climbing turns work best when terrain or vegetation screens the view of travelers coming down the upper approach toward the turn. Avoid building sets of these turns on open hillsides unless the terrain is very steep. It's usually best not to build turns, or the connecting legs of a series of turns, on or across a ridge. The local critters have traveled directly up and down these ridges since the last ice age. They are not going to understand why you are building low hurdles in their path, and they will not be forced onto your trail and turns.
Don't Overdo It
Keep in mind the minimum tool philosophy and build only as many trail elements as you absolutely need to reach your goal.
Plan carefully to avoid impassable or very difficult terrain, reducing the need for switchbacks and climbing turns.
Climbing turns are the trail element most often constructed inappropriately. The usual problem is that a climbing turn is built (or attempted) on steep terrain where a switchback is needed. A climbing turn is built on the slope surface, and where it turns, it climbs at the same rate as the slope itself. Climbing turns work best when built on slopes of 15 percent or less.
The advantages of climbing turns in appropriate terrain is that a wider radius turn of 4 to 6 meters (13 to 20 feet) is relatively easy to construct (figure 66). Trails that serve off-highway-vehicle traffic often use insloped, or banked turns so that riders can keep up enough speed for control. Climbing turns are also easier than switchbacks for packstock and bikes to negotiate (figure 67). Climbing turns are usually less expensive than switchbacks because much less excavation is required and fill is not used.

Figure 66—Climbing turns continue the climb through the turn.
They can be
insloped or outsloped. Add grade reversals at both
approaches to keep water off
the turn.
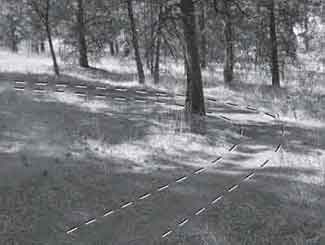
Figure 67—Climbing turns are easier for packstock
and cyclists to negotiate
than switchbacks.
The tread at each end of the turn should be full-bench construction, matching that of the approaches. As the turn reaches the fall line, less material will be excavated. In the turn, the tread should not require excavation other than that needed to reach mineral soil.
To prevent shortcutting, wrap the turn around natural obstacles or place guide structures along the inside edge of the turn. The psychologically perfect place to build climbing turns is through dense brush or dog-hair thickets of trees. Always design grade reversals into both of the approaches to keep water off the turn.
Switchbacks are used in steep terrain (figure 68). Suitable terrain for a switchback becomes harder to locate and maintenance costs increase as the sideslope becomes steeper. Sideslopes from 15 to 45 percent are preferred locations for switchbacks. Although switchbacks can be constructed on sideslopes of up to 55 percent, retaining structures are needed on such steep slopes.

Figure 68—A switchback with a turning platform.
Switchback turns are harder to build correctly than climbing turns, but they keep tread stable on steeper terrain. Most switchbacks are constructed to a much lower standard than is needed. The key to successful switchback construction is adequate excavation, using appropriate structures to hold the fill in place, and building psychologically sound approaches.
Look for natural platforms when you are scouting for possible switchback locations. Use these platforms as control points when locating the connecting tread. Suitable platforms will save you a lot of time later by reducing the amount of excavation and fill needed.
A switchback consists of two approaches, a landing or turning platform, a drain for the upper approach and platform, and guide structures. The upper approach and the upper half of the turning platform are excavated from the slope. Part of the lower approach and the lower half of the turn are constructed on fill (figure 69).

Figure 69—Part of the lower approach and the lower half
of this switchback are
constructed on fill.
The approaches are the place where most of the trouble starts with switchback turns. The approaches should be designed for the primary user group. In general, the last 20 meters (65 feet) to the turn should be as steep as the desired level of difficulty will allow. This grade should be smoothly eased to match that of the turn in the last 2 to 3 meters (6 ½ to 10 feet).
Do not flatten the grade for 20 meters (65 feet) before the turn. If anything, steepen the approach grades to foster the sense that the switchback is the most convenient way of gaining or losing altitude (figure 70). There is absolutely nothing as infuriating as walking a nearly flat grade to a distant switchback turn while looking several meters over the edge at the nearly flat grade headed the other direction. You can build a Maginot Line of barricades and still not prevent people, packstock, and wildlife from cutting your switchback. The only exception is a trail designed primarily for wheeled vehicles where a flatter approach makes it easier for riders to control their vehicles.

Figure 70—The rocks help prevent users from being
tempted to cut this switchback.
As the upper approach nears the turn, a grade reversal should be constructed. The tread below this point should be insloped until the halfway point in the turn. Both sides of this drain ditch should be backsloped to an angle appropriate for the local soil. As the turn is reached, the tread should be 0.5 to 1 meter (19 to 39 inches) wider than the approach tread. This is particularly important on small radius turns and for wheeled vehicles. It's less necessary for hikers and packstock.
The turn can be a smooth radius ranging from 1.5 to 3 meters (5 to 10 feet) or a simple Y-shaped platform. A smooth radius turn is important if the trail's use includes wheeled traffic or packstrings. The Y platform works for hikers (figure 71). The turn platform is nearly flat, reaching no more than a 5-percent grade. The upper side is excavated from the sideslope and borrow is used to construct the fill on the lower side. Switchbacks on steep sideslopes can require very large excavations to reach a stable backslope angle and provide clearance for packstock loads. The greater the turn's radius, the wider the platform, or the flatter the turn, the more excavation that will be required. A point may be reached where a retaining wall is needed to stabilize the backslope.
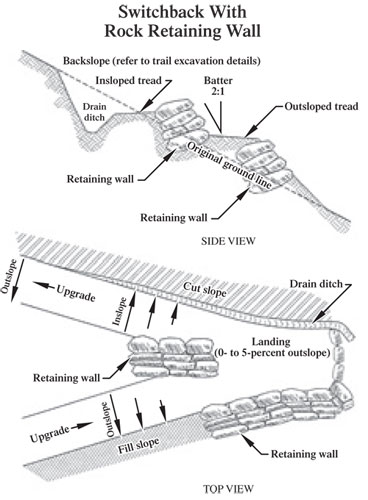
Figure 71—A switchback with a "Y" turning platform,
suitable for hiking trails.
Click here for a long description.
The amount of tamped fill required on the lower side of the turn will usually be at least as much as was excavated from the upper side unless a retaining wall is used to support the fill. A retaining wall is absolutely necessary where the terrain is steeper than the angle of repose for the fill material.
The tread in the upper portion should be insloped, leading to a drain along the toe of the backslope. This drain should extend along the entire backslope and be daylighted (have an outlet) where the excavation ends. Construct a spillway for the drain to protect the adjacent fill from erosion. You may need guide structures—rock walls or logs are common—on the inside of the turn to keep traffic on the trail.
Construct the approach on the lower side of the turn on tamped fill. The retaining wall should extend for most of this length. The tread on the lower portion of the turn should be outsloped. The fill section transitions into the full-bench part of the approach; the approach changes grade to match the general tread grade.
Try to avoid "stacking" a set of switchback turns on a hillside. Long legs between turns help reduce the temptation to shortcut. Staggering the turns so that legs are not the same length reduces the sense of artificiality (figure 72). Keep the grade between turns as steep as the challenge allows. Remember, travelers will cut switchbacks when they feel it's more convenient to do so than to stay on the tread. The designer's goal is to make travel on the trail more attractive than the shortcut.
Maintaining climbing turns and switchbacks requires working on the tread, improving drainage, and doing any necessary work on retaining walls, guide structures, and barricades. The tread should be insloped or outsloped as necessary, slough should be removed to return the tread to design width, and tread obstacles should be removed.
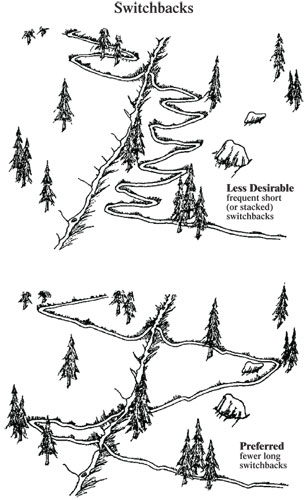
Figure 72—Long sections of trail between switchbacks are
usually better than
short sections—fewer switchbacks
will be needed, with fewer turns to shortcut.
Retaining structures keep dirt and rock in place. The retaining wall keeps fill from following the call of gravity and taking the tread with it. Retaining walls are useful for keeping scree slopes from sliding down and obliterating the tread, for keeping streams from eroding abutments, and for holding trail tread in place on steep sideslopes.
Two common retaining structures are the rock retaining wall and the log crib wall. Of course, rock is more durable and lasts longer than wood.
Rock retaining walls are used when a sturdy wall is needed to contain compacted fill (figure 73) or to hold a steep excavated backslope in place (figure 74). Rock retaining walls are also called dry masonry because no mortar is used between the rocks.

Figure 73—A rock retaining wall is needed to hold
compacted fill.

Figure 74—A rock retaining wall holding a steep,
excavated backslope in place.
Ideally, the bigger the rock, the better. Big rocks are less likely to shift or become dislodged. At least half of the rocks should weigh more than 60 kilograms (130 pounds). The best rock is rectangular with flat surfaces on all sides. Round river rock is the worst.
To build a rock retaining wall, excavate a footing to firm, stable dirt or to solid rock. Tilt the footing slightly into the hillside (batter) so the rock wall will lean into the hill and dig it deep enough to support the foundation tier of rocks (these are usually the largest rocks in the wall). Ideally, the footing is dug so that the foundation tier is embedded for the full thickness of the rocks.
The batter should range from 2:1 to 4:1 (figure 75). Factors determining this angle include the size and regularity of the rock, the depth of header rocks, and the steepness and stability of the slope. At batter angles steeper than 4:1 or so, cement, internal anchors, or both, may be needed for stability.

Figure 75—Terms used to describe rock retaining walls.
Click here for a long description.
The keystone is laid into the footing and successive tiers are laid. For each tier, overlap the gaps between rocks in the next lower tier, called breaking the joints. Each tier should be staggered slightly into the hill to create the desired amount of batter. Header rocks are long rocks turned and placed so that they extend deep into the hillside. Using header rocks is particularly important if the wall's cross section widens as the wall gets higher.
Rocks in each successive tier should be set so they have at least three points of good contact with the rocks below. Good contact is defined as no wobble or shifting under a load without relying on shims (or chinking) to eliminate rocking. Shims are prone to shifting and should not be used to establish contact, especially on the face of the wall, where they can fall out. Add backfill and tamp crushed rocks into the cracks as you build.
The Right Rock
In reality, you have to use the rock that is available. Small walls can be constructed successfully from small rocks. The key is the foundation and batter. Remember to save some large rocks for the capstones. A final point—most rock can be shaped with a few good blows with a rock hammer and carbide-tipped rock chisel. Placing rock on dirt rather than another rock before striking it will help ensure that the rock breaks where you want it to.
Log walls are designed to keep compacted fill in place (figure 76). Construct wood walls by interlocking logs or beams, pinned or notched (for logs) at the joints. Lay sill logs at right angles to the direction of travel and alternate tiers of face logs and header logs (figure 77).
Each successive tier is set to provide enough batter to resist creep pressure from the slope and to reduce pressure on the face logs from the fill. The ends of the header logs are seated against the backslope of the excavation for stability. As fill is tamped in place, filler logs are placed inside the structure to plug the spaces between the face logs. Filler logs are held in place by the fill.

Figure 76—Crib walls help keep compacted fill in place.

Figure 77—The characteristics of a crib wall.
Treated logs are recommended.
Click here for a long description.
Outslope the tread to keep water from saturating the fill and excavation. Use guide structures to keep traffic off the edge of the tread.
All retaining structures should be checked carefully for shifting, bulging, or loose structural material. Make sure that all the footings are protected from erosion. Anchor guides should be secure.
Wire baskets (often called gabions) are another retaining structure. Gabions are wire baskets filled with rock (figure 78). The baskets are wired together in tiers and can be effective where no suitable source of well-shaped rock is available. Gabions look more artificial (in the eyes of traditionalists at any rate) and may not last as long as a rock wall, depending on the type of wire used and the climate.

Figure 78—Wire baskets, often called gabions,
are another retaining structure.
Steps are used to gain a lot of elevation in a short distance. Steps are common on steep hiking trails in New England and elsewhere and less common (but not unheard of) on western trails used by horses and mules. Wooden steps of all configurations are common in coastal Alaska (figure 79).

Figure 79—A step-and-run boardwalk in Alaska.
Sometimes steps are used on an existing trail to fix a problem caused by poor trail location or design. Often, the result is out of character with the desired experience and esthetics of the trail. Before you construct steps, make sure they are consistent with the expectations of those the trail is designed to serve.
Your goal is to design the height (rise) and depth (run) of the steps to match the challenge desired. Steps are harder to negotiate as the rise increases. The difficulty also increases as the steps are closer together.
Yet as the trail becomes steeper, the step must either be higher or the distance between steps must be shorter. Steps can be built into a trail that traverses the slope. This allows the traveler to gain elevation rapidly, without the scary steepness of a stairway.
The components of a step are: the rise, the run, a landing on easier grades, and often retainer logs (figure 80). The rise is the height of the face of each step. The run is the distance from the edge of one step to the base of the next step's face. The landing is the extension of the run above the step. In structures where the landing is composed of tamped fill material, logs are used to retain the fill.

Figure 80—Common types of steps.
Click here for a long description.
Hikers, especially backpackers, generally don't like steps and will walk alongside them if there is any opportunity. The steps need to be comfortable to climb or they won't be used. This means keeping the rise a reasonable 150 to 200 millimeters (6 to 8 inches) and the run long enough to hold a hiker's entire foot, 254 to 305 millimeters (10 to 12 inches, figure 81). It's helpful to corral the sides of steps with rocks to encourage users to stay on the steps.

Figure 81—A general rule of thumb for stairs: twice the riser plus the tread
should equal 635 to 686 millimeters (25 to 27 inches).
The most important area of the step is usually the tread. This is where most users step as they climb. The top of the step (and landing) should be stable and provide secure footing. The edge of the step should be solid and durable. The face or riser of each step should not slope back too far. This is particularly important as the rise of the step increases.
If the stairway climbs straight up the hill, each step should be slightly crowned to drain water to the edges or be sloped slightly to one side. When the trail traverses a slope, each step and landing should be outsloped slightly. Water should not be allowed to descend very far down a set of steps or to collect on the landing. A grade reversal or drain dip is a good idea where the trail approaches the top of the steps.
Build stairways from the bottom up, at a break in the grade. Bury the first rock; it will act as an anchor. The most common mistake is to start part way up a grade. If you do so, the trail will wash out below the stairs. The bottom step should be constructed on a solid, excavated footing. If it is constructed on top of exposed rock, it should be well pinned to the footing. Each successive step is placed atop the previous step (figure 82). Wood steps are usually pinned to each other and to the footing. Dry masonry rock steps usually rely on the contact with the step below and with the footing to provide stability (figure 83).

Figure 82—Begin laying steps at the bottom of a grade
rather than midway.

Figure 83—Each dry masonry rock step needs to
contact the step below.
Steps with landings are a bit harder to secure because the steps do not overlap. Each step can be placed in an excavated footing and the material below the rise removed to form the landing of the next lower step. Usually, this is the most stable arrangement. Or the step can be secured on the surface and fill can be used to form a landing behind it. When the landing consists of tamped fill, the material used to provide the rise does double duty as a retaining structure. These steps must be seated well to prevent them from being dislodged by traffic. For stock use, landings should be long enough, about 2 meters (6 ½ feet), to hold all four of the animal's feet (figure 84).

Figure 84—For stock use, landings should be long enough to
hold all four of
the animal's feet, or about 2 meters
(6 ½ feet) long.
In all steps, the key is to use the largest material possible and to seat it as deeply as possible. Rocks should be massive and rectangular. On steps that traverse a slope, it helps to seat the upper end of the step in footings excavated into the slope.
Pavers can be used to armor switchback turns and steeper slopes, especially on trails designed for motorized traffic (figure 85). Some styles of pavers allow vegetation to penetrate them; others have voids that can be filled with soil, gravel, or other suitable material. In highly erodible soils, pavers combined with geotextiles are an option.
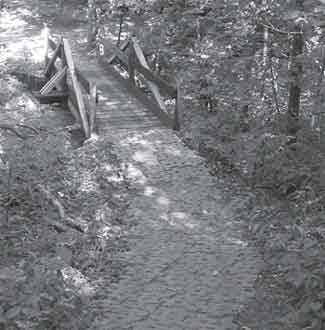
Figure 85—Pavers can be used to armor sections of trail
for motorized traffic.