
Crossing Streams and Rivers
Stream and river crossings present a challenge to trail managers who need to balance difficulty levels, safety, convenience, cost, environmental consequences, and esthetics. At one end of the use spectrum, a bridge can allow people with disabilities, toddlers, and users who are new to the outdoors to experience the trail with little risk. But bridges are expensive. Wilderness visitors who expect a challenge may prefer a shallow stream ford. During high water, these folks may opt for a tightrope walk across a fallen log. Each kind of water crossing has consequences for the recreation experience and the lands being accessed. Choose wisely from the spectrum of options before committing present and future resources to any given crossing.
The Minimum Tool Philosophy
The minimum tool philosophy suggests that we get the job done with the least long-term impact while still meeting management objectives. A few minimum tool questions for crossings are:
- Do we really need a bridge here? Do we really need to cross here early in the spring?
- Will someone be killed or injured if we don't provide an easier crossing?
- Is this really the best place to cross this stream?
- What alternatives do we have to cross this stream, including not crossing it at all?
- Can we afford this crossing?
- What are the environmental and social consequences of a given type of crossing here?
- Can we commit to long-term inspections and maintenance?
- Who will really care if we don't build (or replace) a bridge?
It's a wonderful thing to keep one's feet dry, but keeping those feet dry in the backcountry is expensive.
A shallow stream ford is a consciously constructed crossing that will last for decades with a minimum of maintenance (barring major floods) and will provide a relatively low challenge to users.
The idea behind a shallow stream ford is to provide solid footing at a consistent depth from one bank to the other (figure 56). Most fords are designed to be used just during low to moderate flows. A ford for hikers and packstock, such as llamas and pack goats, should be no deeper than 400 to 600 millimeters (16 to 24 inches, about knee high) during most of the use season. A horse ford shouldn't be deeper than 1 meter (39 inches).
Fords should be located in wider, shallower portions of the stream. The approaches should climb a short distance above the typical high water line so that water isn't channeled down the tread (figure 57). Avoid locations where the stream turns, because the water will undercut approaches on the outside of a turn.
The tread in the ford should be level, ideally made of rock or medium sized gravel that provides solid footing. The plan is to even out the waterflow through the ford so the gravel-sized material isn't washed away, leaving only cobble or boulders. Make sure you don't block passage for fish and other aquatic organisms.

Figure 56—Build fords when the water is low.
Place stepping stones for hikers.
Click here for a long description.

Figure 57—Fords should be established in wider, shallower portions of a
stream. Approaches should climb a short distance above the high-water line.
Several rows of stepping stones or rocks can be placed upstream from the tread to begin evening out the flow and slowing the water before it enters the ford. Be sure these rows of rocks are not too close to the trail or water flowing over them might scour the tread.
On trails receiving motorized use, rocks or concrete pavers (figure 58) can strengthen the trail tread and stream approaches for a solid crossing.
Well-constructed shallow stream fords are almost maintenance free. Watch for deep spots developing in the crossing. Floods or seasonal runoff can wash away the approaches. Debris can be trapped in the line of stepping stones, altering flow characteristics. Approaches can erode or turn into boggy traps. Maintenance consists of retaining or restoring an even, shallow flow and solid footing. When working in streams, consult the land manager and a fishery biologist to find out what you can and cannot do.

Figure 58—Concrete pavers are good for hardening
trails
and approaches for
motorized use. The voids
need to be filled.
Culverts are probably the best way to move small volumes of water under a trail (figure 59). The tread extends over the culvert without interruption. Metal or plastic culverts can be installed easily, or culverts can be constructed out of rock.

Figure 59—Culverts are a good option for moving
small volumes of water
under a trail.
To install metal or plastic culverts, dig a ditch across the trail as wide as the culvert and somewhat deeper. Bed the culvert in native soil shaped to fit it. There needs to be enough drop (about 3 percent) from one side of the trail to the other to keep water flowing through the culvert without dropping sediment. The culvert needs to be covered with 150 millimeters (6 inches) or more of fill. Cut the culvert a little longer than the trail's width, and build a rock facing around each end to shield the culvert from view and prevent it from washing loose. Often a rock-reinforced spillway will reduce headcutting and washouts on the downhill side of the culvert.
The local trail manager may have definite preferences for metal, plastic, wood, or rock culverts. Synthetic materials may be taboo in wilderness. Plastic is lighter than metal, easy to cut, and less noticeable. Aluminum or plastic are preferred over steel in acidic soils. Painting the ends of aluminum or steel culverts helps camouflage them. A culvert should be big enough to handle maximum storm runoff and allow it to be cleaned easily. Usually this means the culvert should be at least 260 millimeters (9 inches) in diameter.
Rock culverts offer workers a chance to display some real trail building skills (figure 60). Begin by laying large, flat stones in a deep trench to form the bottom of the culvert. In some installations, these rocks may not be necessary. Then install large, well-matched stones along either side of the trench. Finally, span the side rocks with large, flat rocks placed tightly together so they can withstand the expected trail use. Cover the top rocks with tread material to hide and protect the culvert. These culverts need to be large enough to clean out easily. The rocks should not wiggle.

Figure 60—Rock culverts may have stones laid along the culvert's
bottom. The
perfect rocks shown here are seldom found in nature.
Water flowing toward a culvert often carries a lot of silt and debris. If the water slows as it goes into the culvert, the silt and debris may settle out, clogging the culvert. A good way to help prevent this problem is by constructing a settling basin at the inlet to the culvert (figure 61). This basin should be at least 300 millimeters (1 foot) deeper than the base of the culvert. Sediment will settle out in the basin, where it is much easier to shovel away, rather than inside the culvert.
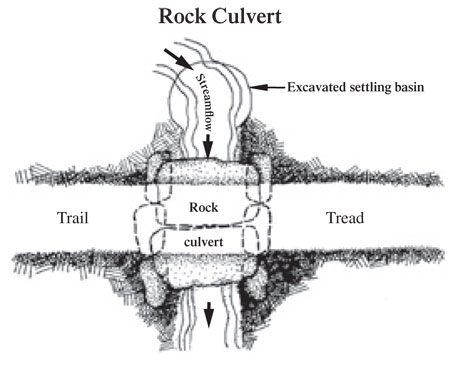
Figure 61—Settling basins help prevent culverts from
clogging with silt and
debris.
Trail bridges range from a simple foot bridge with a handrail (figure 62) to multiple span, suspended, and truss structures. In the Forest Service, handrails are required on all bridges unless an analysis (design warrant) shows that the risk of falling off the bridge is minimal or the trail itself presents a higher risk. All bridges require a curb.
Design Approval
On national forests, all bridges require design approval from engineering before being constructed. Some regions have standardized, approved designs for simple bridges.
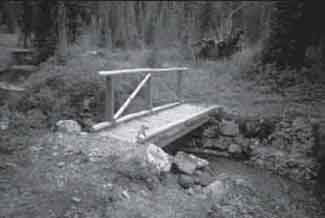
Figure 62—A simple footbridge with a handrail.
On hiking trails, log footbridges (figure 63) can be used to cross streams or to provide access during periods of high runoff. Log footbridges consist of a log, sills, and bulkheads. The log needs drainage and airspace to keep it from rotting. The foot log should be level and well anchored. Notch the sill—not the log—when leveling the foot log. The foot log should be no less than 457 millimeters (18 inches) in diameter. The top surface should be hewed to provide a walking surface that is at least 250 millimeters (10 inches) wide. Don't let the log or rails sit on the bare ground. Remove all bark from logs and poles.
If the foot log is associated with a shallow stream ford, be sure to position the log upstream or well downstream of the ford. Logs immediately below the crossing can trap travelers who lose their footing in the ford.

Figure 63—A log footbridge. The sill can be notched to
accommodate the logs,
but not vice versa.
Photo has been digitally altered.
Choosing the materials for a bridge is not a simple process. Even the use of native material for a simple foot log has consequences. For example, most untreated logs of a durable wood (like coastal Douglas-fir) have a useful life of less than 20 years. Yet it may take 100 years for a log to grow big enough to support visitor traffic and winter snow loads. The typical bridge has three to four stringers. Multiply this replacement-to-growth ratio by several replacement cycles and you can see how it's possible to create a slow-motion clearcut around a bridge site.
Handrails
In the Forest Service, handrails are required unless an analysis (design warrant) shows they are not needed. If you have handrails, construct them according to plan. Improperly constructed handrails are a big liability, because they probably will not be strong enough.
Often, materials are imported to avoid the problem of "clearcuts" near the bridge. Pressure-treated wood, metal, concrete, wood laminates, and even fiber-reinforced polymers are being used in bridges. Many of these materials must be trucked or flown to a bridge site and the old materials must be hauled out. All this is really expensive. Yet the cost of transporting durable materials may be less than the cost of frequently rebuilding structures made with native materials. It's possible to mix-and-match steel or other "unnatural but hidden" components with wood facing and decking to achieve a natural appearance.
Unless your bridge is preassembled and flown right onto a prepared set of abutments, you'll end up moving heavy materials around the bridge site. Be careful not to allow winch guylines and logs to scar trees and disturb the ground. Damage done in a moment can last for decades.
Other types of trail bridges include multiple-span, suspended, and truss structures (figure 64). A two-plank-wide suspended footbridge with cable handrails is more complex than it looks. Midstream piers for multiple span structures need to be designed by qualified engineers to support the design loads and to withstand the expected flood events. It does no one any good to win the National Primitive Skills Award for building a gigantic bridge by hand—only to have it fail a year later because of a design or construction oversight.

Figure 64—A suspension trail bridge typical of the
Northern Rockies.
Bridges are expensive, so it makes sense to take good care of them. Check foot logs and bridges annually for problems. Loose decking, planking, curbs, or handrails should be repaired as soon as possible. Clean debris and organic material from all exposed wood surfaces on the bridge or supporting structures. Structural members should be checked for shifting, loose, or missing spikes or bolts. Approaches need to be well drained so water does not run onto the bridge.
Report any of the following problems to a qualified bridge inspector who can determine whether the bridge should remain open to traffic: rotten wood; bent, broken, or disconnected steel members; large checks, splits, crushed areas, or insect damage in wood members; permanent sag or excessive deflection; erosion around abutments; broken concrete; concrete with cracks larger than 3 millimeters (1/8 inch); or exposed rebar.
The Forest Service requires all bridge structures to be inspected by a certified bridge inspector at least every 5 years.
A good online resource for more information is MTDC's "Trail Bridge Catalog" (Eriksson 2000).