
Trails in Wet Areas
Very few critters like to get their feet wet. There are a few exceptions, of course. Otters, beavers, goofy retriever dogs, motorcyclists, and young children like to jump right in. But the rest of us—horses, llamas, and stodgy adult hikers—often go to great lengths to avoid getting our feet wet or taking an unplanned swim. This section deals with a range of options for getting trail traffic from one side of wet ground to the other. See "Wetland Trail Design and Construction" (Steinholtz and Vachowski 2007) for additional information.
Because nearly every technique for fixing trails in boggy areas is expensive and needs to be repeated periodically, relocating the problem section of trail should be considered first. Scouting for suitable places to relocate trails and reviewing soil maps is time well spent. The alternative route should traverse the sideslope for better drainage. Don't reroute a problem section of trail to another boggy piece of ground. If you do, the result will be two problem trail sections instead of one.
Moving up in cost and complexity, two types of structures—turnpikes and puncheon—are commonly constructed to keep trails dry through wet or boggy areas. Using geosynthetics in combination with these techniques can result in a better tread with less fill. Rock armoring is popular in some areas where hardened trails are needed.
A trail bridge may be needed in situations where long spans will be high above the ground or for crossing streams. Bridges require special designs fitted to each type of use. Engineering approval is needed before constructing either a standard or specially designed bridge.
Boardwalks are common in some parts of the country, particularly in parts of Alaska and in the Southeast. They can range from fairly simple structures placed on boggy surfaces to elevated boardwalks over marshes or lake shores, such as those found at some interpretive centers (figure 34).

Figure 34—This boardwalk relies on pilings for support.
Helical earth anchors
also could be used to support
the structure.
Geosynthetics are synthetic materials (usually made from hydrocarbons) that are used with soil or rock in many types of road and trail construction. Geosynthetics offer alternatives to traditional trail construction practices and can be more effective in some situations.
Geosynthetics perform three major functions: separation, reinforcement, and drainage. Geosynthetic materials include geotextiles (construction fabrics), geonets, sheet drains, and geocells. All these materials become a permanent part of the trail and must be covered with soil or rock. If the material is exposed, it can be damaged by trail users and may cause users to slip or trip.
Geotextiles (figure 35) are the most widely used geosynthetic material. Sometimes they are called construction fabrics. They are made from long-lasting synthetic fibers bonded to form a fabric that is used primarily for separation and reinforcement over wet, unstable soils. They have the tensile strength needed to support loads and can allow water, but not soil, to seep through.

Figure 35—Felt-like geotextiles are easier to work with
than heat-bonded, slit-film,
or woven products with a
slick texture.
Geotextiles are often used when constructing turnpikes or causeways. The geotextiles separate the silty, mucky soil beneath the fabric from the mineral, coarse-grained, or granular soil placed as tread material on top of the geotextile. The importance of separation cannot be overemphasized. It takes only about 20 percent silt or clay before mineral soil takes on the characteristics of mud—and mud is certainly not what you want for your tread surface. Most geotextiles commonly used in road construction work are suitable for trail turnpikes. The fabric should allow water to pass through, but have openings of 0.3 millimeter (0.01 inch) or smaller that silt can't pass through.
Geotextiles need to be carefully sized, trimmed, and sometimes fastened down before they are covered with fill. The fabric needs to be overlapped at joints and trimmed to fit over bedrock. The fabric must be covered with tread material.
Some geotextiles are sensitive to ultraviolet light. They decompose readily when exposed to sunlight. Always store unused geotextile in its original wrapper.
Geonets or geonet composites (figure 36) have a thin polyethylene drainage core that is covered on both sides with geotextile. They are used for separation, reinforcement, and drainage. Because geonets have a core plus two layers of geotextile, they provide more reinforcement than a single layer of geotextile.

Figure 36—The net-like core of geonet allows water to
drain through it.
Sheet drains are made with a drainage core and one or two layers of geotextile. Usually, the core is made of a polyethylene sheet shaped like a thin egg crate. The core provides an impermeable barrier unless it has been perforated by the manufacturer. When used under the trail tread material, sheet drains provide separation, reinforcement, and drainage. Because they have greater bending strength than geotextiles or geonets, less tread fill may be needed.
Sheet drains or geonets can be used as drainage cutoff walls (figure 37). If the trail section is on a sideslope where subsurface water saturates the uphill side of the trail, a cutoff wall can be constructed to intercept surface and subsurface moisture, helping to drain and stabilize that section of trail.

Figure 37—A sheet drain or geonet can be used to
intercept seepage.
Geocells usually are made from polyethylene strips bonded to form a honeycomb structure. Each cell is backfilled and compacted (figure 38). Geocells are good for reinforcement, reduce the amount of fill material required, and help hold the fill in place. Geocell usually has geotextile underneath it for separation from saturated soils. The grids need to be covered and compacted with at least 76 millimeters (3 inches) of tread material so they will never be exposed. Exposed geocells present a substantial hazard to foot traffic and vehicles, which will lose traction.

Figure 38—Geocells are good for tread reinforcement and
help hold fill in place.
Rock underdrains (often called French drains) are ditches filled with gravel. They can be used to drain a spring or seep running across the trail. Wrap the gravel with geotextile to help prevent silt from clogging the rock voids. Start with larger pieces of rock and gravel at the bottom, topping off with smaller aggregate (figure 39). Finish the drain with 150 millimeters (6 inches) of tread material so that the surface matches the rest of the trail.
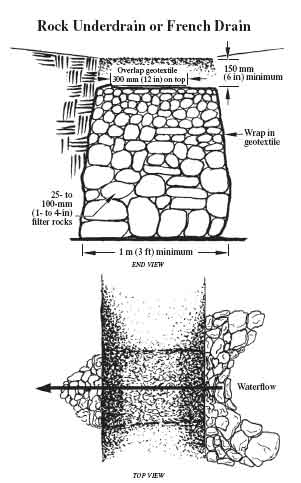
Figure 39—Wrapping rock underdrains with geotextile
helps
prevent them from
clogging. Rock underdrains
are
used to drain low-flow springs and seeps.
Turnpikes elevate a trail above wet ground. The technique uses fill material from parallel side ditches and from areas offsite to build up the trail base so it is higher than the water table. Turnpike construction can provide a stable trail base in areas with a high water table and fairly well- to well-drained soils. Turnpikes are practical for trail grades up to 10 percent (figure 40).
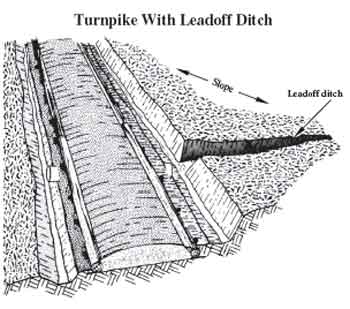
Figure 40—Turnpikes raise a trail above wet ground.
A turnpike should be used primarily in flat areas with wet or boggy ground that have up to 20-percent sideslope. Turnpikes are easier and cheaper to build than puncheon and may last longer.
Finding Fill
Often you need fill material to construct turnpikes. Look for a site that has suitable tread material close to the work site. This is called a borrow pit.
Good places for a borrow pit include:
- Creek bottoms that are replenished by storms and seasonal waterflow
- Bases of slopes or cliffs where heavy runoff or gravity deposits sand and gravel
Don't destroy aquatic or riparian habitat with your pit. Rehabilitate the pit when you're done. Grade the pit out to natural contours with topsoil and debris, then revegetate.
Begin your turnpike by clearing the site wide enough for the trail tread plus a ditch and retainer log or rocks on either side of the trail tread. Rocks, stumps, and stobs that could rip geotextiles or that protrude above the turnpike tread should be removed or at least cut below the final base grade.
Ditch both sides of the trail to lower the water table. Install geotextile or other geosynthetic materials and retainer rocks or logs. Geotextile and geocell should go under any retainer rocks or logs (figure 41). Use high-quality tread material as fill above the geotextile.
Firm mineral soil, coarse-grained soils or granular material, or small, well-graded angular rocks are needed for fill. Often gravel or other well-drained material must be hauled in to surface the trail tread. If good soil is excavated from the ditch, it can be used as fill. Fill the trail until the crown of the trail tread is 50 millimeters (2 inches) or has a minimum 2-percent grade above the retainers. It doesn't hurt for the fill to be a little too high to begin with, because it will settle.

Figure 41—Place geotextile under the retainer logs or
rocks before staking the geotextile in place.
Click here for a long description.
Construct a dip or a drainage structure at each end of the turnpike where necessary to keep water from flowing onto the structure. Keep the approaches as straight as possible coming onto a turnpike, to minimize the chance that stock or motorbike users will cut the corners and end up in the ditches. Turnpike maintenance, especially recrowning, is particularly important the first year after construction; the soil will have settled then. Make sure the ditches are cleaned out and are deep enough to drain the turnpike (figure 42).

Figure 42—Turnpike maintenance includes recrowning the
tread,
cleaning out
the ditches, and making sure the
ditches are deep enough.
An alternative method, one that not only provides separation between good fill and clay but also keeps a layer of soil drier than the muck beneath, is called encapsulation, or the sausage encapsulation technique (figure 43). Excavate 250 to 300 millimeters (10 to 12 inches) of muck from the middle of the turnpike. Lay down a roll of geotextile the length of the turnpike. The geotextile should be wide enough to fold back over the top with a 300-millimeter (1-foot) overlap. Place 150 millimeters (6 inches) of good fill, or even rocks, on top of the single layer of geotextile, then fold the geotextile back over the top and continue to fill with tread material. Rocks or logs can be used for retainers. Rocks last longer.

Figure 43—Sausage encapsulation is another way to raise a
trail above wet
areas.
If you use logs, they should be at least 150 millimeters (6 inches) in diameter and peeled. Lay retainer logs in one continuous row along each edge of the trail tread. The logs can be joined by notching them (figure 44). In some species, notching may cause the logs to rot faster. Anchor the logs with stakes (figure 45) or, better yet, large rocks along the outside. Anchors are not needed on the inside, because the fill and surfacing will hold the retainer logs.
The most important considerations are to keep the water level below the trail base and carry the water under and away from the trail at frequent intervals.

Figure 44—Retainer logs are joined with spikes.

Figure 45—Try this old Alaska trick if your stakes tend
to work up out of boggy ground.
A turnpike without ditches is sometimes called a causeway. These structures are viable alternatives where a hardened tread is needed and groundwater saturation is not a problem. Turnpikes without ditches have been used successfully throughout the Sierra Nevada and elsewhere to create an elevated, hardened tread across seasonally wet alpine meadows. The surface can also be reinforced with large stones, called armoring, paving, or flagstone. Often multiple parallel paths are restored and replaced with a single causeway (figure 46). These structures can create less environmental impact than turnpikes with ditches because they do not lower the water table. The risk is that in highly saturated soils the turnpike without ditches could sink into the ground, a problem that geotextile can help prevent.
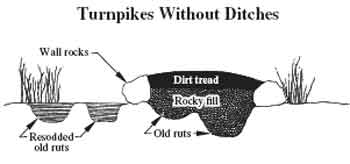
Figure 46—Turnpikes without ditches, sometimes called
causeways, create an
elevated, hardened tread across
seasonally wet areas and can replace multiple
parallel paths.
When the ground is so wet the trail cannot be graded and there's no way to drain the trail, use puncheon.
Puncheon is a wooden walkway used to cross bogs or deep muskeg, to bridge boulder fields, or to cross small streams (figure 47). It can be used where uneven terrain or lack of tread material makes turnpike construction impractical. Puncheon is also preferred over turnpikes where firm, mineral soil cannot be easily reached. Puncheon can be supported on muddy surfaces better than a turnpike, which requires effective drainage.

Figure 47—Puncheon is a wooden walkway used when
trails cross bogs, deep
muskeg, large boulder fields,
or small streams.
Puncheon resembles a short version of the familiar log stringer trail bridge. It consists of a deck or flooring made of sawed, treated timber or native logs placed on stringers to elevate the trail across wet areas that are not easy to drain. Puncheon that is slightly elevated is termed standard puncheon (figure 48).

Figure 48—Standard puncheon is slightly elevated
above the ground.
Here's how to build puncheon. First of all, the entire structure must extend to solid mineral soil so soft spots do not develop at either end. Approaches should be straight for at least 3 meters (10 feet) coming up to the puncheon. Any curves either approaching or on the puncheon add to the risk of slipping, especially for stock, mountain bike riders, and motorcycle riders.
To begin construction, install mud sills to support the stringers. Mud sills can be made of native logs, treated posts, short treated planks, or precast concrete parking lot wheel blocks. The mud sills are laid in trenches at both ends of the area to be bridged at intervals of 1.8 to 3 meters (6 to 10 feet, figure 49). They are about two-thirds buried in firm ground. If firm footing is not available, use rock and fill to solidify the bottom of the trench, increase the length of the sill log to give it better flotation, or use more sills for enough floatation. Enclosing rock and fill in geotextile minimizes the amount of rock and fill required. For stability, especially in boggy terrain, the mud sills should be as long as practical, up to 2.5 meters (8 feet) long.

Figure 49—Proper layout of puncheon, showing mud
sills and stringers.
Stringers made from 200-millimeter- (8-inch-) diameter peeled logs or treated timbers are set on top of the mud sills. They should be at least 3 meters (10 feet) long and about the same length and diameter. Stringers also need to be level with each other so the surface of the puncheon will be level when the decking is added. Two stringers are adequate for hiking trails, but for heavier traffic, such as packstock, three stringers are recommended.
Notch the mud sills, if necessary, to stabilize the stringers and to even out the top surfaces (figure 50). To hold the stringers in place, toenail spikes through the stringers to the mud sills or drive No. 4 rebar through holes in the stringers.
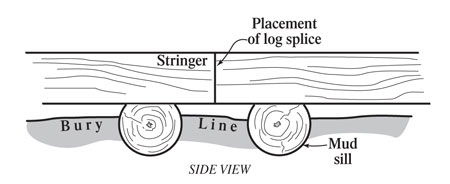
Figure 50—When using logs, notch the mud sill—not the stringer.
Don't notch
the sill more than one third of its diameter.
Next comes the decking. Decking pieces are fastened perpendicular to the stringers. The decking thickness will vary, depending on the loads the structure will need to support. Decking can be as short as 460 millimeters (18 inches) for a limited-duty puncheon for hikers. For stock or ATV use, decking should be 1.2 to 1.5 meters (4 to 5 feet) wide.
Do not spike decking to the center stringer, if you have one, because center spikes may work themselves up and become obstacles. Leave at least a 20-millimeter (¾-inch) gap between decking pieces to allow water to run off (figure 51). Decking should be placed with tree growth rings curving down. This encourages water to run off rather than soak in and helps to prevent cupping.

Figure 51—Place the stringers far enough apart to support
the full width of the
decking.
Running planks are often added down the center for stock to walk on. Often the running planks are untreated because horseshoes wear down the plank before wood has a chance to rot. Do not leave gaps between running planks because they can trap mountain bike or motorcycle wheels.
Curbs, also called bull rails, should be placed along each side of the puncheon for the full length of the structure to keep traffic in the center. To provide for drainage, nail spacers between the curb logs and the decking.
Finally, a bulkhead (sometimes called a backing plate) needs to be put at each end of the structure to keep the stringers from contacting the soil (figure 52). If the plate stays in place, do not spike it to the ends of the stringers. Spiking causes the stringers to rot faster.

Figure 52—Place a bulkhead or backing plate at each end
of the puncheon. Approaches
should have a rising grade so
water will not run onto the structure.
Subsurface puncheon is used in standing water or bogs. It is constructed with mud sills, stringers, and decking flush with or under the wetland's surface. This design depends on continual water saturation for preservation (figure 53). Moisture, air, and favorable temperatures are needed for wood to rot. Remove any one of these and wood won't rot. A good rule for reducing rot is to keep the structure continually dry or continually wet. Totally saturated wood will not rot because no air is present. Cover the surface between the curb logs with a layer of gravel, wood chips, or soil to help keep everything wet (figure 54).

Figure 53—Cover the tread surface between the curb rails with
gravel, wood
chips, or soil to keep everything wet,
preventing decay.

Figure 54—Subsurface puncheon covered with soil and rock.
Corduroy is basically a primitive type of puncheon. It consists of three or more native logs laid on the ground as stringers with logs laid side-by-side across them and nailed in place (figure 55). Corduroy should always be buried, with only the side rails exposed. Corduroy is notorious for decaying quickly and consuming large amounts of material. It should be used only as a temporary measure and is not recommended for new construction. The use of corduroy may indicate that your trail has been poorly sited.
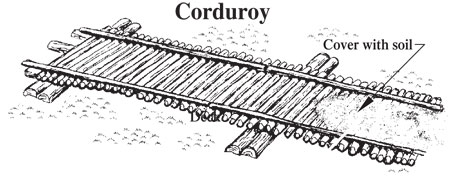
Figure 55—Corduroy should be considered a temporary fix
until a more permanent
structure can be installed.