
Chapter 10—Securing Horses and Mules—Continued
Trail and Corral Gates
Gates must be wide enough to allow riders, stock, and loads to pass through without rubbing. The minimum width for trail gates is 5 feet (1.5 meters), and the minimum width for corral gates is 4 feet (1.2 meters). A 6-foot- (1.8-meter-) wide gate is easier to use when riders are leading stock (figure 10–21). Standard, prefabricated gates are available in 4 and 6 feet widths, while 5-foot gates generally must be custom built. Trails often have standard 6-foot prefabricated gates because they cost less than 5-foot custom gates.

Figure 10–21—The bulky loads carried by packstock require
relatively wide gate openings.
Gates for Arenas and Round Pens
The minimum recommended gate width for arenas and round pens is 12 feet (3.6 meters) to allow access by maintenance vehicles. Large gates may be awkward for riders to open and close when they are leading an animal. To avoid installing a single, heavy gate consider installing two, 6-foot (1.8-meter) gates, or a 12-foot gate for vehicles with an adjacent 6-foot gate for riders (figure 10–22).

Figure 10–22—This arena can be accessed through
a large or a
small gate.
Gate Designs
Stock perceive narrow gates, or those that don't swing completely open, as tight spaces and may move too quickly through them for safe passage. Gates that swing freely in and out of the enclosure are the best. Gates should be easy to open and close with one hand—riders should not have to pick up a gate end and carry it. Once opened, gates should stay open long enough to lead an animal through them. A gate that unexpectedly swings closed against an animal can startle it. Self-closing gates that close too quickly can snag packs, loads, and reins in the closing device. Many riders dismount, hold the self-closing gate open with one hand, and awkwardly maneuver the animal through with the other hand. Sometimes, another rider dismounts and holds the gate open as others pass. To remedy such problems, install a large hook and an eye bolt to hold the gate open.
Gate Materials
Construct gates from smooth fence materials, such as steel, to discourage stock from rubbing against them and straining the hinges. The ideal gate is strong and lightweight—heavy gates frequently sag (figure 10–23) over time. Gates made of wood rails or lumber are heavy, especially if they span more than 5 feet (1.5 meters). Wood gates longer than 5 feet will require frequent maintenance. A premanufactured gate made of steel tubing is a sturdier option that will require less maintenance (figure 10–24). Prefabricated farm gates made with formed flat steel or standard aluminum livestock gates are not safe for horses and mules. When a horse gets a leg caught in a gate made with these materials, the rolled edges can open, injuring the animal as it tries to pull free. The lightest gate material is chain (figure 10–25). When gates are made of wire mesh, a structural frame of steel or vinyl is recommended for stability and ease of use.

Figure 10–23—Wood corral gates are heavy and can sag over
time. This corral has rails attached to the outside of posts. A horse
could pop the rails loose by leaning against them.

Figure 10–24—Premanufactured tubular steel gates are lighter
and less likely to sag than wood gates.

Figure 10–25—Chain gates are simple and effective. Some riders
do not like them because a horse or mule may get its head or hoof
caught in the large openings.
Gate Safety
A safe gate doesn't have sharp edges or protrusions that can cut stock. Figure 10–26 shows an attempt to repair a damaged gate with baling twine, unacceptable for recreation sites. Grind smooth or round all gate corners. Otherwise, curious or playful stock may hurt themselves. Although most tubular steel gates have safe, rounded bottom corners, some have sharp ends on the vertical tubes that can cause serious injury if an animal catches a hoof or leg under the gate. Maintain gates regularly.

Figure 10–26—Baling twine provides a temporary—and possibly
unsafe—field fix for a broken gate. Schedule regular inspection
and maintenance for gates and fences in recreation sites.
Gateposts can support a heavy swinging gate if the posts are set in concrete. Minimize the gaps between the gate and the gateposts, so swished tails won't get caught. Gates should fit closely to the posts, with clearance only for hinges. Make sure the upper hinge pin on horse gates made from pipe or tube is placed correctly. If the pin is set too low, stock can rear up and catch a front leg or hoof between the gate and the gatepost. Minimize the hazard by placing the upper hinge pin as high as possible on the gatepost. Avoid gates made from portable fence panels that have a bottom rail at ground level. When the ground erodes away from the base of the rail, stock can trip or wedge a hoof between the tube and the ground. If these gates must be used, they require regular maintenance.
Accessible Gates
Accessible shared-use trails must have gates that meet ADA/ABAAG requirements. Because gates that can be opened from horseback may not meet pedestrian accessibility requirements, consider installing two separate gates, one for riders and one for other trail users, including people in wheelchairs. Figure 10–27 shows a horse-friendly road gate combined with an accessible kissing gate. This gate and the gates in the following examples don't have latches. These gates would be suitable for trail installations, perimeter fences, and places where stock don't spend a lot of time. Gates without latches are not suitable for areas where horses and mules are confined, because they would figure out how to escape. The tread through accessible gates must meet the requirements for firmness and stability.

Figure 10–27—This prototype road closure gate has a kissing gate alongside.
The combination would allow stock, pedestrians, and people who use
wheelchairs to pass, while still restricting many motor vehicles. For long
description click here.
In 2006, MTDC developed a prototype equestrian kissing gate without a latch that is accessible to people in wheelchairs. Kissing gates, a half-round or V-shaped fence with a hinged gate, are used in the United Kingdom to confine livestock while allowing people to pass. The gate opens by pushing from either side, and closes when it hits the fence on either side. When the gate is pushed partially open, a gap allows a single person to pass through. The prototype MTDC gate combines a horse stile with a traditional kissing gate design (figure 10–28). This gate is appropriate where motor vehicle use is not allowed, because the gate combination restricts the passage of most OHVs and motorcycles.

Figure 10–28—A combination horse stile and accessible kissing gate. For
long description click here.
In Utah, the Bureau of Land Management and the Forest Service use a dual-purpose V-gate (figure 10–29) that has an opening at the bottom wide enough to allow wheelchair access. The opening flares at the top to allow loaded packstock to pass. The gate blocks use by OHVs with four wheels, but doesn't restrict smaller vehicles, such as bicycles or motorcycles.

Figure 10–29—A V-gate for stock and pedestrians. For long description
click here.
Figures 10–30 and 10–31 show another gate that discourages motor vehicles while allowing access for stock and wheelchairs. It is a modified chicane—double bend—design that incorporates an L-shaped leg off the main rail fence. To be accessible, the dimensions at the right turn must allow a 60-inch (1524-millimeter) turning radius for a wheelchair, which may permit passage by some small OHVs.
Resource Roundup
Accessible Horse Gates
For more information on the accessible gates developed by MTDC, refer to Accessible Gates for Trails and Roads (Groenier 2006) at http://www.fs.fed.us/t-d/pubs/htmlpubs/htm06232340. This site requires a username and password. (Username: t-d, Password: t-d)

Figure 10–30—Chicanes use tight turns to prevent unauthorized
use. The entrance to this modified chicane is immediately left of
the signs.

Figure 10–31—The dogleg design of a chicane
restricts some trail
users.
Gate Latches
When it comes to latches and gates, one size does not fit all equestrian situations. Gates along trails should have latches that can be opened from horseback. Corral gates and latches should open easily from ground level because riders generally dismount before leading stock into corrals. Arena gates are a slightly different situation. Many riders prefer to ride into arenas, and they appreciate latches that can be opened from horseback.
Suitable equestrian gate latches must be horseproof—strong enough to give an equestrian peace of mind and complex enough to withstand exploration by a mule's prehensile lips. The latch and gate should be easy to operate with one hand because riders need the other hand to control their mount. A bored or lonesome animal may spend hours methodically moving a latch back and forth with its teeth or lips until the device breaks or releases. If a 2-year-old child can open a latch, a determined horse or mule probably can open it. To deter curious stock, choose horseproof hardware or shield the latch with an overhanging cover. Horseproof latches are optional on gates where stock are not confined for long periods, such as a trail gate designed to restrict motor vehicles while allowing pedestrians and riders to pass.
Premanufactured metal gates commonly include a slotted steel plate and a length of chain welded on the gate panel. The chain wraps around the gatepost and slips into the slot (figure 10–32). Opening the gate is relatively easy with one hand, but closing it requires two hands to wrap the chain around the gatepost. This style is common in ranch country, but many horses and mules can open such gates. To prevent stock from escaping, wrap the chain around the post and use a strong snap to secure the chain.

Figure 10–32— Premanufactured
gates often come with
a slot latch and chain
to wrap around the
gatepost. Attaching a
sturdy snap that can
be hooked back into
the wrapped chain
prevents most curious
horses and mules from
letting themselves out.
The most secure latches generally are made of metal, and many are lockable. Horse-resistant latches may employ a sliding male hook or bar that fits into a female opening or sleeve. Some include a metal chain secured with a pressure snap that stock can't operate.
Mounted riders generally can open gates equipped with double-piston, pull-rod, or spring-lever latches without dismounting. Place latches used by mounted riders about 5 to 6 feet (1.5 to 1.8 meters) above the tread.
Horse Sense
Latching the Gate
Some effective and easy-to-use latches for horse gates include:
- Figure 10–33 is a lockable latch that comes with a self-latching strike plate. It is almost impossible for a horse or mule to open this latch.

Figure 10–33— This galvanized
latch is horse
resistant.
- Figure 10–34 is a latch that opens easily with one hand from horseback or from the ground. It is rustproof, frostproof, and is difficult for stock to open.

Figure 10–34— This galvanized
latch is easy to open
with one hand, even
from horseback. —Courtesy of Ramm
Fence Systems, Inc.
- Figure 10–35 is a latch that opens with one hand from horseback or from the ground. When the latch is open, it allows the gate to swing both ways. When the latch is closed, it supports the gate. This latch is designed for gates with tubes that have an outside diameter of 1 5⁄8 to 2 inches (about 42 to 51 millimeters).
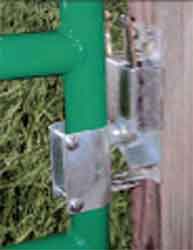
Figure 10–35— This latch allows the
gate to swing both
ways, can be opened
from horseback, and
supports the closed
gate. —Courtesy of
Co-Line Welding, Inc.
- Figure 10–36 is a self-latching unit that mounts on the post rather than on the gate. It is operated from horseback or from the ground. The gate can be pulled or pushed open by pressing down on the rod. Lifting the rod up and giving it a half turn locks the latch in place, foiling curious stock.

Figure 10–36— Pushing down on
this adjustable latch
while pushing or
pulling opens the
gate. —Courtesy
of HiQual
Manufacturing.
- Figures 10–37, 10–38, and 10–39 show some handmade latches that can be operated from horseback.

Figure 10–37— This rustic wood
gate opener has
a lever that can
be operated from
horseback.

Figure 10–38— Pull-rod latches
allow riders to
open gates without
dismounting.

Figure 10-39— A spring-lever latch must
be placed appropriately to be used from
horseback.
Accessible Latches
Gates and latches designed to accommodate all riders, including riders who have disabilities, add tremendously to overall trail accessibility. To be accessible, latches must comply with the ADA/ABAAG requirements—operating mechanisms must be operable with one hand without pinching, tight grasping, or twisting the wrist and cannot require more than 5 pounds (2.3 kilograms) of force to operate.
Resource Roundup
Prototype Latch
In 2006, Hamilton Hinge Co. worked with MTDC to develop a prototype gate latch that keeps stock in and also provides access for people with disabilities (figure 10–40). The gate swings both directions and can be reached from a wheelchair. Dexterous riders can open the gate from horseback with their foot. Figure 10–41 shows a guard ring that can be added to discourage animal exploration. Because some clever mules and horses may be able to open this latch, avoid using it on corrals or other areas where stock are confined for long periods. This latch is best suited to trail or perimeter gates where stock have little opportunity to investigate the mechanism. For more information, refer to Accessible Gate Latch (Groenier 2006) at http://www.fs.fed.us/t-d/pubs/htmlpubs/htm06232331. This site requires a username and password. (Username: t-d, Password: t-d)
Figure 10–40— Depressing the plate
while pushing the gate releases this
prototype accessible latch. Some riders
can open the gate from horseback
using their foot to depress the plate.

Figure 10–41—Adding guard rings
on the gate frame confounds most
escape attempts by stock. Because
some clever horses and mules still
may be able to open this latch,
it is best suited for gates inside
an area that also has a perimeter
fence.
Tethering Devices and Enclosures
The most common methods for securing stock within a facility and at camp units are tying them to something solid or placing them in an enclosure. The most suitable method depends on the length of time the horse or mule is confined and the individual animal's personality. Preferences vary widely among riders.
Riders use the terms hitching or tethering to describe tying their stock. Preferred tether anchors in recreation sites include highlines, tie loops on horse trailers, and hitch rails. The most common horse enclosure in a developed recreation site is a corral, which is suitable for overnight use. Two other enclosures—arenas and round pens—are used for exercising or training horses. Generally, they are not used for confining stock at recreation sites.
No method of tethering or confining a horse or mule is absolutely secure. Anytime an animal is tied to something or confined, there is risk of escape or injury. Inadequately anchored objects may be pulled out of the ground or broken. An animal may work a knot loose, or it may get a leg or head caught in a rope and injure itself. When a horse or mule is confined, it may push through a barrier, worry a latch and open the gate, or get a leg caught in the rails or wires. All confinement options have advantages and disadvantages. To minimize problems and hazards, design facilities so stock can be monitored easily.
Hitch Rails
Hitch rails—also called hitching rails or tethering rails—allow riders to secure horses or mules for relatively short periods. Riders tie the lead rope around the hitch rail to restrain the animal. Riders appreciate hitch rails near toilet buildings and information stations. Another good place to install hitch rails is near water hydrants. Doing so minimizes the distance handlers have to carry water buckets for stock. Allow at least 25 feet (7.6 meters) between the hitch rail and the hydrant to keep animal waste away from the water source.
Install hitch rails at trail access points so riders can tie their stock up before and after outings. Hitch rails midway on trails longer than 8 miles (12.9 kilometers) allow riders to secure their stock during short breaks.
Hitch rails are not needed:
- In trailhead parking areas if parking spaces are
large enough to accommodate stock tied to trailers
- At camp units with permanent corrals
Provide hitch rails if portable panels are used for enclosures, because portable panels are not strong enough for tethering stock.
Hitch rails commonly are constructed of wood or steel. Wood rails are suitable for low and moderate levels of development—however, stock may chew on them, causing damage (figure 10–42). Common steel hitch rails range from 4 to 10 feet (1.2 to 3 meters) long. A hitch rail that is 4 feet long generally has space for one animal tied on each side. A hitch rail that is 10 feet long accommodates three animals—two animals on one side (one animal near each end of the rail) and the third animal tied to the opposite side in the middle of the rail. This allows a comfortable distance between the three animals. However, because stock can touch noses, it is best that the animals know each other and get along well. The extra-long hitch rail shown in figure 10–43 is frequently full during hunting season.

Figure 10–42—Because stock chew on wood hitch rails, the
crossmembers eventually weaken.
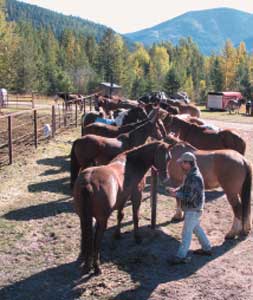
Figure 10–43—Hitch rails come in a variety of lengths
to accommodate the number of stock expected. This
unusually long hitch rail is at a trailhead that is heavily
used during hunting season.
The recommended height for hitch rails is 42 inches (1,067 millimeters). This height is good for both riders and stock when lead ropes are tied properly. To avoid injuries, round the corners of hitch rails (figures 10–44 and 10–45). Properly designed hitch rails don't allow a lead rope to slide from the horizontal rail down the upright posts. If this happens, the animal could easily step over the rope and tangle its front legs, a setup for panic and injuries. Crossmembers may be installed at each end of the rail (figure 10–46) to keep the rope from sliding down or tie rings could be installed on the rail. When lead ropes are tied to the rings, they can't slide along the length of the rail. Lead ropes tied to the long, overhanging ends of the hitch rail shown in figure 10–47 may slide off, releasing the stock.


Figure 10–45— Welded steel loops prevent lead ropes
from sliding along this hitch rail.

Figure 10–46—The braces in the corners of this hitch
rail confine lead ropes to the horizontal bar and make
it a good design choice. However, this site would be
more horse friendly without the raised curb, large loose
rocks, and encroaching vegetation.

Figure 10–47—Because the overhanging ends on this hitchrail
are so long, some riders may tie stock there. Lead ropes could
slide off the open ends, leaving stock loose.
For safety, provide a level area around hitch rails that is free of vegetation or other obstacles (figure 10–48). See figure 10–46 for an example of a well-designed hitch rail that is not popular because a raised curb, large rocks, and encroaching vegetation prevent stock from being tethered on one side. Riders do not use the hitch rail shown in figure 10–49 because the ground is uneven, and the signs, bollards, and rocks nearby are dangerous for horses and mules. Figure 10–50 shows a hitch rail with a suitable cleared area. Because hitch rails may be in high traffic areas, it is wise to add suitable surface material such as aggregate.

Figure 10–48—The minimum wearing surface recommended at a hitch rail.
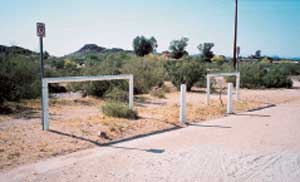
Figure 10–49—Signs, bollards, and an uneven surface would
make these hitch rails unpopular with many riders.
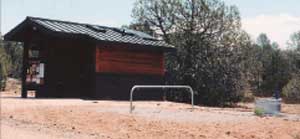
Figure 10–50—Areas near toilet buildings are excellent places
to install hitch rails. Provide plenty of clear space around the
hitch rails. This rest area also includes a horse trough nearby, a
welcome amenity.
Hitching Posts
A hitching post is a variation of a hitch rail that has a single, solid upright with a ring attached near the top (figure 10–51). Riders tie the lead rope to the ring. While hitching posts save space, they have several drawbacks—they only accommodate one horse or mule at a time, and the animal can circle the post, wrapping the lead rope. Use other tethering devices in recreation sites.

Figure 10–51—Stock tied to
hitching posts tend to move in
circles, wrapping the lead rope,
restricting their movement, and
possibly injuring themselves.
Trailer Ties
Some riders prefer tying stock to the side or end of a horse trailer in such a way that the animals can eat, drink, and lie down (figure 10–52). When animals are nearby, riders who sleep in the horse trailer or towing vehicle can keep an eye on their stock. Access to equipment, feed, and supplies is also convenient. To allow riders to tie their stock to trailers, design extra length and width into parking pads and parking spaces. Consult Chapter 8—Designing Roads and Parking Areas and Chapter 9—Designing Camp and Picnic Units for more information.
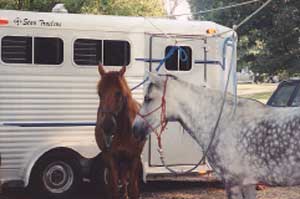
Figure 10–52—Riders frequently anchor highlines to their horse
trailers. —Courtesy of Kandee Haertel.
Stock tied to a trailer can only move sideways 180 or 270 degrees. They can untie themselves, catch their heads or a leg in the lead rope or under the trailer, or injure themselves on sharp, protruding objects. Stock tied to trailers require close monitoring.
Highline Ties
Some riders prefer tethering stock to a highline, also called a tethering line or picket line. A highline is a rope stretched taut between two secure uprights above the animal's head. The stretched rope has tie loops spaced for securing stock with lead ropes. Sturdy trees often are used as anchors for highlines (figure 10–53). When trees are not available, posts set in concrete may serve as uprights (figure 10–54). Riders sometimes park their horse trailers parallel to each other and stretch a rope between them. This is feasible only in locations with double-party or several-party parking pads or group parking areas. Many riders prefer highlines because their stock can move 360 degrees. Highlines are easy to carry and install, and they are an option for stock that shouldn't be confined in corrals.

Figure 10–53—A highline allows stock substantial freedom of
movement. Care must be taken to protect surrounding vegetation
and ground surfaces.
—Courtesy of Kandee Haertel.

Figure 10–54—To be effective, highlines must be stretched taut.
A hand winch helps to apply enough tension.
Highlines require a cleared area of at least 32 feet (9.8 meters) wide by 24 feet (7.3 meters) deep to accommodate two animals (figure 10–55). Plan the location of the cleared areas to avoid sensitive soils. Refer to Chapter 13—Reducing Environmental and Health Concerns for more information on soils. Protect the vegetation, too—hungry or curious stock may devour edibles within 12 feet (3.7 meters) above the cleared space and within 7 feet (2.1 meters) to the side. Trees or branches anchoring highlines should be at least 1 foot (0.3 meter) in diameter. Permanent posts with sturdy tie hooks can be installed for highlines. Securely weld or bolt the tie hooks to the posts.

Figure 10–55—A horse area with a highline suitable for two animals.
In areas that are not prone to vandalism, managers may provide ropes for highlines. However, most riders prefer to bring their own ropes. Install a highline by stretching a suitable rope tightly between the trees or posts, about 7 feet (2.1 meters) above the ground (figure 10–56). Suitable ropes include a ½-inch (12.7-millimeter) multifilament polyesterplus-hemp rope or 3⁄8-inch (9.5-millimeter) poly Dacron rope. Using 2-inch- (51-millimeter-) wide, flat tree-saver straps (figure 10–57), or an equally wide padded rope, helps prevent damage to trees. Fixed tie loops should be at least 12 feet (3.6 meters) apart. The outside loops should be at least 10 feet (3 meters) from trees or posts. At this distance, the animal's heavy front quarters are away from the tree, minimizing soil compaction on tree roots. Do not use metal cables and connectors with metal uprights, as they can be targets for lightning strikes.
Resource Roundup
Don't Fence Me In
Learn more about tree-saver straps, animal hobbles, pickets, and other time-honored equipment in Techniques and Equipment for Wilderness Travel with Stock (Stoner and others 1993), available at http://www.fs.fed.us/t-d/pubs/htmlpubs/htm93232839. This Web site requires a username and password. (Username: t-d, Password: t-d)

Figure 10–56—A highline attached to trees.

Figure 10–57—Highlines can be quickly set up using
tree-saver straps and a rope.
Corrals
Some campers like the security of keeping their stock in corrals, especially riders who have a corral at home. Stock have maximum freedom of movement in corrals, and riders don't have to monitor their stock as frequently. Of all the options presented in this chapter, well-designed corrals that include suitable gates and latches are usually the best choice for recreation sites.
Most stock want to roll on their backs after a workout. If they don't have adequate space to roll in corrals, they can cast a leg or hoof—get it stuck—in the rails. A 12- by 12-foot (3.6- by 3.6-meter) corral is the minimum a larger animal needs to roll, move, and turn around. It also provides enough space for a horse or mule to escape an aggressive animal in an adjoining corral. Where space allows, a 12- by 16- foot (3.6- by 4.9-meter) corral is preferred. Locate corral posts at every corner and midway on each side (figure 10–58). Place posts every 6 feet (1.8 meters) in 12-foot corrals, and every 8 feet (2.4 meters) in 16-foot corrals.

Figure 10–58—Dimensions for a single corral set. A single
corral set holds two animals.
The greatest cost and space efficiencies are achieved when two 12- by 12-foot (3.6- by 3.6-meter) or two 12- by 16-foot (3.6- by 4.9-meter) corrals share a side, forming a corral set (figures 10–59 and 10–60). A drawback to corral sets is that the adjoining enclosures can only be used for compatible stock. Horses or mules that fight, kick, and bite should not be confined adjacent to other stock. It is the rider's responsibility to minimize aggression between stock. This may mean segregating aggressive horses or mules by tying some to the horse trailer. To avoid aggressive horse behavior, build no more than two adjoining corrals in a set. Construct multiple corral sets instead of additional adjoining corrals. Corral sets should be located far enough apart that penned stock can't reach each other.

Figure 10–59—The area required for a single corral set.

Figure 10–60—Two horses relax in a single corral set. Water
buckets are tied to the lower rail.
—Courtesy of Janet Grove.
A single-party camp unit usually includes one corral set. Two corral sets are installed for a double-party camp unit, and three to four are supplied for a several-party camp unit. The number of corrals to include in a group unit depends on the anticipated use and the available space. If there are more than two corral sets, arrange them in a row. Separate corral sets by 10 to 12 feet (3 to 3.6 meters). If space is not available for multiple corral sets in a row, arrange them as shown in figure 10–61. Stock may be uncomfortable walking down the center aisle when there are unfamiliar stock on both sides, so don't install corral gates facing the aisle.

Figure 10–61—Corral placement for a horse area with four corral sets
that are not placed in a row. Four corral sets hold eight animals.
Related Facilities—Arenas and Round Pens
Riders frequently use round pens (figure 10–62) to exercise a high-strung animal before a ride, and to cool an animal down afterward. Round pens also offer a safe place for stock to roll. Round pens are appropriate for areas with high levels of development but are not essential at trailheads or in campgrounds.

Figure 10–62—A round pen is convenient for exercising stock
before and after a ride. When setting up portable panels,
connectors need to hold the panels close together. Install the
connectors carefully—a large gap could trap a horse's leg.
Arenas are spacious fenced areas that provide a comfortable setting to train or exercise stock, teach riding lessons, or hold group events (figure 10–63). In many cities, recreationists use a trailhead much like a community park, and an arena may be appropriate.

Figure 10–63—Group events and equestrian training sessions
often are held in outdoor arenas.
Size and Location
The minimum diameter for round pens that allow riding is 60 feet (18.2 meters). If the pen is smaller, it impedes the natural movements of a horse or mule moving faster than a walk. Suggested dimensions for a multipurpose arena are 100 by 200 feet (30.5 by 61 meters). Round all arena corners (figure 10–64). This allows smooth riding when riders are working their stock, and just as with perimeter fences, prevents stock from being trapped in corners. Because activities in arenas and round pens are likely to excite nearby stock, locate these facilities in isolated but convenient locations. Choose sites with dry, welldrained soil.

Figure 10–64—It is more comfortable to exercise
an animal in a
round enclosure.
Grade
Arenas and round pens must be reasonably level with enough slope to allow drainage. Crown the subgrade in the center and incorporate a 1-percent slope from the centerline to all sides. If the surface is not crowned, slope it 2 percent from one side to the other. For an arena or round pen to be functional year-round, regular maintenance is required. The surface needs to be dragged weekly, monthly, or quarterly, depending on frequency of use. The surface—or footing material—should be replaced every 5 to 10 years.
Dust Prevention
Activity in arenas and round pens can create dust that is unhealthy for stock, riders, and other people in the area. When water is available, a sprinkler system can effectively control dust. Install sprinkler heads that meet plumbing pressure requirements and provide complete and even coverage (figure 10–65). For the safety of arena users, install sprinkler heads where arena users or stock won't trip over or run into them. Common placements include the top rail or ground level adjacent to posts. For convenience and efficiency, allow users to control the sprinklers with a timer. Alternatives to plumbed sprinklers include portable water sprayers and dust abatement products.
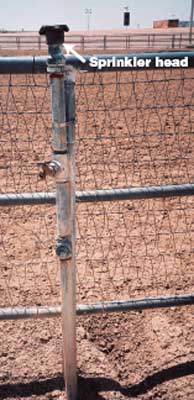
Figure 10–65—Sprinkler heads can be
placed on the top fence rail. Another
popular location is at ground level.
Regardless of the location, the sprinkler
heads should be placed so they are not
hazardous to riders or stock.
Resource Roundup
Best Hoof Forward
The ideal surface for arenas and round pens provides a cushion, is dust-free, and doesn't abrade horses' hoofs. Existing soil and slope characteristics should be evaluated, and a mix of footing materials applied over a base. The most suitable base and footing materials depend on the planned activities—for example, rodeo or jumping activities require different materials than cart driving or miniature horse activities. The Equine Arena Handbook (Malmgren 1999) applies soil science to footing materials. Underfoot (United States Dressage Federation 2007) addresses construction and maintenance of arenas.
Lighting
In areas with high levels of development, lighting may be appropriate for arenas and round pens. To minimize light pollution and maximize energy efficiency, install a timer that allows users to control the lights when needed. Properly selected fixtures reduce environmental impacts and minimize the spread of light into surrounding areas. For best results, have a lighting consultant or engineer design the system.
