  |
 |
Technology & Development Center |
| August 2007 | 7300 | 0773-2322-MTDC |
Richa Wilson, Intermountain Regional Architectural Historian
Kathleen Snodgrass, Project Leader
This tech tip is the third in a series about innovative building materials developed in the first half of the 20th century and commonly used in Forest Service buildings. The series will help you identify materials by describing their histories, manufacture, and physical characteristics. It will also address common problems and provide guidance on maintenance, repair, and replacement.
As noted in the first tech tip in this series, "Early 20th-Century Building Materials: Introduction" (/t-d/pubs/htmlpubs/htm06732314/ Username: t-d Password: t-d), from the earliest days the Forest Service encouraged the use of wood-based products in its facilities. Thanks to this policy—along with the local availability of milled lumber—early ranger stations often had floors of tongue-and-groove boards finished with varnish or paint. Linoleum was acceptable, if funds were available, because it contained wood byproducts.
The Washington Office's "Improvement Handbook" (1937) recommended linoleum for kitchens, bathrooms, and offices where easily cleaned and durable floors were desirable. Linoleum was also preferred as a covering for sink drainboards, as noted in "Principles of Architectural Planning," published by the Washington Office in 1938. Other resilient flooring of the early 20th century was made of asphalt, cork, rubber, and, in some cases, asbestos. In the 1950s, the use of vinyl flooring became increasingly common because of its lower cost and ease of installation.
Linoleum was the first resilient flooring to be developed. Linoleum was an improved version of earlier floor coverings known as oilcloths. Use of oilcloths on floors began in Europe in the early 1700s. These rug-like floor coverings, made of heavy cloth (usually canvas) and often painted in bright patterns, were treated with oil or wax to make them water resistant.
Frederick Walton of England patented linoleum in 1863 and began producing it in the United States a few years later. The ingredients of linoleum—oxidized linseed oil, ground cork or wood, powdered pigments, and organic resins—have changed little since then. These materials were combined to form a uniform layer on burlap or canvas backing. Linoleum was used as a covering for floors, walls, and countertops. It was most popular in sheet form, although it was cut and sold as tiles also. Typically, it was glued to a felt underlayer to minimize cracking and buckling caused by the expansion and contraction of the wood floor or subfloor over which it was laid.
During the early 1900s, linoleum commonly was produced plain, or in jaspé, marbleized, printed, and inlaid patterns. Plain linoleum was one solid color with no pattern. The thickest grade (1⁄8- to ½-inch thick) of plain linoleum was often used on ship decks, so it became known as battleship linoleum. Battleship linoleum was usually manufactured in brown, gray, tan, or green hues. Often it was specified for Forest Service facilities because of its superior durability.
Jaspé and marbleized patterns were more decorative than plain linoleum. They were characterized by streaks of color running in one direction (jaspé, figure 1) or with no distinguishable direction (marbleized, figure 2).

Figure 1—This jaspé pattern flooring has many dents
and stains from
years of use in the cookhouse at
the Fenn Ranger Station (Nez Perce National
Forest, Northern Region), but it is still serviceable.

Figure 2—This marbleized pattern linoleum flooring has developed
cracks. Small nails secure the flooring to the subfloor.
Linoleum was often printed or inlaid with floral designs and geometric shapes, including patterns that imitated brick or stone. Printed linoleum, with its block-stamped patterns, could be quite intricate. However, the printed colors were susceptible to wear if they were not sealed regularly with wax (figure 3).

Figure 3—This linoleum flooring is holding up fairly well, but
the printed
pattern is scratched and worn.
Inlaid linoleum was more durable and expensive than the printed type. Inlaid patterns were less varied because the manufacturing processes were labor-intensive. One process involved cutting pieces of different colors of linoleum and fitting them together like a puzzle. Pressure and heat were used to bond the pieces together on a burlap backing. The second process used granules of linoleum that were stenciled in patterns onto burlap and bonded with heat, producing mosaic-like designs without definite edges.
Linoleum was common in Forest Service buildings constructed during linoleum's heyday in the early 20th century. Linoleum is often confused with vinyl flooring, a material with very different qualities that are explained in the "Asphalt and Vinyl Flooring" section below.
Felt-base flooring was introduced in 1910 as a more affordable alternative to linoleum. Asphalt-saturated felt was printed with oil paint designs. Although felt-base flooring looks a lot like printed linoleum, it was cheaper and did not have a woven fabric backing. The best known of these felt-base flooring products was called Congoleum (figure 4), because the asphalt materials used to make it came from the Belgian Congo (now the Democratic Republic of Congo) in Africa. Originally Congoleum was made in 3-foot wide sheets with a faux wood finish. By the 1910s, Congoleum "rugs" (large printed sheets with borders) became popular for high traffic areas such as kitchens. Today, the Congoleum Corp. produces a wide variety of resilient flooring products, most of which are made from vinyl.
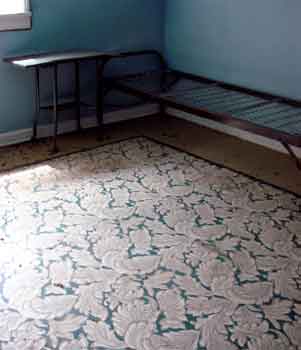
Figure 4—This intricately patterned, felt-base Congoleum "rug" protects
the middle of the painted softwood floor of a bedroom at the Warm River
Hatchery (Ashton-Island Park Ranger District, Caribou-Targhee National
Forest, Intermountain Region). The Congoleum is in very good shape. The
floor is spotted with flies that accumulated over the winter and have not
yet been swept from the seasonal-use building.
The differences between felt-base and linoleum flooring diminished in 1937 when Armstrong started manufacturing Linoflor, which was printed linoleum on a felt backing. Shortages of burlap during World War II further blurred distinctions between products. Then, as now, the term linoleum was commonly used to refer to either true linoleum or asphalt-saturated felt flooring.
Cork flooring is a resilient relative of linoleum made with cork chips. The chips, ground less finely than the cork used in linoleum, were pressed into molds and baked. This process melted the cork's natural resins and created a homogenous material. After World War II, manufacturers commonly added resins to strengthen cork tiles.
Initially, cork flooring, often known by brand names such as Kencork, Linotile, and Corkoustic, was sold unfinished. Consumers were advised to sand and wax or seal the installed floor. By the 1920s, the product was made with a partial finish for improved resistance to moisture and dirt, although suppliers still advised consumers to wax the floors.
Cork flooring, desired for its warmth and sound-deadening qualities, was used from about 1900 to 1960. During the 1920s, it was particularly popular in International and Arts and Crafts style buildings.
Cork flooring was available in sheet form and as square, rectangular, and oblong tiles. Standard sizes of 6 by 6, 9 by 9, and 12 by 12 inches were most common. At first, colors were limited to various shades of brown. Other muted tints were produced later by adding pigments. Visual interest was achieved by inlaying contrasting shades to create a marquetry appearance. Tiles could be installed to create herringbone, mosaic, and parquet patterns.
In recent years, linoleum and cork flooring products have enjoyed revived popularity as "green" or environmentally sustainable materials.
Cork flooring, with its limited colors and characteristic cellular appearance, usually can be distinguished from linoleum and felt-base flooring quite easily. Distinguishing between the latter two can be more difficult because they look so much alike on the surface. One way to tell the difference between them is to look at the backing. Carefully peel up a corner of the flooring in an inconspicuous area, such as a closet. Burlap or canvas backing is a telltale sign of true linoleum. Asphalt-saturated felt backing is black and may show through the surface pattern in worn areas. While this is a sign of felt-base flooring, it could also indicate vinyl flooring (see the "Asphalt and Vinyl Flooring" section below). A search of historic records and/or laboratory testing may be needed for accurate identification.
Because some resilient flooring is difficult to identify, it is helpful to become familiar with patterns associated with certain materials. Numerous books and Web sites have photos of patterns commonly used on linoleum and feltbase flooring, especially the popular geometric and floral designs. See the "Books and Journals" section below and the linoleum page on the Secondhand Rose Web site at http://www.secondhandrose.com/linol/main.htm.
With regular maintenance, linoleum and cork flooring can last 50 years or more. Felt-base flooring is less durable, but maintenance is similar. Vacuum or sweep the flooring frequently to remove grit. The flooring can be damp mopped with a small amount of neutral pH soap like Ivory Snow or a specially formulated cleaner. Avoid abrasive and high-alkali cleaners such as bleach and scouring powders, because they will damage the surface of the flooring. After mopping, dry the flooring to remove excess water. The seams of linoleum and the surface of cork flooring are especially susceptible to water damage. After the flooring has dried, either apply and buff paste wax or apply an acrylic sealer.
To minimize indentations, install large-diameter, smooth, flat glides on furniture legs (table 1). Move furniture and appliances with care to avoid gouging the flooring.
If linoleum or cork flooring is bulging or peeling, the adhesive has probably failed. The flooring can be reattached with adhesive. A sandbag or other heavy object should be placed on the area while the adhesive cures.
There are several tricks to effectively readhering cork and linoleum flooring. For instance, linoleum becomes brittle with age as the linseed oil oxidizes. Use a hair dryer or iron to heat linoleum, softening it, before carefully peeling the edges back to apply adhesive.
Use a large syringe, available from veterinary supply stores, to inject adhesive underneath bulging sections of flooring. Slit the center of the bulge in linoleum flooring. With cork tiles, you can disguise the repair by making a short cut in a seam. Push the tip of a syringe into the cut to inject a water- or solvent-based adhesive under the tile.
There are several methods of patching worn, damaged, or missing areas of linoleum. If the design has worn off printed linoleum or felt-base flooring, touch up the flooring with acrylic paint, carefully matching the colors. Gouges can be patched with linoleum cement that has natural resins and linseed oil. You can make a patching paste with oil-based varnish and linoleum shavings (taken from an inconspicuous area) or sawdust. After the paste dries, finish it with matching oil-based paint topped with oil-based varnish. For larger areas, consider patching the flooring with pieces taken from less visible spaces such as closets.
Scratches in cork flooring may be repaired with light machine buffing. To patch holes or gouges, make a mixture of cork shavings and shellac. Protect the area around the gouge with masking tape. Press in the patching material and smooth it with a putty knife. Let the patch dry for about 30 minutes and then sand it with fine steel wool. You may need to apply clear varnish to make the patch blend in with adjacent cork.
Asphalt flooring, which usually contains asbestos as a mineral filler, was introduced in the 1920s and was manufactured in sheets and tiles. See the "Replacement" section for help dealing with flooring that might contain asbestos.
By the 1930s, asphalt flooring began replacing linoleum as a floor covering and, by the 1950s, was the most common flooring. Although asphalt flooring was initially offered in a dark color palette, later it was available in a variety of light and dark colors with striated, marbleized, and confetti patterns (figure 5). Standard asphalt tile was 1⁄8 to ¼ inch thick, while heavy-duty tile ranged from ¼ to ½ inch thick. Manufacturers offered an assortment of products including greaseproof, flexible, prewaxed, tempered, and reinforced tiles. Elastite and Accotile were two well-known brands of asphalt tile.
Figure 5—This asphalt tile flooring from 1951
has a darker band of tiles
around the edge
of the room for contrast and a plywood baseboard
that was
painted to look like the flooring.
Asphalt flooring was recommended for use on concrete floors below grade because it is not susceptible to deterioration from alkali that can leach out of damp concrete. Asphalt flooring was also used because of its resistance to fire and rot. Asphalt flooring is less resilient than linoleum or cork, making it noisier and easier to damage. Solvents such as oil, gasoline, and grease will damage asphalt flooring, making it soft and spongy.
Vinyl flooring received a lot of attention when it was introduced at the 1933 Century of Progress Exposition in Chicago, but wasn't used much until after World War II. By the 1950s, a new manufacturing method could produce endless patterns and colors of flooring. Vinyl flooring, available in sheet form or tiles (typically 9 by 9 and 12 by 12 inches, figure 6), soon captured a significant share of the market. Vinyl flooring continues to be popular for many reasons, including its low cost and its availability in a multitude of designs with an extensive color palette. It is very flexible, resists most solvents, and is easy to clean.

Figure 6—Although vinyl flooring can be manufactured
in almost any pattern
and color, this vinyl tile in
the Intermountain Regional Office (Ogden,
UT) is
patterned to resemble gray-and-white marble.
Vinyl asbestos flooring, such as Flintkote, was the only type recommended for floors that were below ground level. An adhesive such as bitumen was used to hold it in place. Vinyl laminate on an asphalt-impregnated felt or cork backing was available as tiles or sheets. It was sometimes called cushioned vinyl, but wasn't nearly as soft as the foam-cushioned vinyl flooring that became popular in the 1960s. Solid vinyl tile was introduced in 1945 and proved to be more durable (and expensive) than vinyl asbestos tile.
It is very difficult to distinguish between asphalt, vinyl, and rubber flooring based on the flooring's appearance (see section on "Rubber Flooring" below), especially when viewing striated and marbleized patterns. A simple way to distinguish the material is to test the flooring's resistance to solvents. Moisten a clean, white cloth with a solvent such as turpentine. Use it to rub the flooring in a small, inconspicuous area. Be sure to remove any wax before beginning the solvent test. Because vinyl flooring resists most solvents, its color will not show on the cloth. The color will transfer to the cloth if the flooring is asphalt or rubber. A search of historic records or laboratory testing may be needed to distinguish between rubber and asphalt flooring.
Sweep or vacuum asphalt and vinyl flooring regularly to remove grit. Clean flooring with a damp mop and neutral cleaner, such as water-based, "rinse-free" cleaners that do not leave a soapy residue.
Don't use solvent-based cleaners or waxes, including paste wax, on asphalt flooring. They can damage the flooring. Seal asphalt flooring with water-emulsion wax and buff lightly. Unless the flooring has a no-wax finish (available after 1962), seal vinyl flooring with wax or an acrylic finish (figure 7). Specialty cleaners and sealers are available from flooring companies.

Figure 7—This vinyl flooring in the Intermountain
Regional Office (Ogden,
UT) has been freshly
waxed and polished.
To minimize indentations, install large-diameter, smooth, flat glides on furniture legs (see table 1). Move furniture and appliances with care to avoid gouging the flooring.
Apply adhesive with a syringe or putty knife under areas where the flooring is cracked or peeling. Place a sandbag or other heavy object on the area until the adhesive has cured.
Rubber flooring was manufactured in the mid-19th century, but its use became more common after 1894 when Philadelphia architect Frank Furness patented a system of small, interlocking rubber tiles (figure 8). By the early 20th century, several companies were producing similar tiles in square, rectangular, and triangular shapes. Tiles typically measured 2 inches square, and they could be assembled in creative, colorful mosaics. Larger tiles became available in many sizes and often were laid in checkerboard, basketweave, and herringbone patterns. Vivid hues were available. Over time, striated and marbleized patterns became more common than solid colors.

Figure 8—Rubber flooring used in the early 1900s consisted
of
small, interlocking
tiles. The tile pattern shown in this
drawing
was patented in 1894 by
Philadelphia architect Frank Furness.
By 1924, rubber flooring was available in sheets. Because the sheets were only a few feet wide, their use was often restricted to corridors or borders. The "raised disc" slip-resistant type of sheet flooring was available as early as the 1950s and remains a popular choice for commercial applications today.
Natural rubber was used to make flooring until World War II, when synthetic versions were developed. Synthetic rubber soon proved to be more durable, more uniform, and less affected by oxidation. Typically, both types of rubber were mixed with fibrous materials such as asbestos or ground wood.
Although rubber flooring was more expensive than other resilient material, it was preferred for its pure colors, durability, sound-deadening properties, and ease of cleaning. Its flaws included susceptibility to stains and oxidation. Ultraviolet light also caused deterioration. Solvents such as turpentine softened and stained rubber flooring.
As mentioned previously, identifying rubber flooring can be difficult because it resembles vinyl and asphalt flooring. If a clean, white cloth moistened with a solvent such as turpentine does not take up the color of the flooring when it is rubbed in a small, inconspicuous, unwaxed area, the flooring is vinyl. The color will transfer to the cloth if the flooring is asphalt or rubber. A search of historic records or laboratory testing may be needed to distinguish between asphalt and rubber flooring.
Maintain rubber flooring by sweeping or vacuuming regularly and cleaning with a damp mop. Cool, clear water is preferred, although a mild soap such as Ivory Snow can be added if the flooring is particularly dirty. Avoid solvent-based cleaners, because they will damage rubber flooring.
Rubber flooring may deteriorate as it ages. Over time, the rubber dries out and the surface becomes brittle and dull. The aging process can be delayed and the flooring brightened by sealing it with a thin layer of water-based emulsion floor polish. Paste wax should be avoided because it contains solvents that can damage rubber.
To minimize indentations, install large-diameter, smooth, flat glides on furniture legs (see table 1). Move furniture and appliances with care to avoid gouging the flooring.
Reattach peeling or bulging rubber flooring with a multipurpose floor adhesive using the methods outlined earlier for linoleum. Place a sandbag or other heavy object on the area until the adhesive has cured.
Replacement should be considered a last alternative—not only from a preservation standpoint—but because resilient flooring, adhesives, and even underlayment may be asbestos-containing materials (ACM).
The MTDC "Facilities Toolbox" (/eng/toolbox/haz/haz02.htm) provides information about ACM in Forest Service facilities. The toolbox also explains that, under Forest Service regulations, the only Forest Service employees allowed to work with friable asbestos are the members of the Plumas National Forest's asbestos maintenance group. This enterprise team is specially trained and certified by the U.S Department of Labor Occupational Safety and Health Administration and by the U.S. Environmental Protection Agency to work with all types of ACM.
Friable asbestos crumbles easily and releases needlelike microscopic fibers that may hang in the air for weeks, allowing them to be inhaled and to damage workers' lungs and other organs. With proper training and equipment, Forest Service personnel can work with nonfriable ACM. Flooring is typically nonfriable as long as it remains in place and is not drilled, sanded, cut, or damaged. Asbestos fibers can be released when ACM flooring is removed, which is why special training is required.
The Resilient Floor Covering Institute recommends installing new flooring over existing floors following the manufacturer's instructions. This is the preferred method of dealing with damaged ACM flooring, because of the complexities of ACM regulations and the hazards of removal. Another option is to remove and patch damaged areas, leaving as much of the original flooring as possible.
If the floor must be replaced, determine whether ACM is present, because doing so early may save time and money in the end. Check engineering records for ACM inspection reports, many of which were completed for Forest Service facilities in the 1990s. If you don't find a report for your facility, send a sample of the flooring to a laboratory for inexpensive testing. Only properly trained employees or contractors may cut the sample.
Procedures followed by trained personnel allow a sample to be removed without exceeding OSHA's exposure limit (one asbestos fiber per cubic centimeter of air, averaged over 30 minutes). For more information, refer to the publication, "Recommended Work Procedures for Resilient Floor Covering," at http://www.rfci.com/int_ARF-TechInfo.htm.
If you remove resilient flooring, save and label a sample for archival purposes. Store the sample in an airtight container or heavy-duty bag with a label explaining where and when the flooring was removed. If the flooring is ACM, the sample must be double bagged and the label must say that the material contains asbestos.
When choosing new flooring, try to match the original color, pattern, and material. If it is no longer available or is extremely expensive, substitute materials may be used. For example, vinyl tile may be substituted for asphalt tile. Sheet vinyl may be used instead of felt-base or asphalt sheets. Linoleum is commonly available, although patterns have changed over the years. Consult with your heritage staff and State Historic Preservation Office to determine which substitutions are acceptable.
Several manufacturers offer commercial lines of flooring that replicate historic patterns and colors. Vintage linoleum is sometimes available at salvage yards or online auctions, although this may be an expensive option.
The following resources provide additional information about flooring and guidance on appropriate maintenance and repairs.
Carlisle, Alexander M. 1997. Historic linoleum: analysis, cleaning systems, recommendations for preservation. APT Bull. 28(2–3): 37–43. Technical article on conservation of historic linoleum.
Cole, Regina. 2001. Resilient flooring. Old-House Interiors. 7(1 and 2). (December–January): 84–88. General overview of rubber, vinyl, cork, and linoleum, includes photos and names of manufacturers.
Ellermann, Heiko. 2000. The restoration and conservation of linoleum. In: Linoleum: History, Design, Architecture: 1882–2000. New York: Distributed Art Publishers: 58–67. Provides a case study on the restoration and conservation of a late 1950s linoleum floor covering.
Foster, Benjamin R. 2005. From roofing to flooring. Old-House Journal. 33(2). (March–April): 66–69. A short article about the history and manufacture of Congoleum.
Jester, Thomas C. Twentieth-century building materials. New York: McGraw-Hill. 1995. Individual chapters on linoleum, rubber tile, cork tile, and vinyl tile.
Powell, Jane 2003. Linoleum. Layton, Utah: Gibbs Smith. Extensively illustrated book on the history, patterns, and care of linoleum.
Von Rosenstiel, Helene; Winkler, Gail Caskey. 1988. Floor coverings for historic buildings: a guide to selecting reproductions. New York: John Wiley & Sons. Lists specific patterns of modern materials that are suitable as reproductions or substitutes.
Resilient Floor Covering Institute
401 East Jefferson Street, Suite 102
Rockville, MD 20850
Phone: 301–340–8580
Web site: http://www.rfci.com/
The following is a partial list of flooring manufacturers. Most manufacturers offer maintenance advice and cleaning products. This list is not an endorsement of specific manufacturers or products.
Linoleum and Vinyl Flooring
Armstrong World Industries, Inc.
P.O. Box 3001
Lancaster, PA 17604
Phone: 800–233–3823
Web site: http://www.armstrongfloors.com
Vinyl Flooring in Historic Patterns
Congoleum Corp.
Department C
P.O. Box 3127
Mercerville, NJ 08619–0127
Phone: 800–274–3266
Web site: http://www.congoleum.com
Rubber and Cork Flooring
Expanko, Inc.
1129 West Lincoln Hwy.
Coatesville, PA 19320
Phone: 800–345–6202
Web site: http://www.expanko.com
Linoleum
Forbo Flooring
2 Maplewood Dr.
Humboldt Industrial Park
P.O. Box 667
Hazleton, PA 18201
Phone: 800–842–7839
Web site: http://www.forbo-industries.com
Rubber, Cork, and Vinyl Flooring
Gerbert Limited
119 South Tree Dr.
P.O. Box 4944
Lancaster, PA 17604–4944
Phone: 800–828–9461
Web site: http://www.gerbertltd.com/
Rubber and Vinyl Flooring, Including Retro Rubber
Flexco, Corp.
1401 East 6th St.
Tuscumbia, AL 35674
Phone: 800–633–3151
Web site: http://www.flexcofloors.com/rubber_retro.asp
Linoleum and Commercial Vinyl Flooring
in Historic Patterns
Tarkett, Inc.
2728 Summer St.
Houston, TX 77007
Phone: 800–877–8453
Web site: http://www.tarkett.com
The following is a partial list of flooring suppliers that provide historic patterns or materials. This list is not an endorsement of specific suppliers or products.
Linoleum, Rubber, Cork, and Vinyl Flooring
in Historic Patterns
Linoleum City
5657 Santa Monica Blvd.
Hollywood, CA 90038
Phone: 800–559–2489
Web site: http://www.linoleumcity.com/products.htm
Vintage Linoleum
Secondhand Rose
138 Duane St.
New York, NY 10013
Phone: 212–393–9002
Web site: http://www.secondhandrose.com/
Richa Wilson is the Intermountain Regional Architectural Historian and vice-chairman of the board of directors for the nonprofit Traditional Buildings Skills Institute. She has a bachelor's degree in architecture and a master's degree in historic preservation. As a Peace Corps volunteer, Richa served as head of the Building Inspection Section in Blantyre, Malawi, and provided architectural services to Habitat for Humanity and Save the Children. She worked in private practice in Washington, DC, and Oregon before joining the Forest Service in 1998.
Kathleen Snodgrass came to MTDC as a project leader in 2001. She graduated from Washington State University in 1974 with a bachelor of science degree in architectural studies and then spent about 10 years in highway design and construction with the Idaho Division of Highways. She began her career with the Forest Service in 1984. Kathie worked in facilities, landscape architecture, land line, and general engineering on the Nez Perce National Forest for 10 years and was the forest's facilities architect for about 7 years before coming to MTDC.
Additional single copies of this document may be ordered from:
USDA Forest Service, Missoula Technology and
Development Center
5785 Hwy. 10 West
Missoula, MT 59808–9361
Phone: 406–329–3978
Fax: 406–329–3719
E-mail: wo_mtdc_ pubs@fs.fed.us
Electronic copies of MTDC's documents are available on the Internet at:
For additional information about early 20th-century building materials, contact Kathie Snodgrass at MTDC:
Phone: 406–329–3922
Fax: 406–329–3719
E-mail: ksnodgrass@fs.fed.us
Forest Service and Bureau of Land Management employees can search a more complete collection of MTDC's documents, videos, and CDs on their internal computer networks at:
The Forest Service, United States Department of Agriculture (USDA), has developed this information for the guidance of its employees, its contractors, and its cooperating Federal and State agencies, and is not responsible for the interpretation or use of this information by anyone except its own employees. The use of trade, firm, or corporation names in this document is for the information and convenience of the reader, and does not constitute an endorsement by the Department of any product or service to the exclusion of others that may be suitable. The U.S. Department of Agriculture (USDA) prohibits discrimination in all its programs and activities on the basis of race, color, national origin, age, disability, and where applicable, sex, marital status, familial status, parental status, religion, sexual orientation, genetic information, political beliefs, reprisal, or because all or part of an individual’s income is derived from any public assistance program. (Not all prohibited bases apply to all programs.) Persons with disabilities who require alternative means for communication of program information (Braille, large print, audiotape, etc.) should contact USDA’s TARGET Center at (202) 720-2600 (voice and TDD). To file a complaint of discrimination, write to USDA, Director, Office of Civil Rights, 1400 Independence Avenue, S.W., Washington, D.C. 20250-9410, or call (800) 795-3272 (voice) or (202) 720-6382 (TDD). USDA is an equal opportunity provider and employer.
|
| Top |


