
FS-14R
Parachute
Packing
Instructions
System
Before you begin to assemble the FS-14R reserve parachute, make sure you have these components available (figure 1):
- Pilot chute
- Bridle cord
- Canopy
- Container
- Rubberbands
- Ripcord handle
- Soft cones
- Risers
- Safety pins with lanyards (two each)
- Tube Stoes

Figure 1—Components of the FS-14R parachute.
To begin assembling:
- Attach the pilot chute to the bridle with three 42-stitch bar tacks.
- Install the soft cones into the soft cone pocket on the pilot chute.
- Attach the risers and cross tie to the connector links.
- Attach the canopy system to the container.
Important Notes
- Do not let the suspension lines touch the Velcro hook on the container. The hook may snag and damage suspension lines.
- During winter storage when the reserve is not in use, do not leave the parachute packed with the pilot chute compressed. The pilot chute spring will take a set if it remains compressed for months at a time. About 5 inches of spring travel could be lost.
- Inspect the soft cones before rigging the parachute to ensure that they are not frayed or weakened. Replace the soft cones as necessary.
- Use only 1¼-inch rubberbands for all suspension line stows. These rubberbands are available from:
- Para-Gear Equipment Co. Inc.
3839 West Oakton St.
Skokie, IL 60076–3438
Phone: 800–323–0437
Web site: http://www.paragear.com
- Use only Micro-line T88-MTS Tube Stoes for diaper-locking stows. These Tube Stoes are available from:
Sky Systems USA Inc.
1407 Flightline Blvd.
Unit 13 Deland, FL 32724
Phone: 386-734-6001
Web site: http://www.skysystemsusa.com
All directions (right, left, top, and bottom) are referenced from a jumper wearing the parachute lying face down, head toward the canopy.
- When attaching the pilot chute to the bridle cord, route the bridle webbing through the openings in the mesh on the bottom of the pilot chute. Lay the hotcut end of the bridle cord on the reference mark on the webbing about 8 inches from the hot-cut end of the bridle webbing. Secure the end of the webbing to the bridle with three 42-stitch bar tacks, ¾-inch wide. The bar tacks should be centered on the webbing (figure 2).
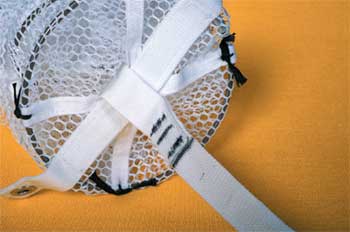
Figure 2—Bridle attachment to the pilot chute.
- Straighten the apex and vent. Equalize the vent lines and make sure that the pilot chute bridle is centered on the vent lines. Recheck the vent hem alignment, then tie a 15-inch piece of 80-pound cotton break tape around the vent lines 4 to 6 inches from the top. Pull this knot as tight as possible without breaking the tape. Make the tie one turn (single) and tie it off with a surgeon's knot and a locking knot (figure 3).
This break tie serves to keep the pilot chute bridle centered on the apex lines and MUST BE INSTALLED. THE PARACHUTE HAS NOT BEEN TESTED WITHOUT THE BREAK TIE INSTALLED.

Figure 3—Pilot chute bridle attachment to the apex of the canopy
and break tape
tie on vent lines.
- Place the canopy on the packing table with the stamp panel between lines 1 and 20 on top. In proper layout, lines 1 and 20 run clear from the skirt, through the slider to the inside of the connector links. Lines 10 and 11 run to the outside of the connector links (figure 4). Position the diaper between the table and the canopy.
- Attach the risers and the cross tie to the connector links. The riser snaps should face down. The cross tie should connect the two inside edges of the connector links with no twists (figure 5).


Figure 5—Riser and cross tie attachment to the connector links.
- Connect the reserve safety pins to the reserve snaps, using either red or green Type IIA Mil–C-5040 suspension cord. Finger trap two loops into the cord. Route one loop through the attachment bar of the reserve snap and one loop through the rubber grommet in the center of the safety pin. Secure both loops with either a 28- or 42-stitch bar tack (figure 6).
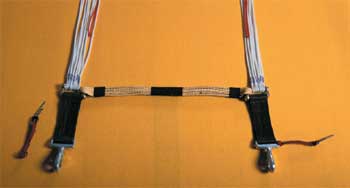
Figure 6—Safety pin attachment to the reserve snaps.
- Tack the steering loops to lines 3 and 18 with red safety tie thread. This step will ensure clean deployment (figure 7).

Figure 7—Steering loops tacked
to suspension lines 3 and 18.