
FS-14R
Parachute
Packing
Instructions
Compressing the Pilot Chute
- Insert the soft cone loops into the soft cone pocket. Secure the soft cone pocket with a double turn of red safety seal thread. Secure the thread with a surgeon's knot and locking knot (figure 8).
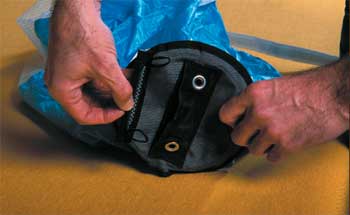
Figure 8—Insert the soft cone loops into the pilot chute.
- Bring as much excess material as possible to the top of the pilot chute before compressing the spring (figure 9).
- Compress the spring and lock the pilot chute by inserting the pilot chute locking rod through the packing tab grommet, running it across the top of the pilot chute and through the packing tab grommet on the other side.
- Make the pilot chute clean and compact by stuffing excess pilot chute material around the pilot chute spring. Run two pullup cords through the soft cone loops (figure 10).

Figure 9—Compress the pilot chute.

Figure 10—Compressed pilot chute with locking rod and pullup cords.
- Before flaking the canopy, do a four-line check to ensure that all lines are clear. Move the slider down the suspension lines halfway between the canopy skirt and risers. Straighten the apex to ensure that the canopy skirt is even (figure 11).

- Beginning with line 11, flake the canopy in the normal manner. When flaking is complete, the stamp panel gore 20, with mesh, will be on the top left side, and gore 10 will be on the bottom right side (figure 12).

Figure 12—Canopy layout after flaking.
- Follow line 20 down to the corresponding grommet on the slider. Grab the top of the slider and pull it as far into the air channel of the canopy as possible (figure 13). The grommets of the slider should be just below the skirt where the suspension lines are attached (figure 14).

Figure 13—Insert the slider into
the flaked canopy.
- After inserting the slider into the main canopy, flake each gore of the slider into the corresponding folds of the canopy (figures 15 and 16).
- Place a shot bag over the line groups just below the edge of the slider.

Figure 14—Slider grommet position on the radial tape.

Figure 15—Flaking the slider into the canopy skirt.

Figure 16—Canopy layout with flaked slider inside the canopy.
- Fold the skirt 90 degrees so that the skirt edge is parallel to the radial tapes (figure 17).
- Long-fold the canopy four times. Always fold the right side, then the left side. The first two folds should be the same width, with each fold overlapping the center by 2 to 3 inches (figures 18 and 19). The third and fourth folds should also overlap the center slightly (figures 20 and 21).


