
FS-14R
Parachute
Packing
Instructions
Closing the Diaper
- Release the risers from the tensioning device. Place a shot bag on top of the risers to prevent them from twisting and to keep nominal tension on the lines (figure 22).

Figure 22—A shot bag is placed on the risers for tension.
- Fold the right side of the slider skirt up 90 degrees so it is parallel to the radial seams. Fold the left side of the slider skirt over so it is parallel to the bottom of the diaper. This will more evenly distribute the bulk of the slider skirt (figure 23).
- Bring both line groups up over the skirt (figure 24).

Figure 23—Folding method for the slider skirt.

Figure 24—Bring both line groups over the skirt.
- Wrap the diaper around the canopy and suspension lines. Route the Tube Stoes on the left side of the diaper through the diaper grommets (figure 25).
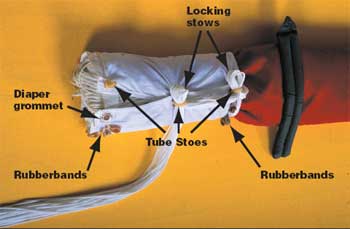
Figure 25—Route the Tube Stoes through the diaper grommets
to secure the locking
stows.
- Close the diaper by making locking stows through the three Tube Stoes. Work from the top of the diaper down. Use 1-inch bights on the locking stows, single wrapping the Tube Stoes (figure 26).
- Make the first line stow after completing the locking stows. Secure the line stow with a single-wrap of the rubberband (figure 27).

Figure 26—Both line groups in the three locking stows.

Figure 27—First stow after the locking stows.
- Stow the remaining suspension lines on the diaper in 1-inch bights single-wrapped with rubberbands. Leave 10 to 15 inches of suspension lines unstowed for placement in the container (figure 28).

Figure 28—Complete the line stows on the diaper.
- Install the riser snaps in the snap retainers on the container (figure 29).
- Place the cross tie in a 'U' shape in the container to distribute its bulk (figure 30).

