
Dam Problems Continued
- Livestock and Cattle Traffic
- Transverse Cracking
- Longitudinal Cracking
- Low Area in the Crest of a Dam
- Excessive Quantity and/or Muddy Water Exiting From a Point
- Seepage Water Exiting as a Boil in the Foundation
Probable Causes and Possible Consequences
- Livestock paths and activities on the downstream dam face can damage slopes, especially when wet.
- Livestock activities may reduce erosion protection and cause erosion channels.
- Bare areas may allow water to stand and be susceptible to drying cracks.
Recommended Action
- Fence the embankment area to keep out livestock.
- Repair erosion protection by reestablishing grasses or by placing riprap.
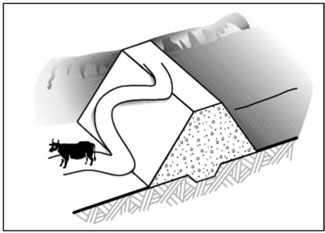 Figure 17—Livestock and cattle traffic. |
 Figure 18—Livestock paths on dam faces can lead to dam erosion. |
Probable Causes and Possible Consequences
- Uneven movement between adjacent segments of the
embankment may cause transverse cracking.
- Deformation caused by structural stress or instability may
provide a path for seepage through the embankment
cross section.
- If not corrected, cracking creates an area of low strength
within the embankment that may lead to future structural
movement, deformation, or failure.
- Cracks create a point for water to enter the embankment. Saturation of the adjacent embankment area may occur and could lead to localized failure.
Recommended Action
Report the suspected problem to the appropriate Federal or State agency official immediately.
- Inspect the crack and carefully record its location, length,
depth, width, and other pertinent physical features. Stake
out the crack limits.
- Have a qualified engineer determine the cause of
cracking and supervise all steps necessary to reduce
danger to the dam and correct the condition.
- Excavate the crest along the crack to a point below the bottom of the crack. Backfill the excavation using suitable material and correct construction techniques. This seals the cracks at the crest surface to prevent surface water infiltration. Monitor the crest routinely for evidence of future cracking.
 Figure 19—Transverse cracking. |
 Figure 20—Transverse cracks can be an indication of dam instability. |
Probable Causes and Possible Consequences
- Uneven settlement between adjacent sections or zones
within the embankment may cause longitudinal cracking.
- Foundation failure causes loss of embankment support,
which can result in embankment slide.
- Settlement creates an area of low strength within
an embankment, which may lead to future structural
movement, deformation, or failure.
- Cracks create a point for water to enter the embankment. Saturation of the adjacent embankment area may occur and could lead to localized failure.
Recommended Action
Report the suspected problem to the appropriate Federal or State agency official immediately.
- Inspect the crack and carefully record the location,
length, depth, width, alignment, and other pertinent
physical features. Immediately stake out the crack limits
and monitor frequently.
- Have a qualified engineer determine the cause of
cracking and supervise the steps necessary to reduce
danger to the dam and correct the condition.
- Effectively seal the cracks at the crest surface to prevent
surface water infiltration.
- Monitor the crest routinely for evidence of further cracking.
 Figure 21—Longitudinal crack. |
 Figure 22—Longitudinal cracks can be an indication of dam instability. |
Low Area in the Crest of a Dam
Probable Causes and Possible Consequences
- Excessive settlement of the embankment or internal
erosion of embankment material may cause a depression
on the top of a dam.
- Foundation spreading upstream and/or downstream,
prolonged wind erosion, or improper final grading
following construction may cause a low area in the crest
of a dam.
- Low areas can reduce the freeboard available to pass flood flows safely through the spillway.
Recommended Action
Report the suspected problem to the appropriate Federal or State agency official immediately.
- Establish survey monuments along the length of the
crest to determine the exact amount, location, and extent
of settlement in the crest.
- Have a qualified engineer determine the cause of the low
area and supervise all necessary steps to reduce any
threat to the dam and correct the condition.
- Use proper construction techniques to fill in the low area
and reestablish a uniform elevation over the length of the
crest.
- Reestablish and routinely monitor survey monuments to detect any settlement across the crest of the dam.
 Figure 23—Low area in the crest of a dam. |
 Figure 24—Low areas in the crest of a dam reduce the freeboard. |
Excessive Quantity and/or Muddy Water Exiting From a Point
Probable Causes and Possible Consequences
- Water has created an open pathway, channel, or pipe
through the dam. The water is eroding and carrying
embankment material.
- Surface agitation of water and embankment materials
exiting at one point may cause muddy water.
- Rodents, frost action, or poor construction may allow
water to create an open pathway or pipe through the
embankment.
- Continued flows can saturate parts of the embankment
and lead to slides in the area.
- Continued flows can further erode embankment materials and lead to dam failure.
Recommended Action
Report the suspected problem to the appropriate Federal or State agency official immediately.
- Begin measuring outflow quantity. Determine whether water is getting muddier, staying the same, or clearing up.
- Have a qualified engineer inspect the condition and recommend further actions.
- If the quantity of flow is increasing, lower the water level in the reservoir until the flow stabilizes or stops.
- Search for an opening on the upstream side of the dam. Plug it if possible.
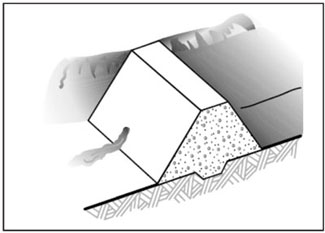 Figure 25—Excessive quantity and/or muddy water exiting from a point. |
 Figure 26—Excessive water piping through the dam at the toe of the embankment. |
Seepage Water Exiting as a Boil in the Foundation
Probable Causes and Possible Consequences
- Some part of the foundation material is supplying a flow
path. This could be caused by a sand or gravel layer in
the foundation.
- Increased flows can lead to erosion of the foundation and dam failure.
Recommended Action
Report the suspected problem to the appropriate Federal or State agency official immediately.
- Examine the boil to see if foundation materials are being
transported.
- Have a qualified engineer inspect the condition and
recommend further actions.
- If soil particles are moving downstream, use sandbags
or earth to create a dike around the boil. The pressures
created by the water level may control flow velocities and
temporarily prevent further erosion.
- If erosion is increasing, the reservoir level should be lowered.
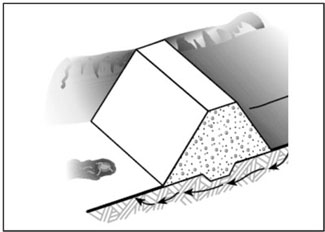 Figure 27—Seepage water exiting as a boil in the foundation. |
 Figure 28— Sandbags surrounding a boil on the downstream side of the dam. |