
Chapter 3—The Art and Science of Restoration
- 3.5 Using Soil Binders
- 3.6 Using Icebergs
- 3.7 Site Delineation
- 3.8 Blending Restoration Projects Into Wilderness
- 3.9 Common Wilderness Campsite and Trail Problems
Soil binders, also called tackifiers, aggregate the top layer of the soil to reduce dust and prevent surface erosion. The slurry used in soil binders is made from wood products, plaster, petroleum, or other materials. Seed can be mixed into the slurry for hydroseeding. Soil binders commonly are used on raw road cutbanks and fill slopes after construction projects. They are applied with large motorized sprayers. Soil binders typically would not be included in a wilderness or backcountry project, because the projects are smaller and motorized equipment may not be allowed.
Binders are applied after a project's earthwork is complete. Binders sometimes inhibit water infiltration and prevent seeds on the surface from becoming established, because they dry up. In such cases, binders could interfere with restoration goals (Belnap and Furman 1997). The use of soil binders may merit further research as a way of addressing challenging situations.
3.6 Using IcebergsSite preparation includes installing icebergs where they are appropriate. Icebergs are large natural objects found at your project site, such as rocks or logs, that are buried with about one-third of the mass aboveground and at least two-thirds belowground. Arrange icebergs so they appear to be natural (figure 3-74).

Figure 3-74—Icebergs (deeply buried rocks) are an effective
tool
for discouraging overnight use of closed campsites. In
this example from the
Desolation Wilderness, CA, crews artfully
selected and placed two rocks that
blend well with natural
patterns,
but make the site undesirable for camping.
Icebergs are installed for several reasons—to deter users from camping in a restoration site, to shrink a campsite, and to provide microsites where vegetation can become established. Logs (figure 3-75) provide habitat for fauna and fungi. Although it is more difficult to make artificial snags look natural, trees can be buried upright (figure 3-76) to deter use on a site.

Figure 3-75—This punky log looks like it has been at this site
in the
Desolation
Wilderness, CA, forever. My, but
that restoration crew is clever!
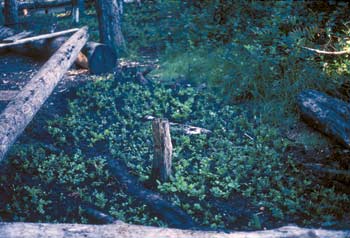
Figure 3-76—Restoration crews at Olympic National Park, WA,
are
clever,
too— the stump in the center of the photo looks like it
grew
here,
but it was installed to discourage campers from using this site.
It is tempting to install icebergs that have sharp points so visitors won't sit on them. Doing so is counterproductive unless the iceberg blends in with the surrounding rock and is sunk deeply into the ground. Industrious visitors will simply grab hold of the iceberg and yank it out.
Moving large rocks to make icebergs can be a challenge. The U.S. Department of the Interior National Park Service moves rock from nearby talus slopes with helicopters (figures 3-77a and 77b). Primitive methods include using a grip hoist or making litters to support the rock so workers are able to walk in an upright position while sharing the load (figure 3-78).


Figures 3-77a and 77b—At Olympic National Park, WA, helicopters
(top) have carried talus to harden campsites or close restoration
sites (bottom).
The National Park Service sometimes uses
helicopters
as the minimum tool when
managing wilderness.

Figure 3-78—Litters can be improvised to move rock. Grip hoists
can
be used to drag larger rocks, but doing so would damage vegetation.
Icebergs also can be used to attract use. In places you want people to use, a large rock with a flat surface is like a piece of furniture (figure 3-79). Lest providing such furniture offends your wilderness sensibilities, consider this: the rock provides a hardened place for people to sit, set up their camp kitchen, or lean their packs. If the rock is within a hardened site, this tactic helps concentrate impacts in the impacted area. Otherwise, campers are drawn to other nearby rocks or trees that will serve the same function, widening the zone of impacts.

Figure 3-79—Rock added as "Flintstone furniture" helps
confine
use within the impacted perimeter of designated campsites. Flat
rocks
can serve as a kitchen, a place to sit, or a place to lean backpacks.
Visitors to public lands often are oblivious to the ease with which vegetation can be damaged. Visitors may walk, sit, camp, and tie up their animals on fragile, vegetated areas. Visitors can and will take the shortest or most interesting route possible, even when it means leaving hardened surfaces that could resist trampling. An important method for subtly—or not so subtly—channeling use is site delineation (Scott 1998). Barriers are installed during site preparation because installation requires disturbing the area.
You can delineate where you would like to keep users out (an exclosure). For instance, the rail fence in figure 3-80 is intended to keep visitors from using a restoration site. Or you can delineate where you would like to keep visitors in (an enclosure), such as when you define the edges of a campsite or trail (figure 3-81).
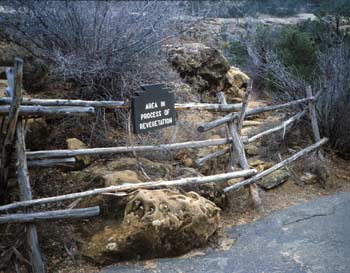
Figure 3-80—Barriers can help keep visitors from
using
a
restoration
site.
This fence (commonly known as a
jack fence)
is near a road pullout
at Natural Bridges
National Monument,
UT.

Figure 3-81—Rows of rock keep users on the Pacific Crest Trail
in the
John Muir Wilderness, Sequoia-Kings Canyon National Park, CA.
The size of the barrier and the materials it is made from are intended to match the awareness level of users. Remember minimum requirement principles, because barriers may not always seem like a light-handed technique in wilderness. In locations with informed users, plantings may be the barriers—tree seedlings could block a path, for instance. Low-profile barriers, such as a row of rocks that lines trails or small-diameter logs (figures 3-82a and 82b) pegged into place along a trail, are slightly more obtrusive, but will keep visitors out of your restoration sites in some areas. With enough attention, these barriers can be designed so they are not obtrusive (figure 3-83).


Figure 3-82a and 82b—These low-profile log barriers (top)
delineate
a trail through a closed restoration site. The barriers
also serve
as
silt
dams for backfilling the restoration sites.
Log carriers
(bottom)
placed underneath
the log are
useful when
transporting log barriers.

Figure 3-83—The rocks and log used to block this social trail in
the
Desolation Wilderness, CA, blend in so well that the average user
may not
notice them.
You may determine that hefty fence-like barriers are needed for your visitors. Ruth Scott, a veteran restoration practitioner at Olympic National Park, has learned through experience that large logs or rocks often are needed to corral users.
3.7.2 String Fences
String fences are commonly used to delineate restoration sites. String fences are inexpensive, easy to transport, and easy to install. Their height can be adjusted easily by changing the length of the stakes. Unfortunately, string fences are a high-maintenance item, easily collapsed by snow or unknown dark forces. In addition, string fences have a less natural appearance than native materials. String fences are certainly not a long-term solution for site management. However, they are a good short-term fix to funnel use in areas where the vegetation will soon take over or when other options are not practical.
One weekend day, while on patrol at Snow Lake in the Alpine Lakes Wilderness, I stepped within earshot of one of our recently closed and treated restoration sites. The site was covered with jute matting (figure 3-84) that had plugs of native vegetation poking through. A string fence, installed to block the site from use, had fallen into disrepair. Two people had plunked themselves down in the middle of the site to enjoy their picnic lunch. Just as I felt my ire rising and I was searching for words of diplomacy, I heard the woman in the group say, in a loud shrill voice, "Isn't it nice that they put down a mat so that we have a nice clean place to sit?" —Lisa Therrell

Figure 3-84—The scene of the crime. String fences
can discourage
visitors from using restoration
matting
as a seat cushion.
If you use a string fence, (figures 3-85a, 85b, and 85c), it is best to construct it from parachute cord or heavier cord. Stakes need to be made from 1- by 2-inch (25- by 51-millimeter) lath or bigger material to withstand snow and marauders. Small Lexan or Rite-in-the-Rain paper "Restoration Site" signs are available that can be attached to the cord with wire (see chapter 5, Tools of the Trade and Other Resources, for a source of signs).

Figure 3-85a—While string fences can rope off large expanses
or
block a trail, they require perpetual maintenance.

Figure 3-85b—Small Lexan or Rite-in-the-Rain paper
"Restoration
Site" signs are available that can be
attached to the cord with wire.

Figure 3-85c—Specially marked stakes
are more durable.
Some readers may be mortified after reading a discussion of recontouring sites and installing barriers and Flintstone furniture. These techniques seem quite manipulative and too structured for many wilderness settings. The challenge is to determine when these techniques really are the minimum tool, then designing the project so it blends with local landscape features as much as possible.
3.9 Common Wilderness Campsite and Trail ProblemsParallel Trails
When parallel trails are not deeply eroded, the unneeded trails usually can be obliterated by using plantings, rocks, and logs to deter continued use (figure 3-86). The "real" trail is left open and improved to correct any problems that may have led to the formation of parallel trails. Usually, the problem was that the trail was muddy when wet or was too rough or narrow to invite continued use.

Figure 3-86—If a parallel trail is not deeply eroded, it can be
blocked with rocks or logs and planted to repair the damage.
This trail is
in the Eagle Cap Wilderness, OR.
With a large enough budget, restorationists could install lots of checkdams and backfill parallel trails with imported fill, returning them to the original slope contour.
Many Forest Service projects don't have the funding to allow such approaches, and the agency is less likely to use a helicopter to support a wilderness restoration project. A compromise solution is to create a broad swale by digging up and rearranging the raised ridges of vegetation separating each parallel trail.
Digging up and moving surviving vegetation is not completely desirable. Do so only if the result seems more desirable than leaving the visual lines and erosion channels of the parallel trail trenches.
Human use might be directed onto a relocated trail, which contours the slope at a sustainable grade. Alternatively, rock or log steps that serve as siltdams could be installed to allow the trail to be improved at its original location (figures 3-87a and 87b). If your trail is used by stock or bicyclists, make sure that each step is longer than the length of a horse or bicycle, and short enough that a chain sprocket will not hang up.


Figures 3-87a and 3-87b—Several steep, parallel trails (top)
plunged down an embankment at Snow Lake in the Alpine Lakes
Wilderness, WA.
One trail was hardened by installing rock steps.
Other trails (bottom) were
closed and restored.
Deeply Eroded Trails
Deeply eroded trails are difficult to erase without adequate fill and substantial labor. The permanent scar of the old trail—often partially filled with rock or wood chunks to slow the movement of water and trap silt—is evidence of many trail relocation projects.
Ideally, checkdams will be installed in the old trail and backfilled at ground level. If surface erosion is being directed toward the trail, it may be possible to trap additional sediment behind checkdams.
In forested or brushy areas, a compromise solution would be to stabilize the trail with lower angle checkdams and backfill, then to design the vegetative treatment to include some taller plants that will break up the visual effect of the trench. If the trail includes large step-downs caused by headcutting, the slope angle will need to be laid back. If the project location supports riparian vegetation, a bioengineering treatment—such as the trench pack—might help. If the trail cannot be treated successfully, give serious consideration to hardening the trail.
Trails That Contour
Sometimes a trail that contours is slated for restoration. If the trail has had little or no erosion, pull the berm or fill at the outer edge of the trail back into the tread as much as possible. If the trail is more deeply eroded, determine whether it is more effective to pull the berm in—exposing a large raw area but reestablishing the contour—or to use a series of checkdams and backfill. If the tread remains incised, be sure to include drain dips or waterbars as you would for a system trail. Controlling ongoing erosion by directing water off the trail will be important to the project's success.
Excavated Campsites
Some campsites have an excavated cutbank where the site was carved into the hillside. If the fill is still available on the downhill edge of the site, it can be moved back into the cut. Logs or rock can be arranged to stabilize the new contour. Without treatment, many sites will continue to erode back into the slope because of rodent activity or wind action.
Eroded Campsites
A site on a slope might continue to erode from water, wind, human use, or even animal activity. Checkdams or siltbars can be installed to stabilize the slope in shallow benches and fan out running water (figure 3-88) to slow it down. Be sure to evaluate whether the water should be directed away from the uphill side of the site. For example, a well-placed drain on the trail accessing the site may prevent water from coursing through the site. This same approach can be used to stabilize a campsite you wish to keep open for use, leaving large enough flat areas to serve as tent pads. As with an excavated campsite, if erosion is continuing to eat back into a slope, design a way to stabilize the erosion, such as laying rock or organic debris against the eroding cut.

Figure 3-88—Rocks and logs used as low-angle siltbars stabilize
the tent space on this campsite at Lake Mary in the
Alpine Lakes Wilderness,
WA.