
Chapter 3—The Art and Science of Restoration
- 3.10 Plant Selection, Collection, and Propagation Techniques
- 3.10.1 Genetic Considerations for Restoration Projects
- 3.10.2 Plant Selection for Restoration Projects
- 3.10.3 Determining Propagation Methods for Your Site and Species
- 3.10.4 Concluding Thoughts on Plant Selection
- 3.10.5 Comparison of Propagation Methods
- 3.10.6 Plant Collection Principles
- 3.10.7 Preventing Further Damage to the Project Area
- 3.10.8 Working With Seed
- 3.10.9 Working With Cuttings
- 3.10.10 Divisions
- 3.10.11 Layering
- 3.10.12 Transplanting Wildlings
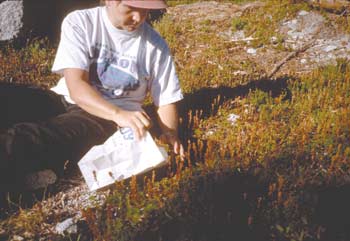
This portion of the guide lays out the factors to consider when you are selecting the plant species to treat restoration sites, the manner in which you collect the plant material, and the propagation methods you might employ. The botanist or plant ecologist (figures 3-89a and 89b) on your team will help you through this process. This guide focuses on the information needed to do work successfully onsite, as well as the knowledge needed to coordinate with a professional nursery. Appendix B, Propagation and Establishment Requirements for Selected Plant Species, summarizes additional species-specific information.

Figure 3-89a—You will appreciate the help of the botanist
or plant
ecologist
on your team when you need to identify
and select appropriate plant species
for a restoration treatment.

Figure 3-89b—"Dang, these sedge flowers have small
plant
parts!" Drawings courtesy of the University of
Washington Press (Hitchcock
and Cronquist 1976).
3.10.1 Genetic Considerations for Restoration Projects
The design of a restoration project should consider the genetic implications of selecting, moving, and propagating plant materials. Plant movement guidelines define the area over which plant materials, such as seed or cuttings, can be collected relative to the project location to assure restoration success and maintain the genetic integrity of the local plant population. In addition, plant propagation techniques can result in an unintentional selection against a portion of the total genetic material (certain genotypes) represented in the plant material collected for propagation. This section explains these concepts and offers suggestions for minimizing changes to the genetic structure of the area being restored.
Selecting plant material appropriately increases the probability that the plants will survive, grow to maturity, and reproduce with new individuals suited to the local environment. Increasingly, even projects in highly modified environments, such as highway corridors, are using locally adapted native plants (Smith 1994).
Most plants are precisely adapted to their immediate environment. Many species that are widespread are grouped into ecotypes, each of which is adapted to a specifically defined ecological situation within one or more subareas of the species' range. Subpopulations are usually continuous, but maintain their integrity through ecologically specified selection pressures, despite gene flow from the other neighboring "ecological" races (Potash and Aubry 1997). For example, western shrub species (figure 3-90) show strong ecotypic variation in morphology, growth rate, flowering times, cold hardiness, germination patterns, and so on (Meyer and Monsen 1992).

Figure 3-90—Rabbitbrush (Chrysothamnus spp.) in
Mesa Verde National
Park, CO.
Nonlocal stock, especially of native species, can introduce different maladapted genotypes (the total genetic information contained in the plant) into the gene pool of the local plant population. Changes can occur in a number of traits, including plant size and shape, growth rate, seed production, and survival. These changes could be temporary or permanent. Too little is known about possible changes in most plant species to predict the outcome. The degree to which these changes occur depends on the difference between any two subareas, such as alpine, subalpine, or lower elevation environments (Guinon 1992; Potash and Aubry 1997).
In wilderness or other remote sites, there is also an ethical imperative to maintain the genetic integrity of the local plant community. The goal for restorationists should be to use locally adapted plant materials that will not change the genetic composition of the plant community.
Maintaining genetic integrity is an important planning challenge, because specific scientific parameters that could be used to define a seed collection zone are not known for most plant species. Conifer species are an exception. The Forest Service has been refining a seed zone concept for conifers since the 1950s. Professional opinions range widely regarding just how far other species of plants should be moved. For example, some projects have moved plants over hundreds of miles based on ecotype (Redente 1993; Smith 1994). Other projects collected plant materials from within a few feet of the actual site to be treated.
Some agencies have incorporated plant movement guidelines into policy or procedures. Using these policies and working with a geneticist is an important starting point in deciding species-specific plant movement guidelines. In wilderness or other relatively natural settings, err toward preventing unwanted genetic movement, rather than going farther afield to collect plant materials.
3.10.1a Determining a Local Collection Area
Lacking better information, a local collection area is defined as the combined distance that pollen would be likely to travel plus the distance that seeds would be dispersed. The following considerations will help determine the radius of genetic isolation (Albright 1994; Millar 1992).
The life history of a plant affects genetic diversity. Plants that are wind-pollinated, such as conifers (figure 3-91), alders, cottonwoods, and graminoids (grasses, rushes, and sedges) cross-pollinate over much wider geographic areas than plants that are cross-pollinated by insects. For example, corn pollen generally travels up to a quarter mile (0.4 kilometer), and can travel much farther, depending on wind patterns. Materials from wind-pollinated species can be collected from a larger area without affecting genetic diversity. This is not the case for materials of plants that self-pollinate or that reproduce vegetatively.

Figure 3-91—The windblown pollen of conifers such as
subalpine
fir
(Abies lasiocarpa, above) distributes genetic material
far
from the
parent
plant. Drawings courtesy of the University
of Washington
Press (Hitchcock
and Cronquist 1976).
The seed-dispersal mechanism, which is generally easy to identify, also has significant bearing on genetic movement. Seed that becomes airborne or that is dispersed by animals (figure 3-92) is likely to travel farther than seed that falls to the ground below the plant or that is transported short distances by ants or rodents. For example, the seed of willows, aspen, poplar, and fireweed can be dispersed for at least 1 mile (1.6 kilometers) by the wind. The heavier seed of paper birch, alder, and spruce can be dispersed up to a quarter mile (0.4 kilometer, Densmore and Vander Meer 1998).

Figure 3-92—The hooked and sticky seed pods of trail plant
(Adenocaulon
bicolor) travel long distances while stuck to the fur
of mammals, distributing
genetic material farther than the seed
of species that may be blown a short
distance or that fall to the
ground near the plant. Drawings courtesy of the
University
of Washington Press (Hitchcock and Cronquist 1976).
In some cases, changes in a plant's morphology (physical appearance) based on its location can be observed readily. While it is important to collect materials from a variety of individuals, if morphological changes are based on identifiable ecological or geographic differences, plants morphologically unlike those at the restoration site should be considered genetically separate and should not be collected.
Ecological barriers may restrict genetic movement. Identify localized breaks in geology, topography, climate, vegetation type, or other ecological extremes. For example, genetic information is more likely to remain in a basin (figure 3-93) than to migrate across ridges. Limit plant collection to an area with the same environmental characteristics as the project area. The more diverse the local habitat of a plant, the greater the local genetic variation (Linhart 1995).

Figure 3-93—Seed or pollen is more likely to
remain within a basin
than to cross ridges.
3.10.1b Preventing Unintentional Selection
Even if collection distances are carefully determined and followed, the genetic structure of plants can be changed when they are collected for propagation. For instance, too few plants could be collected to assure some genetic diversity, or the plants that were collected could be too closely related. In such situations, propagated plants would run the risk of inbreeding depression and subsequent population decline (Guinon 1992).
Plant materials should be gathered from throughout the collection area. The collector should be familiar with the pollination method of each species, in order to surmise how far to go to gather individuals likely to be unrelated. Small annuals may be unrelated if they are 5 to 11 yards (4.6 to 10 meters) from each other. Forest trees may need to be 110 to 220 yards (101 to 201 meters) away to be unrelated (Linhart 1995). If seed or cuttings are collected from a variety of individuals, a minimum of 30 to 50 parent plants are needed to help preserve all the genetic options available to the population in the project area. If mortality is anticipated at any stage of the propagation process, collect from more donor plants (Potash and Aubry 1997). An equal amount of seed (figure 3-94) or cuttings should be gathered from each plant; overcollecting from heavy seed producers can cause a genetic shift (Meyer and Monsen 1992).

Figure 3-94—When collecting seed and
other
plant materials, consider
how
far genetic material
would be likely to travel naturally, and
emulate that
pattern. Here, seed is being
collected in the Alpine Lakes Wilderness, WA.
Collect from every microhabitat represented at the project site. Donor plants should not be selected for uniformity or other characteristics such as heartiness; rather, collections should be from individuals that exhibit an array of size, growth form, vigor, and so forth. A trait that may appear to be undesirable could ultimately be the trait that enables a plant to survive in a slightly altered environment. If too few plants are available in the collection area, collections should be made at other sites by matching donor and project site characteristics as closely as possible (Guinon 1992).
The type of plant material collected also will affect the genetic outcome. Seed, which is the product of cross-pollination, is much more diverse genetically than cuttings or plant tissue. Genetic integrity also is maintained by collecting from the wild local population, rather than from offspring grown in a nursery or produced through seed-increase programs that may cause a genetic shift (Meyer and Monsen 1992).
Timing of collection also can be a factor in maintaining genetic variation. Ripening times of seed can vary on the same plant, with each seed lot having different characteristics. When this is the case, seed should be collected at several different times (Meyer and Monsen 1992).
Seed handling and germination procedures affect survival rates, selecting for and against certain traits. Avoid overcleaning seed, which removes smaller seed that may differ genetically from seed of average size. Ensure that seed is cured and stored properly (more on this in the section on handling seed). The best insurance against unintentional selection is to use presowing treatments that break dormancy completely in every viable seed and then to assure the survival of the delicate seedlings. When thinning, do not routinely remove the smaller plants; leave plants with a variety of sizes and other traits (Meyer and Monsen 1992). Ideally, every plant should be saved and used.
Finally, it is important to document where plant materials were collected. This will be considered later when evaluating monitoring results. An example of a collection documentation sheet is included in appendix E, Forms.
The following example is the summary of a policy developed by a geneticist for a national forest in western Washington based on local ecosystems (Potash and Aubry 1997). This policy is a good illustration of applying the principles described in this section.
Summary of Guidelines for Native Plant Collection to Ensure Genetic Diversity and Adaptation to Planting Environment
- Collect from 30 to 50 unrelated plants.
- Collect an equal number of seeds or cuttings from each plant.
- For upland tree species, collect seed and cuttings within (predetermined)
seed zones and 500-foot (152-meter) bands of elevation or not more than
250 feet (76 meters) above and below the project site.
- For shrubs, forbs, grasses, and riparian tree species, collect seeds and cuttings within watersheds and 500-foot (152-meter) bands of elevation or not more than 250 feet (76 meters) above and below the project site.
In practice, wilderness restoration practitioners exercise caution in limiting the distances they go to collect plant material. Mount Rainier National Park collects most of its plant material within 200 feet (61 meters) of the project site (Rochefort 2002). The Wenatchee River Ranger District of the Wenatchee National Forest collects from within the same lake basin, up to half a mile (0.8 kilometer) away at the most and no more than 200 feet (61 meters) in elevation above or below the site to be treated. Care is taken to collect from throughout the basin to avoid limiting the gene pool too much and to avoid overharvesting individual stands of plants. Successive collections are taken when possible, and each plant material batch is combined with others of the same species to avoid any genetic bias when propagating or planting.
3.10.1c Additional Information on Genetic Considerations
For more information on genetic considerations for restoration projects, refer to the Mt. Baker-Snoqualmie National Forest Native Plant Notebook (Potash and Aubry 1997), Genetic Considerations (Meyer and Monsen 1992), and Promoting Gene Conservation Through Seed and Plant Procurement (Guinon 1992).
3.10.1d Nonnative Plants, Agronomic Varieties, or Native Cultivars
Thinking about the use of nonnative plants or agronomic varieties for restoration projects has been evolving. Agronomic varieties and native cultivars have been developed from native plants selected for certain desirable traits, such as forage value, drought hardiness, tolerance of alkalinity, or increased seed production. Some grass species have had many agronomic varieties developed from a single species, with each variety specially suited to a specific environment. Agronomic varieties, as the name suggests, are literally farmed, grown in commercial fields to provide a relatively abundant, inexpensive source of seed. These varieties, as well as nonnative plant species, have been used extensively at a landscape scale for many decades, usually to reclaim mines or overgrazed range, or to stabilize slopes after wildland fires (Aubry and others 2005; Monsen 1975; Owen, no date).
The decision to use nonnative plants, agronomic varieties, native cultivars, or even nonlocal native stock usually is based on economy, because these plants are available readily at a lower cost per unit—usually per pound (half a kilogram) of pure live seed per container—than the cost of propagating local native stock. Some have argued that the lower cost of nonnative plants is false economy because the purchase cost does not include the cost to the ecosystems involved (Dalpiaz 1994; Kratz and others 1994; Owen, no date). A number of the most aggressive pest plants in North America were introduced to reclaim erosion or improve forage, including kudzu, purple loosestrife, reed canarygrass (figure 3-95), African lovegrass, tamarisk, and Scotchbroom.

Figure 3-95—Reed canarygrass (Phalaris arundinacea) is a native
plant
in North America. It has been bred as an agronomic variety and used
extensively
for pasture improvement and streambank stabilization.
Because it has underground
tillers, reed canarygrass can spread quickly
and become invasive, displacing
local native plant communities.
To quote a briefing paper from the Rocky Mountain Region of the USDA Forest Service, "We do not know the impacts of exotic plants on animals, insects, and the soil microflora and microfauna" (Kratz and others 1994). According to Berger (1993), the introduction of nonindigenous species may disrupt native ecosystems either through effects on competition or predation, through the introduction of disease vectors, or by affecting mutualistic relationships, such as when insect and plant invaders drastically alter community structure by displacing native plants. The growing body of literature on this topic suggests the following conclusions:
- Selecting nonlocal native plant material or nonlocal
native cultivars is potentially the most destructive course of action because
cross pollination and outcrossing are likely to occur, "polluting" the
gene pool of the local native plant community (Kratz and others 1994).
Selecting
nonnatives that are closely related to local natives also is a poor choice
because of the possibility of hybridization.
- Nonnative species, especially
agronomic varieties, often will be vigorous for several years before
declining in numbers (Brown and Johnston 1979). A number of studies have
shown that
the introduced species will prevent the initial establishment of native
plants
(Amaranthus and others 1993; Schoennagel 1997). In addition, some introduced
species, depending on growing conditions, are persistent and can outcompete
native plant communities. For example, red fescue (Festuca
rubra) was
selected for use at Mt. Rainier National Park based on the prediction that
it would
not be persistent and would allow natives to invade. The fescue was used
extensively for erosion control before it was discovered that it was
reproducing both vegetatively
and from seed and was too invasive to allow natural succession (Hingston
1982).
- For projects where nonlocal natives are not available in sufficient quantity and some other plant material must be selected, a sterile, nonpersistent, and noninvasive species would be the best choice (Keigley 1988; Kratz and others 1994). In this approach, the introduced species often is used as a cover crop to improve soil conditions, allowing natives to invade. Restoration research scientist Jayne Belnap advocates the use of a cover crop to maintain soil microbial populations on a disturbed site when planting with native stock needs to be delayed. Sterile hybrids can help stabilize slopes, especially when natives may be slow to establish extensive root systems (Belnap and Furman 1997). This approach will force the planner to do some careful consulting with geneticists, plant ecologists, or other restoration practitioners to determine the species and seeding rates that might meet these criteria for the project location.
The use of annual ryegrass (Lomium multiflorum) as a cover crop to implement approach number 3 has worked in some cases and failed in others. In Rocky Mountain National Park, annual rye was used successfully as a nonpersistent, noninvasive cover crop that allowed future transplants of containerized natives onto the disturbed site. The annual rye also improved soil moisture retention, available nitrogen, and slope stability (Keigley 1988). However, when annual rye was seeded after a wildland fire in a sugar pine (Pinus lambertiana) forest type in southern Oregon, the native species cover and richness were reduced, with possible long-term negative effects on slope stability, productivity, and reestablishment of conifer seedlings (Amaranthus and others 1993).
For small projects, such as those addressed by this guide, it would be uncommon to consider using anything other than nonlocal native plants. Larger projects have the potential for even greater ecosystem disturbance when they resort to using nonnative plant materials. The alternative, which involves planning ahead, is to develop adequate sources of appropriate native plant material over time. For large-scale projects, this would start with defining ecotypes for species of interest, and starting large-scale propagation programs such as a seed- increase program to develop an adequate supply of seed for project needs.
Decisions on using nonnative or nonlocal native plant stocks depend on the project's goals. If the goal is to allow for the eventual establishment of a native plant community that approximates the vegetative mosaic before disturbance, local native plant stock should be used. If the goal is merely to revegetate an area for other human benefits, it may be appropriate to consider using nonnative plants. In designated wilderness, where land managers are legally mandated to manage for "untrammeled" landscapes, the latter approach conflicts with the philosophy of the Wilderness Act of 1964, and in some cases, runs counter to agency policy.
3.10.2 Plant Selection for Restoration Projects
The process of selecting plants for a restoration project is essentially a ecological and horticultural feasibility study that begins by selecting a reference site, as described at the start of this chapter. Often, the plant community that is desired to meet long-term goals for the area is not within immediate reach because of any number of limiting factors, including environmental conditions, the degree of disturbance at the site, continuing patterns of destructive use, difficulties in propagation, and budgetary constraints.
The very first consideration is whether natural revegetation might be possible as the minimum tool. This concept was described more fully in chapter 2. Natural revegetation may be possible, for example, if the soil has a known seedbank, if other live plant material could revegetate the site, or if the environment is lush and recovers quickly. Sometimes plants are not the dominant feature of the landscape. The appearance of restoration can be accomplished by other means, such as recontouring and replacing missing features (rock, for instance). Vegetation can be allowed to recover naturally. This approach can be successful in environments such as deserts or alpine fellfields (rocky habitats with a cover of low plants on exposed alpine summits and ridges).
The Leadville Ranger District of the San Isabel National Forest developed an interesting partnership for managing scrambling routes on the Colorado Fourteeners (peaks higher than 14,000 feet [4.27 kilometers]). Despite being in a "trailless" zone, many of these peaks were scored by steep, eroding parallel trails. Volunteers organized by the Colorado Fourteeners Initiative (http://www.14ers.org), are establishing one stable trail to each peak. The remaining routes are being obliterated and allowed to revegetate naturally (figure 3-96). Wilderness rangers have observed limited establishment of native seedlings on some of these routes after use has been eliminated.
If your project team decides that natural revegetation is infeasible, a vegetative prescription must be developed. The botanist or ecologist will help you determine the plants that could serve as an appropriate mix for restoration. You also should review the scientific literature and consult with practitioners who have worked with the same plant species or in similar environments. The outcome will be the selection of plant species, treatment methods, and propagation methods "most likely to succeed" in reaching project goals. This section lays out one approach for determining the plants that will be most successful.
Consider carefully planned experimentation (otherwise known as trial and error) to cut losses and learn more about successful treatments that can be used in future projects.

Figure 3-96—Mount Belford (elevation 14,197
feet, 4,327 meters)
is one of more than 50
Fourteeners in Colorado. The trail is recovering
naturally
after being closed.
3.10.2a Using the Reference Sites To Develop Plant Prescriptions
The vegetative characteristics of the reference site should be compared to those of your restoration site. Attributes to compare include the species represented, their relative abundance, distribution patterns, and age classes. Observe the stand structure; note the mix and spatial distribution of trees, shrubs, grasses, forbs, lichens, and mosses (figure 3-97). Note the growth forms of the various species present, paying special attention to species that appear to spread underground or establish freely from seed. If the site being treated is not homogenous, observe the relationship between changes in vegetative characteristics and subtle changes in site characteristics, such as full sun versus partial shade, or changes in slope or aspect. If the reference site itself has been disturbed and revegetated, examine how the successional transition occurred.

Figure 3-97—Learn to recognize vegetative patterns that form
separate
plant communities. Even within a meadow, the vegetation
type will change based
on factors such as slope, aspect, soil depth,
and soil moisture. This meadow
is in the San Juan National Forest, CO.
The plant communities found on your reference sites serve as a pharmacopeia, from which you can select appropriate plant species for restoration. Conceptually, the process goes like this: you want to replace the dominant species found on your disturbed-but-revegetated reference site and introduce at least some of the dominant species found on your undisturbed reference site. Those dominant species may be problematic for restoration because of limiting factors or challenges in working with the plants themselves. In that case, you will identify the early- to mid-seral species that lend themselves to propagation and outplanting, even if they are not dominant. You also will think about how to restore the stand structure so that the site supports an appropriate mix of growth forms and mimics a natural appearance, while addressing any additional limiting factors and design concerns.
The following four steps will help you translate the plant community found on the reference site into a vegetative prescription for your restoration site.
- Investigate the feasibility of propagating dominant
species found on the disturbed-but-revegetated
reference sites—There are a couple of ways to identify dominant
species. Look at species dominance on the reference sites you have chosen—which
species are represented in the greatest numbers? Also look at the plant
association type—a vegetative classification scheme that categorizes
dominant overstory and understory species. These two methods serve as
a check-and-balance
system
for species selection. The reference site will show you which plants
are really there, but the plant association type will help you see the
site in terms of
the broader landscape.
Some dominant species may pose challenges for propagation and restoration. While it is worthwhile to include propagation of these species in your prescription, you may not be able to rely on their reestablishment. In general, upland shrub species are more challenging to reestablish than graminoids (grasses, sedges, and rushes) and forbs.
- Investigate
the feasibility of propagating early- to mid-seral species found on the
disturbed-but-revegetated reference site-The theory of vegetative
succession is that early-seral species (lichens, mosses, graminoids,
and some herbaceous
plants) develop site conditions allowing mid-seral species (herbaceous
species and some shrubs) to invade, which further develop site conditions
allowing late-seral species (some shrub species and trees) to invade.
This is a grossly oversimplified textbook example of Type I Succession
(Smith 1980). In reality, your project environment could have trees or
shrubs that behave as early-successional species. For instance, bitterbrush
(Purshia tridentata), a shrub, can establish
itself on loose, bare soils. Your reference site has been chosen because,
after considering soil conditions
and other limiting factors, you gauged that you could reestablish this
vegetative condition on your restoration site. If you can't count on
reestablishing some of the dominant species, you will want to identify
appropriate early- and mid-seral species to add to the mix.
A botanist or ecologist can help you identify successional patterns at your site. Identify the plants that fall into the early-, mid-, and late-seral stages of succession. For some plants, this may be general knowledge; if not, examine the project area to distinguish between disturbed sites with early-seral plant communities growing on exposed mineral soil, mid-seral communities growing where there is some soil development, and late-seral communities (often comprised of trees or shrubs). Look for species that grow both on disturbed and undisturbed sites; a number of practitioners have observed that mid-seral species hold promise for restoration, because they survive into the development of late-seral communities (Belnap and Furman 1997; Chambers and others 1984; Chapin 1992). Grasses and sedges generally colonize disturbed soils, as do plants that spread from stolons or runners (figures 3-98a, 98b, 98c, and 98d).

Figure 3-98a—Plants that spread underground often can be spotted
by their trailing habit (plants may be in clumps or even in a line). Such
plants
are early-seral to mid-seral species that make good restoration
candidates
and may be resistant to trampling. Such species
include bunchberry (Cornus
canadensis).

Figure 3-98b—False lily-of-the-valley (Maianthemum
dilatatum),
a good candidate for restoration projects.

Figure
3-98c—Twinflower (Linnaea borealis),
a good candidate for restoration
projects.
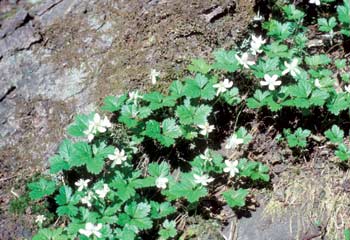
Figure 3-98d—Five-leaved bramble (Rubus pedatus),
a good candidate
for restoration projects.
- Investigate the feasibility
of propagating dominant species on the reference site, especially mid-seral
species—As described in chapter 1, theories of how plant succession
takes place differ. One theory, Type III Succession,
presumes that once a vegetative stand becomes established, it will hold
its own against "all comers" (Smith 1980), unless the stand
is disturbed. If we presume this theory applies to your reference plant
community, and your long-term goal represents a late-successional community,
it would be prudent to introduce some of the species of your long-term
goal, favoring mid-seral species that help develop conditions that might
eventually support late-seral species.
- Identify the growth forms desired as an outcome of restoration (trees, shrubs, forbs, graminoids)—While the graminoids and forbs are relatively easy to reestablish, they may not provide the stand structure represented in your reference sites. If your long-term goal is to have a mix of species providing ground cover, shrubs, and trees, identify the species that will move you toward this goal. It may be necessary to propagate shrubs from cuttings if seed is not readily available. For example, in the subalpine tree clumps of the North Cascades, currants (Ribes) are well established in the dense shade of undisturbed reference sites. The currants rarely set fruit, making it necessary to consider propagating them from cuttings.
3.10.2b Additional Limiting Factors and Design Considerations
Plants also must be selected in light of other ongoing problems such as trampling, recompaction, or continuing erosion. It is important to identify these potential factors and predict the factors that will represent the most difficult problems. Refer to appendix A, Treatments To Manage Factors Limiting Restoration, for additional advice on selecting plant species to help address your project's constraints. This appendix lists specific plant types and propagation methods used to address a number of extreme conditions that make it difficult to reestablish vegetation.
The nature of the disturbance may vary within the project area, requiring you to vary the species used for restoration. For example, the cut roadbeds may support different species than the fill slopes because of the differences in soil depth. In arid environments, grasses have deeper root systems than shrubs; a grassland that loses soil may support nothing but shrubs in the future (Belnap and Furman 1997).
Addressing Trampling in a Vegetative Prescription
Examining current human uses may further define limits to restoration and guide the selection of certain plant materials and propagation methods. Would continued human use of the project location prevent recovery of the desired plant community? Activities to consider might include walking, camping, off-highway-vehicle use, commercial grazing, or recreational use of packstock. Decide which of these activities will be removed through the project design, and which will be compensated for by selecting certain plant materials or types of treatments.
In areas with continued recreation or livestock use, it may be important to select plants that can withstand trampling.
Plants that can withstand trampling generally:
- Are low-growing rather than erect
- Are tufted
- Are armed with thorns, prickles, or spines
- Have leaves in a cluster at the base of the stem (basal
rosette)
- Have stems that are flexible rather than brittle or rigid
- Have small, thick leaves
- Can grow from the base of the plant as well as the tips
of the stems
- Have flexible leaves that can fold under pressure
- Are perennials that can regrow from buds beneath the
soil's surface where they are protected from trampling
- Can reproduce vegetatively from suckers, stolons, rhizomes,
or coring, as well as sexually through seeding
- Grow rapidly
- Can reproduce despite trampling
Addressing Visual Concerns
Selected plants need to be harmonious with landscape patterns and features. For example, trees or shrubs may be selected to hide a landscape feature, such as a gully.
Addressing Erosion Control
Plants also may be selected for their ability to help control erosion. A mix of growth forms provides more erosion control. The two main types of roots are taproots and fibrous roots. Taprooted plants (such as carrots and dandelions) have a large central root with finer lateral (side) roots. Taproots act like an anchor to stabilize soils. Taproots also help break up soil compaction and provide a means for water to percolate deeper into the soil. Plants with fibrous roots (such as grasses) spread a mass of fine roots that stabilize the surface of the soil better than taproots. The two types of roots can complement each other. Trees and shrubs are more deeply rooted than grasses and herbaceous species. A combination of all these growth forms can help stabilize eroding sites.
Plants that root or become established quickly also help stabilize erosion. Refer to table 3-8 in section 3.4.9, Bioengineering Applications, for a list of riparian species that root readily where soil moisture is abundant. These species can be used to build living structures to stabilize riparian sites. These techniques were described in more detail in section 3.4.9a, Selecting and Installing Bioengineered Structures.
In environments where native plants become established slowly, such as the subarctic, sometimes a sterile hybrid plant, such as rye, is used to provide roots that will stabilize the surface (Densmore and Vander Meer 1998). The use of sterile hybrids and other nonnative cultivars was discussed more fully in section 3.10.1d, Nonnative Plants, Agronomic Varieties, or Native Cultivars.
Adding Nitrogen-Fixing Plants, If Appropriate
Many restoration projects benefit from the use of native nitrogen-fixing plants (figure 3-99). These plants have a symbiotic relationship with bacteria that convert atmospheric nitrogen into a form that can be used by plants. The bacteria live in easily observed nodules found on the roots of the host plant. Nitrogen fixation is common in many species in the pea family (Fabaceae), as well as some other species. If plants that fix nitrogen are in the project area, they are likely to be included in the mix for propagation. If so, it will be necessary to inoculate the disturbed soil with bacteria (see section 3.2.5c, Soil Bacteria).


Figure 3-99—Plants in the pea family (such as this lupine growing
in subalpine meadows in the Cascades, above) cohabitate with
Rhizobium, a bacteria
that lives in root nodules (below). The
Rhizobium
bacteria convert atmospheric
nitrogen into a form
plants can use, improving soil fertility.
Genera That Include Some Nitrogen-Fixing Species(Barbour and others 1987; Hingston 1982)
- Alnus
- Casuarina
- Ceanothus (figure 3-100)
- Cercocarpus
- Colletia
- Comptonia
- Coriaria
- Discaria
- Dryas
- Eleagnus
- Hippophae
- Luetkea
- Myrica
- Purshia
- Rubus
- Shepherdia

Figure 3-100—Many species of ceanothus, found throughout
the
drier regions of the Western United States, fix atmospheric
nitrogen. Mahala
mat (Ceanothus prostratus), which has striking
blue flowers, ranges from
the Sierras and western Nevada north
to southern Washington. Drawings courtesy
of the University
of Washington Press (Hitchcock and Cronquist 1976).
3.10.3 Determining Propagation Methods for Your Site and Species
The costs and success rates of different methods of propagation vary dramatically. Helpful information can be found in a variety of sources. The USDA Natural Resources Conservation Service has developed a comprehensive national plants database that is on the Web at http://plants.usda.gov/. Additional helpful Web sites are listed in chapter 5. The propagation requirements of many species can be found in the scientific literature and in books on propagating native plants. Some recommended references include:
- Growing California Native
Plants (Schmidt 1980)
- Propagation of Pacific Northwest Native
Plants (Rose and others 1998)
- Seeds of Woody Plants in North America (Young
and Young 1992)
- Native Plant Propagation Techniques
for National Parks (Link 1993)
- A Native Hawaiian Garden: How to Grow
and Care for Island Plants (Culliney and Koebele 1999)
- Grass, Grass-like, Forb, Legume, and Woody Species for the Intermountain West (Ogle and others 2003)
Subject-area experts often are happy to share what they have learned; seek the advice of other restorationists, native plant growers, or the technical support staff at the USDA Natural Resources Conservation Service Plant Material Centers.
Appendix A, Treatments To Manage Factors Limiting Restoration, lists a variety of potential treatments, including plant types and propagation methods. Appendix B, Propagation and Establishment Requirements for Selected Plant Species, contains species-specific information on propagation methods and plant establishment. The next section describes in more detail the field techniques for onsite propagation and for collecting plant materials for offsite propagation.
If successful, onsite seeding with local native plants is the least expensive method of propagation and tends to do the best job of providing genetic diversity. In many environments, including arid lands and in the subalpine zone, onsite seeding has not been very successful. Transplanting wildlings (wild plants removed from one area and transplanted to another) or other methods of onsite vegetative propagation can be fairly economical, especially if volunteer labor is available. However, these methods tend to harm the collection areas. Projects that disturb areas nearby may provide an opportunity to transplant materials. Not all species transplant well. Large plants and taprooted plants are especially challenging to transplant.
3.10.3a Seed-Increase Programs
Offsite propagation methods, such as seed-increase programs (also called a grow-out) or nursery-grown planting stock, are more expensive than seeding with local native plants or transplanting. In many cases, offsite propagation is the only viable option. Seed-increase programs are useful if a large amount of seed is needed. A relatively small amount of seed (such as several pounds or a kilogram or two) is grown as a seed crop on a relatively small plot (for instance, 1 acre or 0.4 hectare) by a farmer or nursery (figure 3-101). This approach is especially useful when planning for rehabilitation of roads, slope stabilization following wildland fires, and so on.

Figure 3-101—If a large quantity of seed is needed for restoration,
consider
a seed-increase program. A relatively small amount of
seed
is grown in an agricultural
setting, such as at the Forest Service's
J. Herbert Stone Nursery in
Central Point, OR, and harvested
to provide more seed.
Seed-increase programs require 2 to 5 years to produce an adequate seed crop. Typically, the seed from the first crop is sown to produce a larger second crop, increasing the volume of seed. The cost of the seed produced goes down each year, but each successive crop runs an increased risk of genetic shift, because the growing conditions will favor plants that respond well to agriculture.
Genetic shift can be minimized by mimicking natural growing conditions as closely as possible and by having successive harvests of ripe seed. The USDA Forest Service's Pacific Northwest Region has a native plants program that is using seed-increase programs on a number of forests.
3.10.3b Propagation Methods and Stock Types
For nursery-grown plants, it is important to identify the propagation method and stock type. Propagation methods commonly in use for native plant production include growing from seed, various types of cuttings, divisions, layering, or tissue propagation.
The stock type is a combination of the length of time a plant is grown in a nursery before being outplanted and the method of growth (bareroot or different sizes of containers). Outplanting is when a plant is taken from the nursery to be planted elsewhere. Determining the appropriate stock type by species is a very important step in the planning phase. For each species, the appropriate stock type will depend on the project goals as well as known or inferred information on species propagation success and plant establishment once stock has been outplanted (refer to appendix B, Propagation and Establishment Requirements for Selected Plant Species, for species-specific information).
Consult with professional growers or other practitioners to help determine the best stock type. In some cases, selecting several stock types may enable the practitioner to hedge against losses or to provide an array of plant sizes mimicking the natural condition at the project location. The stock types are listed below in relative order of expense (Potash and Aubry 1997):
1-0 Ship: A bareroot seedling grown for one growing season in a nursery bed. Many species perform well in outplanting, including many riparian species and shrubs. Most species are started from seed, although some can be grown from cuttings.
Plug: A containerized seedling typically grown for one growing season. Outplanting performance is similar to 1-0 ship. Seedlings can be propagated from seed or cuttings. Cuttings are much more expensive. The containers come in many sizes, depending on the size of seedling that is needed. Generally, the bigger the container size, the better the seedling will perform. This stock type is good for rocky soils where it is difficult to excavate a hole for a large root system. Because the plant is in a rooting medium, there is more flexibility in the timing of outplanting than with bareroot stock.
2-0: A bareroot seedling grown for two growing seasons in a nursery bed, producing a bigger seedling than 1-0 ship or plug stock types. A conifer seedling grown as a 2-0 generally does better than plug and 1-0 ship seedlings on harsh, dry sites.
1-1: A bareroot seedling that is transplanted to a nursery growing bed after one growing season. It is grown for a second year and then lifted as a bareroot plant for outplanting. Generally, these seedlings have a thick stem and a very massive, fibrous root system. On highly productive sites, these seedlings grow very quickly, staying above competing vegetation. Because of their exceptional growth potential, they often are used in hot, dry areas or in areas where animals damage seedlings.
Plug-1: A bareroot seedling grown as a plug the first season and them transplanted to a nursery bed for another year. The performance and uses of a plug-1 seedling are similar to those of a 1-1 seedling.
2-1: A bareroot seedling grown for two seasons in a nursery bed and transplanted into a nursery bed for another year. This stock type can be used for species that are very slow growing. For faster growing species, the shoot-to-root ratio can be high, which means that the root system may not support the shoot, causing poor performance when the seedlings are outplanted.
3-0: A bareroot seedling grown for three seasons in a nursery bed. This stock type is used for slow-growing species.
Large containers: A seedling that usually is grown for more than one growing season in a 1- to 4-gallon (3.8- to 15-liter) or larger pot. Because of their large size, seedlings of this stock type appear established when planted and can withstand some of the abuses that are common in heavily used recreational sites.
Container Sizes
In the wet forests of western Washington, plants destined for restoration in wilderness are generally propagated in 2-inch (50-millimeter) pots (figure 3-102). Plants that need more than one growing season before being outplanted may be transferred to larger pots. For drier sites, long planting tubes such as the 8-inch (200-millimeter) or longer super cell, will make it possible to outplant seedlings with a deeper root system. Most native plant nurseries use this approach (figure 3-103).
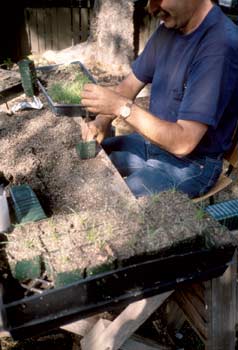
Figure 3-102—Wilderness restorationist Greg Shannon transfers sedge
seedlings started in flats to 2-inch (50-millimeter) pots where they
will grow
for 3 more months before planting. The 2-inch
(50-millimeter)
pots
provide
a plug that is large enough
to be planted in areas
with dependable precipitation.

Figure 3-103—Methow Natives (Winthrop, WA) and many other
native
plant nurseries use long tubes for growing plant stock with
deeper root systems.
This approach works well when establishing
plants on drier sites and in areas
where irrigation is a problem.
The restoration staff at Joshua Tree National Park in California uses a 36-inch (914-millimeter) "tall" pot and an 18-inch (457-millimeter) "half tall" made from 8-inch- (200-millimeter-) diameter PVC pipe with a removable mesh bottom (figures 3-104a and 104b). Creosote bushes or other shrubs grown in these pots for 6 months or so can be transplanted easily into machine-augered planting holes. Their root systems are deep enough to reach the available soil moisture. Plants grown in large containers such as these are the most expensive, but sometimes stock from large containers is the minimum tool necessary to assure outplanting success.

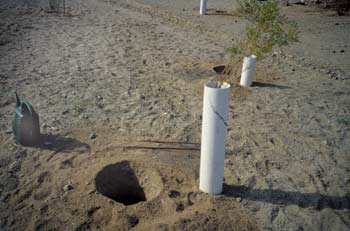
Figures 3-104a and 104b—To establish native vegetation on
the exceedingly
dry Mojave Desert, the staff at Joshua Tree National
Park, CA,
developed
36-inch
(914-millimeter) "tall" containers and
18-inch (457-millimeter)
"
half talls" (top). The mesh bottom is removed
before the containers
are
planted (bottom). The container is
removed by lifting it from the planting
hole.
3.10.3c Noxious Weeds and Other Nonnative Invaders
Unfortunately, noxious weeds have thoroughly invaded some remote backcountry and wilderness areas. You could unknowingly identify a weedy species (figure 3-105) as having potential for revegetation. The botanist on your team will help you avoid this mistake. Weedy species have great potential—that's why they're a problem.
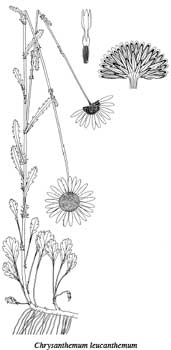
Figure 3-105—Although oxeye daisy (Chrysanthemum
leucanthemum)
is
prolific and easily established (even pretty), you wouldn't want to
inadvertently
select this noxious weed to restore your restoration site. One of
the authors
has been pulling oxeye daisy seedlings in her garden for 15
years and still
hasn't depleted the seedbank. Drawings courtesy of the
University of
Washington Press (Hitchcock and Cronquist 1976).
3.10.4 Concluding Thoughts on Plant Selection
Selecting plant species involves careful consideration of project goals, site capability, and methods to ameliorate adverse conditions. Very few projects fully succeed in replacing all elements of the predisturbance plant community— its species composition, structure, and function. It is easy to become discouraged, because deep down we all recognize the importance and desirability of restoring the predisturbance community. A careful planning process, such as the one described in this chapter, will help you make the best call possible, given site conditions, technological capabilities, and the project budget.
3.10.5 A Comparison of Propagation Methods
Growing plants from seed is the only form of propagation that results in sexual reproduction with a wide array of genotypes represented in the propagated plants. The vegetative forms of propagation produce clones of the donor plant, limiting the genetic diversity of the restored plant community. However, some species are not easy to grow from seed. In such cases, vegetative propagation techniques become the solution for providing adequate and affordable plant materials. Tables 3-11 and 3-12 summarize the pros and cons of various onsite and offsite propagation methods.
Project planning should include consultation with others having experience with the same species or in similar environments. Even slight changes in environmental conditions can change the outcome of a treatment.
If plants are propagated offsite, they will need to be slowly hardened off before outplanting. Hardening off is the process of weaning plants off the optimal growing conditions provided in the nursery so they will survive once they are planted in the wild. Hardening off usually involves reducing water and shade, increasing or decreasing ambient temperatures, and reducing fertilization. Many species are top pruned or even root pruned several weeks before outplanting to increase the root-to-shoot ratio. The hardening-off process usually occurs at the nursery, although sometimes restorationists are required to take care of this crucial step themselves (figure 3-106). In some cases, the plants are hardened off at the restoration site.

Figure 3-106—Before plants used in restoration are outplanted,
they are hardened off, gradually increasing their exposure to
the
conditions
they will experience after they have been planted in the
wild.
As can be seen
on these sunlit sedge flats, their foliage was cut
back to increase the root-to-shoot
ratio, increasing the chance that
they would survive. These plants were stored
behind the
Leavenworth
Ranger Station in Washington for 3 months before outplanting.
Bareroot stock is hardened off to induce dormancy. Plants are held in
a cool, dark, moist environment until they are transplanted. If
3.10.6 Plant Collection Principles
The genetic principles for collecting plant material outlined earlier in this guide should be followed, including adhering to local or agency genetic policies. In the absence of such a policy, the following guidelines are conservative enough to preserve the genetic integrity of plants in wilderness or other wildland project locations, while assuring adequate representation of an array of genotypes to establish a genetically diverse population.
Plant materials, such as seed, cuttings, or wildlings should be collected from throughout the entire plant collection zone, taking equal amounts from at least 30 to 50 unrelated individuals (figure 3-107). The plant collection zone can extend 250 vertical feet (about 76 meters) above and below the project location. Start collections at the upper elevation limit to assure that some of cold-adapted individuals are included. Ideally, in wilderness, plant material should come from the same subbasin. If plant material is scarce, collecting plant material within the same watershed is considered acceptable.
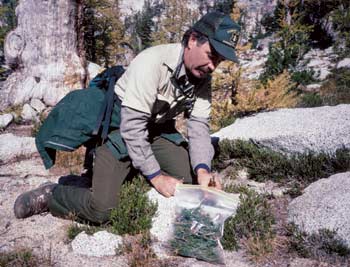
Figure 3-107—Wilderness restorationist Greg Shannon collects
cuttings
from heather for propagation. All cuttings taken from an
individual
plant will
be a clone of that plant, making it
important
not to collect too many cuttings
from one plant.
Propagules should be collected from plants that differ in appearance and are found in different microhabitats, if possible (rather than only from the most robust-looking individuals on the most ideal sites). Parent plants that are diseased or that have insect infestations should be avoided. If the site to be treated is unusually harsh, seek out propagules from plants found on sites that are just as harsh. To avoid genetic bias, avoid overharvesting stands that are unusually lush.
Nursery propagation methods are not described in detail in this guide. Many books and publications on propagation techniques and the propagation of native plants are listed in the references. The interest and commitment to using native plants is rising within agencies, which means that restorationists are more likely to have professional support to help them select propagation methods and develop sources of locally adapted native species.
If plants are going to be propagated offsite, consult with the grower. Questions to ask the grower include how to collect and prepare plant material, how much to collect, and how to ship the material to avoid injuring it. In addition, the plants may need to be stored or held over until the next growing season before outplanting. For an additional cost, some growers can do so. Others may not wish to.
If nursery-grown stock is to be inoculated with soil organisms, the plant collector will probably collect inoculum at the same time that the plant materials are collected.
3.10.7 Preventing Further Damage to the Project Area
Once the planting begins, take care to avoid further damage to the project location, including the freshly prepared site and the vegetation surrounding it. Have a plan in place for work crews to follow, including how crews will travel in and around the work site. Select a staging area, preferably one that has already been impacted, or one in a resilient location. If the work crew is to camp, select a campsite that can withstand the impact of their stay. If the area receives recreational use, the campsite should be isolated from public view. Crews should be taught low-impact practices before they begin their work.
Once the planting bed has been prepared, minimize soil compaction caused by foot traffic or machinery. It often helps to identify a travel corridor in the site being treated, perhaps even laying out stepping stones. Indoor-outdoor carpet, scrim, or worn out foam sleeping pads, make good walkways to protect meadow vegetation from excess trampling. Ladders have been used to access steep, eroding banks to avoid walking up and down the slope.
For additional information on plant propagation, consult Plant Propagation: Principles and Practices (Hartmann and others 1990) and Plant Propagation (Browse 1979).
3.10.8 Working With Seed
Seed crops can vary widely from year to year, with some species going for years with no seed or fruit (in which case a different propagation method may need to be chosen). Because of this variation, it may be necessary to collect and store seed for several years to have an adequate supply for a restoration project.
The seed of many plant species ripens and drops quickly. With some species, it is not uncommon to leave the project area for a few days and come back to find that all the seed has completely dropped. If seed collection is important, the ripening seed must be monitored carefully. Characteristics to look for include: capsules beginning to open, pods beginning to darken, seed that is swelling and becoming hard instead of pulpy when squeezed, seed that drops from the plant when disturbed, grass heads that are beginning to cure, fleshy fruits that are ripening, and so forth (figures 3-108a and 108b).

Figures 3-108a and 108b—Partridgefoot seed (top) is collected by
District
Ranger Becki Heath, a dedicated wilderness line officer (bottom).
Partridgefoot
(Leutkea pectinata) seed is easy to collect by leaning the
stems
into the opening
of a bag and tapping the stems gently. Seed is ripe
when the flower stalks
begin to turn reddish brown and the capsules open.
Some fruits explode to disperse seeds. These fruits should be harvested when the pod is nearly ripe, before the pod explodes. Pods or capsules can be stored in paper bags so seeds will not be lost when the capsules explode. Collect cones when they have turned from green to brown, but before they have opened.
Seed collection should occur throughout the ripening period, to assure genetic diversity. With some species, collection can begin during the latter part of the "soft dough" stage, which can be recognized by squeezing the seed between the thumb and forefinger and squeezing out the contents. In the "hard dough" stage, the seed cannot be squeezed open and is generally too hard to bite open.
The ripening period for a particular species may not be consistent from year to year. In mountainous environments, the initiation of flowering often is based on temperature, which can vary from one year to another, sometimes delaying flowering for weeks. Seed will mature earlier or later depending on the initiation of flowering. In desert environments, flowering often follows rain, with seed production close behind.
Do not deplete an area of more than 50 percent of its seed. This generally is not a problem, because most collectors drop seed when collecting it or don't harvest entire stands. Be careful not to contaminate native seed by inadvertently collecting weed seed. Seed collected throughout the plant collection zone at a given site or sites can be combined by species into a seed lot (figure 3-109).

Figure 3-109—Seed collected throughout the plant collection zone
at
a given site or sites can be combined by species. This combination
is a
seed lot that will be documented on a seed collection form.
Most projects in wilderness areas and remote sites are relatively small, allowing seed to be collected by hand. A number of simple comb-like tools can be fabricated to make the collection go faster. For small collections, collectors can use small paper bags to hold the seed. For larger collections, collectors can wear fruit picking bags, carry plastic pails, carry metal trays like baking pans, or use similar devices. It is rarely feasible to use machinery when harvesting native seed from the wild (Young and Young 1986).
The following techniques have proven successful for harvesting seed by hand:
Cutting—Use scissors or a sickle to remove seed heads. When using a sickle, gather the stems with seed heads in one hand, and cut the stems as close below the heads as possible. Wear leather gloves to protect your hands. This technique works well with herbaceous plants and grasses.
Stripping—To strip seed, pinch fingers and pull them over the seed head, allowing the seed to drop into a container. This approach works with graminoids, forbs, and some shrubs when the seed is ready to fall from the plant. Gloves will protect your fingers.
Beating and Shaking—Plant stems can be held and shaken over a tray or tarp or beaten by hand or with a paddle. For large collections, tarps are less efficient because of the time needed to spread them out. It is faster to hold a metal tray under the branch or stem.
Pruning—When other methods are not successful, seed can be removed from tall shrubs or trees by pruning limbs bearing seed.
3.10.8b Initial Processing of Seed
Seed will mold and rot quickly if it is not cured properly. Collectors should spread the seed out to dry for about a month in a warm (not hot) location. Seed that is small will dry in less time. Small quantities of seed can remain in brown paper bags while drying. The mass of seed should be pushed to the edges of the bag to maximize air circulation. If seed is cured outdoors, it must be protected from animals that eat seed and from excess heat, precipitation, and frost.
Dry cones by spreading them out in a single layer on racks in a warm place with good air circulation. Turn the cones every few days to prevent them from molding. Cones will open in a few weeks or so (Sound Native Plants 1994).
Seed processing and cleaning is a rather involved science. Professional growers use a wide array of equipment to separate the seed from the plant material and to clean the seed. Professional growers can help, particularly with seed that is difficult to clean, but their services add to the cost. For many species, field practitioners can do part or all of the cleaning themselves, being careful to retain as much of the viable seed as possible to preserve genetic diversity.
Seed processing and cleaning needs to be more thorough if seedlings are to be grown in a nursery or resown with machinery. But even if the seeds will be sown onsite, excess plant matter mixed in with the seed can cause the seed to deteriorate and increase the time needed for the seed to break dormancy. For instance, the awns on the seed of some species of grass have a chemical inhibitor that maintains seed dormancy.
Rub the plant parts to free the seed from its covering. The plant material can be rubbed on a wire screen (figure 3-110) or between blocks of wood or bricks. Plant material can be put inside a bag or a rubber tire tube and kneaded underfoot to abrade it. One restorationist suggests placing a bag with seed and several pairs of shoes in a dryer and tumbling them with no heat. You may want to be careful whose dryer you pick for this method!

Figure 3-110—Plant material can be rubbed on a wire
screen to remove
the seed.
Chaff can be separated from heavier seed by blowing the seed with a fan while it is being rolled down a screen or poured between two containers. An alternative method is to put plant parts in a tub and run a string-type weed eater in the tub to separate the plant materials from the seed. Most seed will work its way to the bottom of the tub.
Seeds can be extracted from fleshy fruits by crushing the fruit on a screen with a rolling pin, or by running it through a fruit press (figure 3-111). An alternative method is to macerate the fruit by adding about 50 percent water by volume and running the material through a blender that has its blades taped to reduce damage to the seed. The blender's blade can be replaced with strips of rubber, which will reduce the seed that is damaged. Allow the resulting slurry to sit until the pulp has separated from the seed; this may take a few minutes to a few days. Fleshy fruits that have dried out can be run through a grain mill with a coarse setting.

Figure 3-111—Seed can be extracted from fleshy fruits by crushing
the fruit on a screen, by macerating the fruit with water in a blender,
or
by running dried fruit through a grain mill with a coarse setting.
This photo
shows black twinberry (Lonicera involucrata).
Some seed, such as those from cones, pods, or open seed heads, can be placed in bags and trod underfoot. Tree nurseries have more thorough methods for removing seed from cones. Any wings on the seed need to be removed before the seed is sown.
The seed of most species requires a period of afterripening, ranging from one to several months when the embryo matures inside the seed. With some species, afterripening takes place inside the fruit. This adaptation prevents seed from germinating prematurely during inhospitable growing conditions, such as during the winter or the extreme heat of summer.
If plants are to be grown professionally, seed should be shipped as soon as it has been cured to prevent seed mortality. Ship early in the work week to avoid weekend delays.
Practitioners may choose to store small quantities of seed, particularly if the seed will be used for onsite seeding. Seed can be destroyed by insects, fungi, or ice crystals during storage. For most seed, proper drying coupled with storage in a cold, dry environment will maximize seed viability (figure 3-112).
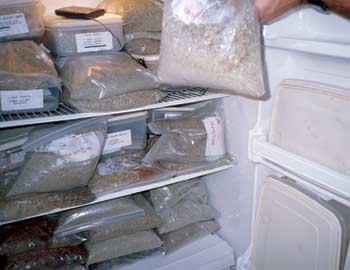
Figure 3-112—Once seed has been air dried thoroughly, the greenhouse
staff at Joshua Tree National Park, CA, stores seed lots in a freezer.
Young and Young (1986) suggest that moisture and temperature influence seed deterioration in the following way; first, each 1-percent reduction in seed moisture doubles the life of the seeds, and secondly, each 10-degree-Fahrenheit (6-degree-Celsius) reduction in seed temperature doubles the life of the seeds.
If stored seed has more than 14-percent water content, ice crystals can form and destroy the embryo. Water content of less than 5 percent also seems to damage the seed.If mold or insects are anticipated to be a problem, the surface of the seed can be sterilized with a 10-minute soak in a solution of two parts bleach to three parts water, or of 3-percent hydrogen peroxide. Follow the soaking with a thorough rinse in water. These treatments are toxic to some plant species and should be used only if they are needed (Bainbridge and others 1995). A sprinkling of diatomaceous earth also will protect stored seed from damage by insects.
The maximum temperature for drying seed is 90 to 100 degrees Fahrenheit (32 to 38 degrees Celsius). Seed must be dried in an area with low relative humidity, because the idea is to draw moisture out of the seed rather than into it. Seed needs to be dried quickly, but if it is dried too rapidly, the surface of the seed can be damaged by cracking.
Small lots of seed are stored at below freezing temperatures in sealed jars, such as canning jars. Indicator desiccants, such as colored silica packets, should be placed in each jar to absorb moisture. When the silica changes color, it is replaced with a new packet. The old packet can be renewed by heating it in an oven to drive off the moisture.
For larger seed lots, seed can be stored in moisture-proof containers, such as metal boxes with a gasket on the lid. Properly dried seeds can keep for several years when stored this way. Professional seed-processing facilities have moisture- proof storage rooms with storage conditions that are close to ideal.
Pure live seed per pound is a measure of viability and purity, determined by a seed testing lab. Most wilderness projects probably don't need to test seed viability. Testing may not be necessary for species that have reliable seed viability. Without high-quality seed, all the time, money, and effort of preparing a site could be wasted. If professional or commercial services are involved in collecting seed, seed-increase programs, or growing seed offsite, the percentage of pure live seed should be determined. Knowing the pure live seed per pound also is important if seed mixes are being developed.
Pure live seed per pound is determined by sending about 500 seeds of a species to a seed lab for testing. Several methods are used to determine viability. Tetrazolium staining, used to determine whether the dormant seed embryo is respiring (still alive), is one of the more reliable tests for larger seeds. Tetrazolium staining also has the benefit of offering quick results for seeds that might need longer to break dormancy. Tetrazolium staining generally is not feasible with small seed (the size of grains of salt or sand). Instead, a weighted replicate germination test is used (Vankus 2004).
Each State has a seed testing program geared toward supporting the agricultural industry. Not all seed labs are equally proficient in testing native seed (Vankus 1997). To identify a reliable lab, consult with native growers or large-scale restoration practitioners.
3.10.8f Breaking Dormancy
Most seeds have adaptations that allow them to remain dormant until growing conditions are favorable for seedlings to become established. Seed dormancy can be caused by a thick seed coat, chemical inhibitors, or a combination of both. Breaking dormancy is critical to professional nurseries, which know a great deal about the requirements of many species. The practitioner needs to be aware of these basic concepts, especially in regard to preparing seed and timing onsite seeding. The methods for breaking dormancy for a number of selected species are identified in appendix B, Propagation and Establishment Requirements for Selected Plant Species.
In nature, plants with thick seed coats often are broken down when birds crack the seed or partially digest it. Seed may be abraded when wind tumbles it across rocks or when it is scorched by fire. If seed with a thick seed coat is sown without pretreatment, germination rates will be lower and germination will take longer.
Scarification is used to break dormancy in plants with thick seed coats. Depending on the species, the seed coat can be cracked with a rolling pin, clipped with snips, nicked with a knife, abraded with sandpaper between blocks of wood, soaked in hot water or sulfuric acid, or leached in running water (figures 3-113a, 113b, and 113c). Care must be taken to avoid damaging the tiny embryo. Sulfuric acid treatment should be done professionally, because the acid is dangerous, timing is critical, and a neutralizer is needed. Seed can be leached in water by putting seed in a cloth or mesh bag and allowing water to run through the seed lot for the correct period of time, often 48 hours. An easy way to run water through the seed lot is to put the bag of seeds inside the tank of a toilet that is used frequently.

Figure 3-113a—The seed of creosote bush (Larrea
tridentata)
needs
to be leached with water to wash away chemical inhibitors
stored in its thick
seed coat. (Hickman 1993).

Figure 3-113b—Creosote seed is laid on wet, paper-lined
trays
to
germinate.
Germinants are carefully picked up with tweezers
and planted in pots at Joshua
Tree National Park, CA. (Hickman 1993).

Figure 3-113c—Did you know that creosote bush is one of the
world's
oldest living plants? Some creosote bush clones are
10,000 years
old (Hickman
1993).
Plants with chemical inhibitors that maintain dormancy usually require cold-moist stratification. In nature, this usually happens during the fall and winter, when soil temperatures are consistently cool and moist soil is against the seed. For the practitioner planning to sow seed onsite, a fall sowing provides the best chance that the seed will break dormancy over the winter, although during some years the conditions may not allow the seed to do so. The period of time needed to break dormancy varies tremendously by species.
Professional growers induce cold-moist stratification by packing seed in a moist medium, such as peat moss, and storing the seed in a refrigerator for a set period of time. Or seed can be soaked in a net bag, which is placed inside a plastic bag and hung inside a cooler.
After dormancy has been broken, the seed begins to germinate. To germinate, a seed must imbibe water, which induces chemical changes that allow metabolism to increase. When the embryo grows, it pushes the seed open and begins to root in the soil, a process called seedling emergence if the tiny plants survive germination. Germination requirements, which include the amount of moisture, warmth or cold, and darkness or light, vary by species. The germination requirements of a particular species will influence the practitioner's choice of cultural methods.
Two good references are Collecting, Processing, and Germinating Seeds of Wildland Plants (Young and Young 1986) and Native Seed Collection Guide for Ecosystem Restoration (Huber and Brooks 1993)
3.10.8g Onsite Seeding Techniques
Onsite seeding is a common restoration treatment. Seeding success varies, depending on the environment, weather conditions, species, and the degree of site disturbance. If successful, direct seeding is the least expensive method of restoring native vegetation and it assures genetic diversity.
Species generally respond most favorably if the seed is covered with soil, increasing the moisture available to support the emerging seedling. Seed can be broadcast on the soil surface and covered with soil, or seed can be placed directly into the soil. Most subarctic species require light for germination, an exception to the rule of covering seed with soil.
Projects in wilderness or at remote sites probably will be seeded by hand sowing (figure 3-114) or with a hand-held seed spreader, such as a Cyclone seed spreader. Larger projects outside wilderness can use equipment to broadcast seed quickly. Helicopters can broadcast seed over huge landscapes. They work well on steep or broken terrain. Machines called drillers drill small holes to a specified depth in the ground, drop in seed, and tamp the ground, producing uniform rows of seedlings. Hydroseeding mixes seed with water and sprays the mixture over the area to be treated. Hydroseeding can be very effective in temperate areas, but is not very successful on arid lands. It also requires motorized equipment, making it unsuitable in wilderness areas. Other types of equipment, such as centrifugal broadcasters (also called end-gate seeders), cast the seed 20 to 40 feet (6 to 12 meters) and use a harrow or a chain pulled behind the seeder to cover the seed with soil.

Figure 3-114—A Parmesan cheese shaker will help assure that
small
seed is distributed evenly. If you add the seed to fine,
dry sand and
put the
mixture in the shaker, the seed will go
farther
than if you
spread it with
your fingers.
Some benefits achieved with machinery also can be emulated on small sites by using handtools. For example, imprinting creates microbasins across the surface of the site that catch water, retain mulch, and provide some protection from wind. Pitting creates even smaller pits about 20 inches (510 millimeters) apart and 2 to 3 inches (51 to 76 millimeters) deep with seed planted inside each pit (Belnap and Furman 1997).
Literature relating to mine reclamation, road obliteration, and other landscape-scale restoration applications describe the use of mechanized techniques for seeding. They will not be discussed further in this guide.
Once seed has been sown on the seedbed, you can lightly rake it into the soil or work it in with your fingertips. A thin layer of topsoil or compost can be added. If the soil is loose, the ground can be tamped lightly to make sure that seed contacts the soil. In sandy soil, seed needs to be planted a little deeper. A general rule of thumb is to plant seed one and a half to two times deeper than the seed diameter. For many environments, mulch will provide additional protection to emerging seedlings discussed fully in section 3.12, Plant Protection and Establishment. Some species require a mineral soil seedbed for establishment; practitioners at Denali National Park in Alaska have found this to be true with subarctic species (Densmore and Vander Meer 1998).
If animals are likely to eat too much of the seed, a variety of techniques can be considered to address the problem. In the Southwest, ants are major collectors of seeds. Cracked wheat can be spread before seeding to satiate the ant population (Bainbridge and others 1995). Raking seed into the soil or covering the soil with mulch will help discourage birds and rodents.
Seed is sown onto a prepared seedbed in the fall and mulched with an erosion-control blanket (figures 3-115a and 115b). When the snow has melted the following season, clear plastic sheeting is anchored over the seeded area.
Visqueen (polyethylene sheeting) warms the soil and retains moisture, which is especially helpful when working with sedges (Carex spp.).
The sheeting is removed before the soil gets warm enough to kill the tiny seedlings. According to backcountry district ranger and restorationist Bill Lester, the technique of using Visqueen to enhance seedling emergence was discovered by accident in North Cascades National Park, WA. When a crew left the backcountry for their days off, they accidentally left a piece of Visqueen lying over some bare soil. When they returned, they noticed that the soil under the sheeting was covered with tiny green seedlings.
The optimal soil temperature is 85 degrees Fahrenheit (30 degrees Celsius). A soil thermometer is used to monitor soil temperature. Frequent monitoring is necessary to prevent the temperature from getting too high or the bed must be irrigated as the soil dries. Perforated landscape plastic has the advantage of ventilating heat better, which could reduce the frequency of monitoring. The sheeting is removed once seedlings emerge, or it could remain longer if temperatures remain cool (Weisberg 1993).
This is basically the same setup that is used in solarization to kill weed seeds (described previously in the soils section). The difference is in that soil temperature is maintained at about 85 degrees Fahrenheit (30 degrees Celsius), the optimal temperature for seedling emergence. Solarization allows soil temperatures to reach temperatures of 180 degrees Fahrenheit (82 degrees Celsius), which kills most germinating plants (Bainbridge 1990).
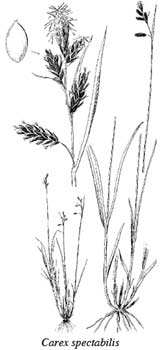
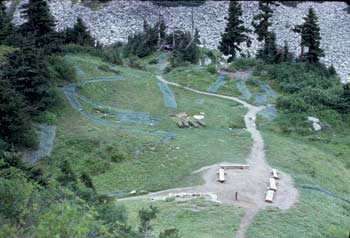
Figures 3-115a and 115b—Warmth and moisture benefits
newly seeded
sedges (top). Jute netting (blue strips,
bottom) helps protect seeded areas
at a restoration
site in North Cascades National Park, WA.
Drawings courtesy
of the University of Washington
Press (Hitchcock and Cronquist 1976).
There is virtually no way to correlate the desired ratio of established plants with a seed-mix formula because of the array of variables: seed viability, time and conditions needed to break dormancy and induce germination, animals that eat seed, soil moisture, seedling survival, and so on. Seeding rates that are too low will not provide enough seedlings for erosion control or competition to keep out nonnative species, while too many seedlings may outcompete one another for limited water and nutrients. The ratio between various life forms (graminoids, forbs, shrubs, and trees) affects the establishment ratio, but the correlation is not direct. For example, on the sagebrush steppe, grasses tend to outcompete forbs, so a mix lower in grass seed may be needed unless the desired outcome is for grasses to dominate (Doerr and others 1983). In the same way, the ratio of species in a seed mix cannot be correlated directly to species establishment. Seeding rates often take years of site-specific experience to develop.
Redente (1993) suggests that broadcast seeding techniques require twice as much seed as techniques based on drilling, but that the result more closely mimics natural processes. Seeding rates vary by the environment, species, and the viability of the seed.
Seeding rates usually are expressed as seeds per square foot or pounds per acre. The USDA Natural Resources Conservation Service recommends 20 pure live seeds per square foot for favorable planting conditions. That rate may need to be increased two to four fold, based on factors such as weed competition, steep slopes, low soil moisture or nutrients, or highly disturbed soils (Redente 1993). Arid land restorationist Dr. David Bainbridge (Bainbridge and others 1995) recommends 100 to 500 seeds per yard (meter) for arid lands such as the Mojave Desert of southern California. Restorationists sow at least 133 seeds per square foot (0.09 square meter) in Mount Rainier National Park in Washington (Rochefort 1990).
Redente offers the following broadcast seeding rates for forbs and graminoids, based on annual precipitation (table 3-13). The rate needs to be higher for shrubs.
| Annual precipitation inches (millimeters) |
Pure live seeds per square foot |
|---|---|
| 6 to 18 (152 to 457) | 40 to 60 |
| 19 to 30 (483 to 762) | 60 to 80 |
| More than 30 (762) | 80 to 120 |
- Pounds/acre x 1.12 = kilograms/hectare
- Kilograms/hectare x 0.892 = pounds/acre
- Kilograms/hectare x 0.10 = grams/square meter
- Pounds/acre x 0.000367 = ounces/square foot
- Pounds/acre x 0.00330 = ounces/square yard
20 pounds/acre = 100 square feet seeded with 0.05 pounds of seed
3.10.9 Working With Cuttings
When it is difficult or impossible to propagate plants from seed, cuttings are a common method of propagation. Depending on the species, cuttings can be taken from different parts of the plant: buds, stems, leaves, or roots. Determine which type of cutting is appropriate for a given species; several types of stem cuttings are the most common when propagating native plants.
Cuttings are usually rooted at a nursery, although a few genera and species lend themselves to rooting directly in moist soil at the project site. Often, these species are used to create bioengineering structures designed to stabilize slopes. Methods for bioengineering are described in section 3.4.9, Bioengineering Applications.
3.10.9a Collecting and Handling Cuttings
The plant collection guidelines described at the beginning of this section are used to identify and tag parent or donor plants. This must be done while leaves are on the stem to assure accurate species identification. Some plants, such as willows, have separate male and female plants. It is important to collect cuttings from plants of each gender to establish a population that can reproduce.
Collect two to four times as many cuttings as the desired established population. Mortality of 50 percent is not uncommon during the rooting phase. Another 50 percent of the cuttings may be lost to mortality when the cuttings are outplanted. Cuttings are grouped in bundles, often 25 or 50 cuttings per bundle, to keep track of the total. Bundles should be labeled with the correct plant collection information.
Cuttings can deteriorate rapidly. They must be kept moist, cool, and out of the sun. After the cuttings have been taken out of the field, they should be stored at 34 to 38 degrees Fahrenheit (1 to 3 degrees Celsius). Take care that they do not freeze. Cuttings should be rooted as soon as possible, but some species can be stored for up to several weeks. If cuttings are going to be shipped to a professional grower, ship them early in the week to make sure they arrive before the weekend.
To cut the stem cleanly, use sharp scissor-type, hand-pruning shears. Anvil-type shears will crush the stem. Cut the stems at a 45-degree angle to increase the rooting surface. Recut the upper end of the stem at a 90-degree angle so the upper end can be distinguished from the lower end (figure 3-116).
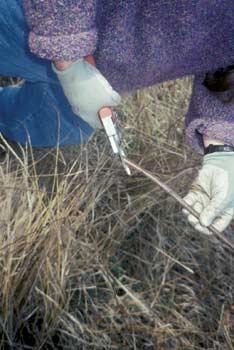
Figure 3-116—Cut stems with bypass pruning clippers at a
45-degree
angle to increase the rooting surface. Recut the upper
end
of the stem at a
90-degree angle so that the upper end
can be distinguished from the lower.
This photo was digitally altered.
Cut off side shoots. Save those that are large enough to plant. It is best to collect cuttings in the morning while the stems are fully turgid. Depending on their size, the cuttings can be placed in small wet plastic bags, wet burlap bags inside a plastic bag, or in triple-layer paper bags. To avoid harming a donor plant, do not remove more than 30 percent of the branches from any one plant.
3.10.9b Semihardwood Stem Cuttings
Semihardwood cuttings are taken in late summer or early fall from the partially matured growth of woody plants. Stems are ready if they snap rather than crush when they are bent.
Hardwood cuttings are taken when the plant is dormant in the late fall or winter. Cuttings should not be taken after the buds have begun to swell in late winter. Deciduous plants enter dormancy when the leaves have dropped. Cuttings should include the terminal bud (figure 3-117), and be 6 to 24 inches (152 to 610 millimeters) long and 3/8 inch (9.5 millimeters) in diameter. Include at least two nodes, with the bottom cut being just below a node. Thick, young stems root best because they have carbohydrate reserves. (Huber and Brooks 1993; Weisberg 1993).

Figure 3-117—Determining the age of a branch. Drawing
courtesy
of Carol Aubry (Potash and Aubry 1997).
3.10.9d Softwood and Herbaceous Cuttings
These cuttings are taken in spring or early summer from the rapidly growing tip of plants. This type of cutting is subject to wilting.
This technique is possible for some species with roots or rhizomes that produce stem buds. Donor plants need to be prepared by closely root pruning them and pruning back the foliage before the growing season (see section 3.10.12, Transplanting Wildlings, for this technique). Vigorous new roots that can produce stem buds will form quickly during the growing season. The new portion of the root is the part closest to the crown. Cut the root away at a 90-degree angle (so the upward end remains recognizable), then cut off the thin end with a sloping cut. Remove fibrous lateral roots. The number of plants from each root can be maximized using the following rule of thumb:
- If
planting the cuttings directly into the ground, cut the root in 4-inch
(100-millimeter) segments.
- If propagating the cuttings in a cold frame or cold greenhouse,
cut the root in 2-inch (50-millimeter) segments.
- If planting the cuttings in a heated greenhouse, cut the root in 1-inch (25-millimeter) segments.
Root cuttings are subject to fungal rot. Dust them with sulfur or Captan, an antifungicidal powder. Use 1 teaspoon of Captan for every 100 inches (2.54 meters) of root. Place the roots and powder in a plastic bag and shake. Plant the segments with the crown end up. The crown has the perpendicular cut. It is best to take root cuttings during the dormant season.
Root cuttings have the potential for onsite propagation. Try replanting 4-inch (100-millimeter) or longer root segments immediately while the soil is moist. Do not water the cuttings until shoots appear (Browse 1979). Sprigging is an onsite technique that uses machinery to closely crop vegetation back to the crown before lifting the root systems from the ground. The sprigs are spread over the restoration site, covered with soil, and lightly tamped. This technique works with grass and shrub species that sprout from their roots or are rhizomatous (Redente 1993).
A few native plants have the ability to produce plantlets on leaves that have just expanded to their full size. Bulb scaling is a form of leaf cutting in which a scale from a bulb is peeled off and planted separately. This method of propagation is tricky. The most common failure is that the leaf rots before it can root. Cuttings need to be processed before the leaves wilt or desiccate.
This type of stem cutting can be taken from anywhere on the stem. It is an undamaged mature leaf with a very short piece of stem that has a leaf bud in the axil where the stem and leaf join (figure 3-118). The upper portion of the stem is cut away at an angle just above the bud (Browse 1979).

Click on image for
large and descriptive view
Figure 3-118—Taking a leaf bud cutting. Drawing courtesy
of the
Washington
State University Extension Office
(Propagating
Herbaceous Plants From Cuttings,
Pacific Northwest
Extension Publications 2001).
Divisions are taken from plants where the fibrous root mass or crown lends itself to being split into more than one plant. Each division has both roots and shoots. Divisions can be made easily with strawberries or plugs of grass (figure 3-119). Divisions can be done over and over at a nursery, greatly increasing the amount of plant material gained from a donor plant. Divisions also can be used as an onsite propagation technique. The donor plant is dug from the ground carefully and split with hands or a knife into more than one plant, with each division being replanted. According to Krystyna Urbanska, a Swiss alpine restorationist, alpine grasses can be divided into single tillers, maximizing plant material (Urbanska 1986).

Figure 3-119—Some plants, such as strawberries,
are divided easily
at the roots.
3.10.11 Layering
In layering, a new plant is rooted while it is still attached to the donor plant. A number of plants reproduce naturally by layering, which is to some degree an adaptation to short growing seasons where a seed crop may not be a reliable way to reproduce. Native plants that layer naturally include juniper, subalpine fir, heather, blackberry, and willow.
This method has more potential for propagation onsite than offsite, because a mature plant donor would need to be grown or established in a nursery. Layering works well to restore closed trails if shrubs are growing alongside the trail.
With this method, a new plant is rooted from a single branch by burying the branch about 1 foot (about 300 millimeters) back from the tip. This should be done at the beginning of or during the growing season, so roots will begin to form immediately. Prevent the soil from drying too much while the branch is rooting. The newly rooted plant can be cut away from the donor plant at the end of the growing season or during the following spring if the plant was layered during the midseason. Check for roots before cutting the new plant away from the donor. Because the branches are still attached to the donors, your survival rate may look impressive, but it won't be if roots have not formed.
The first technique for simple layering is to dig a 6-inch- (150-millimeter-) deep hole at the correct spacing away from the donor plant, ideally in the site to be restored. The branch is bent into a "U" shape over the hole, about 1 foot (about 300 millimeters) back from the tip (figure 3-120). Leaves are removed from the portion of the branch to be buried. Rooting is stimulated by partially breaking the branch, abrading the bark with a pocket knife, or by twisting or girdling the shoot between the "U" and the donor plant. If necessary, the stem can be anchored to the bottom of the hole with a peg or rock. Firmly pack the hole with soil. You may want to stake the branch to keep it upright.

Figure 3-120—These drawings show simple layering. Drawings courtesy
of Jenny Tempest (Hanbey 1992). The plant's stem is abraded or girdled
to stimulate root production before the stem is pinned underground.
The second technique for simple layering is used on plants with branches that are low. The branch is covered with 3 to 4 inches (76 to 101 millimeters) of soil, 12 inches (about 300 millimeters) back from the tip (Weisberg 1993). Once roots have formed, the stem from the parent plant can be cut and the new plant can be moved.
The concept behind mound layering is to root many new plants from the same shrub (figure 3-121) by forcing each branch to develop roots. This technique works well with shorter shrubs or stiffly branched plants. The shrub does not need to be immediately adjacent to the restoration site. Mound layering is begun just before the growing season begins, and plants are cut from the donor in the spring or following fall.

Figure 3-121—Heather can be propagated with mound
layering (Weisberg
1993).
This technique holds promise
for a species that is challenging to propagate.
Select a mature shrub and prune each branch back to 3 inches (76 millimeters). Once new shoots are 3 to 4 inches (76 to 101 millimeters) long, soil is mounded over the crown of the plant (similar to hilling potatoes), leaving 2 inches (50 millimeters) of shoot tips above the soil. With species that are more difficult to root, the entire crown is covered with soil ½ inch (13 millimeters) above the branch tips as soon as the branches are pruned. Continue to mound soil several times throughout the growing season to a total depth of 8 to 10 inches (200 to 250 millimeters), leave several inches of the growing tip above the soil. The soil must be well drained and kept moist.
If the new plants are cut away in the fall, the donor plant should be protected with soil for the winter. The same donor plant can be used for several years in a row (Weisberg 1993).
Tip layering works with a few species, such as blackberries. The concept of tip layering is that the attached shoot tip is buried upside down in the ground, where the terminal bud will turn to push right-side up through the soil.
The growing tip of the side shoots are cut back early in the growing season. By the middle of the growing season, new shoots with small, curled tips will have formed. These tips are bent to the ground, and buried firmly, tip down in a 4- to 6-inch- (100- to 150-millimeter-) deep hole. The soil must be kept moist until fall, by which time a well-developed root system should have formed. At this point, the new plant can be cut 6 to 8 inches (150 to 200 millimeters) above the soil, separating it from the donor plant. The new plant can be transplanted immediately or during the following spring.
3.10.12 Transplanting Wildlings
A wildling is an indigenous plant growing in its native habitat. You may also hear wilderness folk referring to wildlings as transplants or plugs. This guide avoids calling wildlings plugs because we also transplant greenhouse-grown plugs.
Some species can be transplanted successfully as wildlings. This procedure should be used only if adequate plant material exists and care is taken not to cause too much damage to the collection site. If plants can be salvaged from a ground-disturbing project nearby, transplanting wildlings can be relatively inexpensive and effective, especially if volunteer labor is available.
Transplanting wildlings tends to provide vertical relief to a site more quickly than other methods, and there is no risk of introducing nonnative organisms such as weeds, insects, or pathogens. In some environments wildlings establish and spread quickly. Plants that spread underground or with stolons perform exceptionally well. However, on dry, compacted sites, the rate of spread can be slow to nonexistent. Taprooted plants do not transplant well; most are difficult to transplant as wildlings and require special care so that as much root is left on the transplants as possible (figure 3-122). Some taprooted plants are best propagated offsite, where they can be grown in tall pots. Plants having long, brittle, horizontal roots, such as heather or vine maple, also are difficult to transplant. Such plants probably should only be transplanted if they are being salvaged and the plants will be destroyed anyway.

Figure 3-122—Be sure to have pruning clippers or a root saw
handy
if you
salvage wild plants that have taproots. Drawing
courtesy of Jenny Tempest
(Hanbey 1992).
Wildlings should be transplanted in their new location as quickly as possible. Some delay may be unavoidable if restoration follows a salvage operation. Dig the holes at the restoration site before digging out the transplants. Holes need to be refilled after transplants are removed.
Larger plants, such as small trees, tend to be difficult to transplant successfully. Their root-to-shoot ratio is not high enough to allow them to survive transplant shock. Large plants can be prepared for transplanting by root pruning, a common technique in the nursery and landscape industry that increases the root mass dramatically. A sharp shovel is inserted into the ground, making a vertical cut through the roots all the way around the outer perimeter of the plant's foliage, known as the drip line (figure 3-123).

Figure 3-123—Roots are pruned two or more times to stimulate root
production before transplanting. The roots are pruned by sinking a shovel
blade
vertically into the soil around the drip line of the plant that will
be transplanted.
Drawing courtesy of Jenny Tempest (Hanbey 1992).
A tree spade is the tool of choice, because it has a relatively flat blade. A scoop shovel can work if care is taken to keep the blade perpendicular to the plant. Root pruning needs to begin early in the growing season of the year the tree will be transplanted, or even the year before, with several cuts made throughout the growing season. Not only will survival rates be higher after root pruning, but the tree will be easier to lift for transplanting as well. Root-pruned plants need to be tagged to facilitate relocation.
Wildlings should be transplanted in the spring or fall, or better, when the plant is fully dormant. Otherwise, transplant shock is likely.
If possible, wildlings are watered the day before they are lifted from the collection site. Transplanting should take place during the morning or on a cloudy, cool day while the plant is fully turgid. The digging technique is similar to root pruning. The shovel cuts are made into the soil around the plant with the blade as nearly perpendicular to the surface of the ground as possible. It is important to have a good ball of soil around the wildling's roots, and to dig out as much of the root system as possible.
Pay attention to root morphology. On well-developed soils or on arid lands, roots will grow down more than out. On shallow soils or on areas with permafrost, roots will spread out, making it necessary to dig up a much larger area around the plant. In general, larger plugs have a better chance of survival than small plugs. For relatively small plants, such as graminoids or forbs, a good rule of thumb would be to have the plug about as wide as a scoop shovel, and about 8 inches (200 millimeters) deep. Experimenting with various plug sizes is a worthy endeavor. If all plugs survived, smaller plugs would allow more transplants.
Some shrub and tree species transplant more successfully if their north-to-south orientation is maintained. Mark the orientation in some way, such as by hanging a flag from the north side of the plant.
Use the shovel and your hands to lift the root ball gently out of the hole, keeping the root ball together. Hand pruners can be used to cut away woody roots that do not come free with the shovel. The root ball can be transferred into a 5-gallon (19-liter) bucket, a wheelbarrow, or plastic or burlap bags for transport to the restoration site. If wildlings are dug from sandy soil, the soil will fall away from the roots. Use buckets of water, wet rags, or jelly roll material to protect the roots until the wildling can be transplanted. Denali National Park uses heavy equipment to salvage large, shallow pieces of sod (up to the size of a bucket on a front-end loader). If the use of machinery is not an option, smaller pieces of sod can be cut and moved by several people (Densmore and Vander Meer 1998).