
Chapter 3—The Art and Science of Restoration
- 3.3 Concluding Thoughts on Soil
- 3.4 Site Stabilization, Preparation, and Delineation
- 3.4.1 Reestablishing Site Contours
- 3.4.2 Stabilizing Gullies
- 3.4.3 Stabilizing Headcuts
- 3.4.4 Stabilizing Downcutting
- 3.4.5 Stabilizing Lateral Erosion Into Gully Banks
- 3.4.6 Surface Erosion Control
- 3.4.7 Subsurface Erosion Control
- 3.4.8 Nonliving Siltbars and Checkdams
- 3.4.9 Bioengineering Applications
Here are the basic steps to remember when analyzing and working with soil.
- Select a reference site that is representative
of the impacted site and that reflects project limitations, including soil
limitations.
- Analyze the differences between the site to be treated
and one or more reference sites.
- Work with a soil specialist to devise
a prescription
that will correct as many soil deficits as necessary.
- Use native and
local soil sources to the extent possible, without damaging the borrow
site.
- Use
additional materials or supplements if native sources are not adequate.
- Monitor
and maintain your site. If at first you don't succeed, try a different
approach.
- Recognize that the process of correcting and rebuilding damaged soils is very slow and difficult, taking many years, if not decades. You should be able to notice the site improving as it becomes more like the desired native plant community.
The precise order of actions taken to prepare a site may vary, but generally follows this sequence:
- Recontour the site if needed.
- Scarify the soil.
- Install
erosion-control
features.
- Install barriers.
- Add additional soil needed for
fill.
- Add icebergs and posts for signs, if any are needed to discourage
use of the site as it recovers.
- Add soil amendments and additional organic
material.
- Leave the soil surface uneven (pitted).
- Install crimping before seeding.
Site stabilization and delineation help create a stable area where native plants can reestablish themselves, given enough time. Your goal may be to further stabilize a relatively flat area (such as a campsite), or to stabilize an unstable slope (such as a steep site or trail slump) or a gully (such as an entrenched trail).
A site-stabilization strategy needs to be designed to handle peak annual waterflows. Peak flows may occur during snowmelt, the rainy season, or heavy thunderstorms.
A number of additional techniques for establishing vegetation and reducing erosion are described in more detail elsewhere in this guide. Such methods include:
- Using mulch and erosion-control
blankets—see section 3.12, Plant Protection
and Establishment.
-
Preventing further damage to biological crusts—see section
3.1.3c,
Evaluating Biological
Soil Crusts.
- Inoculating plants with mycorrhizal fungi—see
section 3.2.5b, Inoculating Plants With
Mycorrhizal Fungi.
- Adding organic matter—see section
3.2.3c, Amending
Altered or Depleted Soils.
- Selecting plant species that provide rapid cover and a variety of root forms—see section 3.10, Plant Selection, Collection, and Propagation Techniques.
Site delineation is the process of engineering a site to keep users where you want them. This involves designing visual cues or even physical barriers to concentrate use.
In the mechanical world of industrial-strength restoration, crawler tractors, backhoes, dump trucks, rippers, and imprinters make short work of site preparation. In the wilderness world, we work with modified stock panniers, 5-gallon (19-liter) buckets, stretchers, log carriers, come-alongs, pick axes, shovels, grub hoes, and McLeods—not to mention blood, sweat, and tears. In some areas, helicopters and wheelbarrows have been deemed the minimum tool, moving material more quickly and, in some cases, with less damage than other techniques.
Livestock can haul soil and gravel in specialized panniers (figure 3-41). These panniers are loaded from the top and unloaded from the bottom without removing them from the animal. Gravel Bags for Packstock (Vachowski 1995) offers alternative designs, sources, and even a plan for making your own specialized panniers.
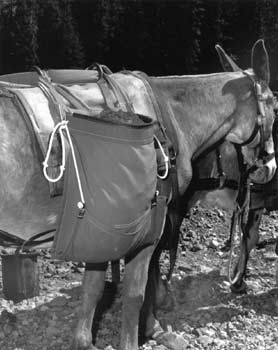
Figure 3-41—Fabric bags (panniers) that can be
loaded from the
top and unloaded by releasing
the bottom are handy when stock are used to
haul gravel or soil.
3.4.1 Reestablishing Site Contours
Recontouring your site (figures 3-42a and 42b) is likely to be part of a restoration prescription. In an ideal world, a site would be restored to its original contour. However, the fill material needed to achieve such an ambitious goal may not be available. In addition, the slope angle may have become too steep to support successful restoration. A more intermediate set of goals could include: restoring a more natural appearing line, controlling the movement of water through the area to be replanted, and creating a favorable medium for reestablishing vegetation. Meeting such goals may involve rearranging existing site materials or building structures that are backfilled with rock and soil.


Figures 3-42a and 42b—This wide, severely eroded trail at Snow
Lake
in the
Alpine Lakes Wilderness, WA (top), was brought back up to grade
(bottom)
by installing siltbars and adding many buckets of locally collected
fill.
Runoff contributes more to erosion than all the trampling hooves and feet on a trail. Methods for evaluating erosion were addressed in the section on assessing soil conditions. Is water channeled into the site causing ongoing damage? Is it desirable to redirect water away from the site or would this cause unacceptable change to slope hydrology? Work with your soil scientist or geologist to address these issues.
For example, digging an uphill parallel ditch (figure 3-43), is a time-tested trail management strategy to dry up muddy trail segments and redirect water across the trail at a natural sag in the grade. This strategy drops the water table, which changes the vegetation on the site. Differing solutions might come into play. Water can be redirected away from the site, channeled through the site, slowed while being allowed to continue moving through the site, fanned out across the site—or managed using any combination of these techniques. Bioengineering techniques also can be used to reduce excess water on projects (Eubanks and Meadows 2002).

Figure 3-43—A small parallel ditch dug alongside this social trail
will dry out
the tread surface, reducing the likelihood that hikers will walk
to the side
of the trail, making it wider and wider. The salvaged plugs of
plants and soil
were transplanted into closed social trails nearby. The plant
community
may
change because the water table will drop to the depth of the parallel ditch.
Steep sites may be reworked to eliminate erosion channels by creating a smooth slope with no vertical rills, enabling water to spread out across the slope. Another approach is to harden erosion gullies with a series of structures designed to absorb the impact of flowing water and to trap sediment. Water has to go somewhere; if you don't plan for the flow, it is likely to cause erosion someplace else.
If the top of a steep slope is headcutting, the headcut (figures 3-44a and 44b) must be stabilized by laying back the slope. The headcut is where the slope is eroding the fastest, generally at the top. Where headcutting is occurring under mats of vegetation, it is sometimes possible to excavate underneath the vegetated mat and lay the mat down over the recontoured slope break.

Figure 3-44a—Soil lost because of extensive historical
sheep grazing
initiated
the headcutting shown above,
which continues eating into the bank, destroying
the
integrity of this subalpine meadow in the Alpine
Lakes Wilderness, WA.

Figure 3-44b—This roadbank headcut will
continue to erode unless
it is
treated. The
slope angle could be reduced by hollowing
out the bank
from
below. The mat of
vegetation
could be pinned to the soil substrate.
Arid land restorationist and researcher Jayne Belnap recommends recontouring with a 3:1 (33 percent), or shallower slope. She suggests that any slope steeper than 2:1 (50-percent slope) will be too steep to treat successfully (Belnap and Furman 1997). A series of terraces could be created on steeper slopes. In riparian areas, bioengineering techniques could be used.
3.4.2 Stabilizing Gullies
Three mechanisms contribute to the formation of gullies: headcutting, downcutting (erosion that deepens the gully), and lateral cutting into the banks (Prunuske 1987). You need to address all three mechanisms when you are stabilizing erosion in a gully. A deeply incised trail may not have headcutting, but it will be eroding through the other two mechanisms.
A headcut is where a gully is eroding the fastest, generally at the upper end. If a headcut is not treated, it will continue to eat its way upslope (figure 3-45). A bank headcut is found at the top of road or trail cutbanks.

Click on image for
large and descriptive view
Figure 3-45—The process of gully movement. Drawing
courtesy of
Susan Pinkerton (Prunuske 1987).
A headcut with low gully erosion and low flow velocities may be treated by reshaping the headwall to a 3:1 or shallower slope (figure 3-46), armoring the slope with rock riprap, or revegetating the slope with herbaceous cover, shrubs, or trees. Moderate gully erosion requires a combination of treatments. Serious gully erosion requires the combination of shaping, rock riprapping, and establishing a variety of plants, including woody plants (Prunuske 1987).

Figure 3-46—The headcut is laid back to a 3:1 slope angle.
Drawing
courtesy
of Liza Prunuske (Prunuske 1987).
Downcutting erodes the gully deeper (figure 3-47), which also drops the water table, changing vegetative characteristics. Downcutting can be slowed by reducing the speed of flowing water and raising the level of the gully. This is accomplished by constructing checkdams, then backfilling the checkdams or allowing adjacent surface erosion to fill the dams. Checkdams are small dams designed to check (stop) erosion, but not to store water. Checkdams that are more than 4 feet (about 1.2 meters) tall need to be designed by an engineer.

Figure 3-47—Downcutting in gullies not only increases soil lost
through erosion, but also drops the groundwater table to the base
of
the gully.
Drawing courtesy of Liza Prunuske (Prunuske 1987).
3.4.5 Stabilizing Lateral Erosion Into Gully Banks
Unless a gully is backfilled completely, its banks should be stabilized with vegetation. If the banks are too steep for vegetation to become established, the banks must be laid back to a shallow angle so plants can grow.
Riprap (figure 3-48) is a layer of heavy stones laid down to armor the soil surface, preventing further erosion. Riprap also may be used to armor trails, as is commonly the case in the Sierra Nevada Mountains of California and Nevada. Riprap has been used at rather grand scales—such as armoring entire stretches of riverbanks or shorelines. This guide just explores small-scale applications.

Figure 3-48—Riprap reduces surface erosion by providing
a
durable
surface in Grand Canyon National Park, AZ.
The size of the largest rocks used to construct riprap is based on the water velocity at peak flows. Once you have placed the largest rocks, fit smaller rocks between them to construct a stable surface that doesn't wobble underfoot. Refer to tables 3-5 and 3-6 to determine rock weights and the relative proportions of different sizes of rocks.
| Water velocity feet per second (meters per second) |
Approximate Rock diameter inches (millimeters) |
Weight of a rock pounds (kilograms) |
|---|---|---|
| 2 (0.6) | (51) | -- |
| 4 () | 4 (102) | -- |
| 6 (1.8) | 7 (178) | -- |
| 8 (2.4) | 10 (254) | 50 (23) |
| 10 (3.1) | 14 (356) | 150 (68) |
| 12 (3.7) | 19 (483) | 375 (170) |
| 14 (4.3) | 25 (635) | 1,000 (454) |
| 16 (4.9) | 33 (838) | 2,000 (907) |
| *This calculation assumes rock weighs 165 pounds per cubic foot (2,643 kilograms per cubic meter). Rock should have a minimum specific gravity of 2.5, meaning a cubic foot (0.028 cubic meter) of rock weighs 2.5 times as much as a cubic foot (0.028 cubic meter) of water. | ||
| Maximum weight of rock pounds (kilograms) |
Minimum and maximum weight of rocks pounds (kilograms) |
Weight range of 75 percent of rocks pounds (kilograms) |
|---|---|---|
| 150 (68) | 25 to 150 (11 to 68) | 50 to 150 (23 to 68) |
| 200 (91) | 25 to 200 (11 to 91) | 50 to 200 (23 to 91) |
| 250 (113) | 25 to 250 (11 to 113) | 50 to 250 (23 to 113) |
| 400 (181) | 25 to 400(11 to 181) | 100 to 400 (45 to 181) |
| 600 (272) | 25 to 600 (11 to 272) | 150 to 600 (68 to 272) |
| 800 (363) | 25 to 800 (11 to 363) | 200 to 800 (91 to 363) |
| 1,000 (454) | 50 to 1,000 (23 to 454) | 250 to 1,000 (113 to 454) |
| 1,300 (590) | 50 to 1,300 (23 to 590) | 325 to 1,300 (147 to 590) |
| 1,600 (726) | 50 to 1,600 (23 to 726) | 400 to 1,600 (181 to 726) |
| 2,000 (907) | 75 to 2,000 (34 to 907) | 600 to 2,000 (272 to 907) |
Before riprap is installed (figure 3-49), a layer of filter material is laid down to prevent piping, a problem that develops when water sluices out of fill material underground. Natural filter materials include gravel or a thick layer of organic leaf litter. A commercial filter fabric can be installed using 6-inch (about 150-millimeter) staples. This option deters establishment of long-rooted plants. Riprap is installed from the base up. A trench is dug at the toe of the slope. Big rocks are keyed into this trench. Then angular rocks are fitted together working up the slope, using intermediate-sized rock to fill spaces between the larger rocks. Plantings can be incorporated between the rocks, if desired. Live stakes, which will sprout into shrubs, can be driven through openings between the rocks (see figure 3-62). During the first few years, areas of riprap where rocks have washed out will need to be patched.

Click on image for
large and descriptive view
Figure 3-49—Placing rock for riprap.
Drawings courtesy of Susan
Pinkerton
(Prunuske 1987).
3.4.7 Subsurface Erosion Control
In general, structures are installed in the order that creates the least additional disturbance. As much as possible, excavated soil or rock is piled within the existing disturbed area. Another suitable staging area might be located nearby to hold excess fill or salvaged plant materials. Work back toward a hardened "escape route." If possible, work your way downhill to avoid back strain. Training and constant reminders will prevent workers from walking on vegetation adjacent to the site, causing further damage.
Subsurface erosion-control structures fall into two broad categories, living and nonliving. Nonliving structures include siltbars or checkdams built of wood (figure 3-50), rock, or erosion-control blanket. On wet sites, native plant materials can be used to craft a variety of structures, a technique known as bioengineering. The plants not only physically stabilize the site, but also provide a plant community (figure 3-51).

Figure 3-50—Log checkdams are an example of a nonliving subsurface
erosion control structure. The checkdams are keyed into the
bottom and sides
of an eroded hiking trail, preventing further
erosion
and collecting sediment.
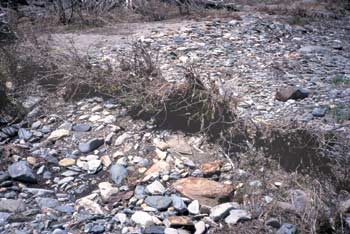
Figure 3-51—The live trench pack stabilizing this gully is one
example of a
living subsurface erosion control structure (Eubanks and Meadows
2002).
3.4.8 Nonliving Siltbars and Checkdams
Siltbars are shallower than checkdams and are just one layer high. Siltbars are used to address erosion on low-angle slopes. They may be used to control erosion at campsites, on trails that are not too deeply incised, or in areas that don't have enough material for checkdams. Checkdams (sometimes called siltdams) are created by stacking siltbars one on top of another. Crimping, a technique that incorporates straw or native hay into the soil surface, can be used when log or rock checkdams would not be appropriate.
3.4.8a Materials Used To Construct Siltbars and Checkdams
In the wilderness and backcountry, native materials are preferred for siltbars and checkdams, if they can be obtained without further damage to the landscape. Checkdams should be constructed to allow water to percolate through the dam; an impervious checkdam is more likely to blow out during heavy runoff.
Native Rock Siltbars or Checkdams—Native rock, if available, is often the best material for siltdams because of rock's longevity and ability to blend with the environment. As is always the case with native materials, evaluate whether the rock can be collected without causing undue harm to ecological processes or the visual setting. For instance, partially submerged rocks with plants growing around them would be a poor choice for removal—the plants are likely to die once they are exposed and an unsightly hole will be left behind.
Log Siltbars or Checkdams—Log checkdams can be constructed from dead material nearby. Native materials also may be brought in using packstock or helicopters. Cedar rails are a common choice for checkdams in the national parks of the Pacific Northwest.
Dimensional Lumber Siltbars or Checkdams—If you strike out on native material, consider using dimensional lumber such as 2 by 6s or 2 by 8s; such material is more challenging to blend with the wilderness environment. You will also need wooden upright material for attaching planks.
Erosion-Control Blanket Siltbars—Erosion-control blankets can function as a siltbar when the blanket is partially buried and pinned with ridges protruding slightly above the ground surface. This technique has been used successfully in arid lands.
3.4.8b Installation of Checkdams
Siltbars (figure 3-52) and checkdams are installed perpendicular to the flow of water. The direction of flow may be tricky to determine in a sinuous gully. Construct siltbars and checkdams so they are deeper and wider than the opening they are blocking to prevent water from flowing under or around the checkdams.

Figure 3-52—Siltbar installation. Siltbars have just one tier of
material,
unlike checkdams that have more than one tier of material. Drawing
courtesy
of Regina Rochefort (1990).
Siltbars, whether rock or wood, are installed by toeing them into the base of the slope. The sides are anchored into the slope or are anchored with wooden pegs.
Checkdam installation involves more technical considerations. Start by digging a trench 6 inches (about 150 millimeters) deep contouring the slope (or perpendicular to the bed of the trail or gully). For eroded trails, continue the trench up the sidewalls of the gully to form a 6- to 12-inch- (about 150- to 310-millimeter-) deep vertical slot (called a keyway) slightly wider than your checkdam material (figures 3-53a and 53b).

Figure 3-53a—To properly seat a siltbar or checkdam, a trench
is
dug about 6 inches deep across the contour or
perpendicular to the gully.

Figure 3-53b—In gullies, a keyway is excavated about 6
inches into
each sidewall to pin the checkdam or siltbar
material into place.
Once the trench has been established, begin fitting in the materials for the siltbar or checkdam. You may need to improve the trench to seat your materials properly. Check your work to assure that the base of the checkdam is well seated, preventing water from flowing under the material. Keep stacking materials until the desired height has been reached—ideally flush with the ground level (figure 3-54). It is not necessary for the top of the checkdam to be above the ground. Keep the checkdam level to avoid channeling water to one side.

Figure 3-54—Keep stacking materials until the desired height
has
been reached—ideally flush with the ground level.
(This photo has been
digitally
altered.)
If planks are used for the checkdam, attach them to upright 4 by 4s that have been buried into the bed of the gully to half the depth of the exposed checkdam. The deeply buried uprights prevent the planks from becoming misaligned, which could cause the checkdam to malfunction. Uprights should be about 3 feet (910 millimeters) apart for shorter dams, but no more than 2 feet (610 millimeters) apart for dams that are 3 to 4 feet (0.91 to 1.22 meters) tall (figure 3-55a).

Click on image for
large and descriptive view
Figure 3-55a—Checkdam installation. Wooden checkdams
are constructed
by stacking logs or split rails.
Drawings courtesy of Liza Prunuske (1987).
Firmly tamp the excavated soil back around the dam. Avoid backfilling the checkdam with rock. Rock backfill could direct water to the dam material, allowing some water to get through.
Rock checkdams (figure 3-55b) also require a trench. Using your very best dry stone masonry skills, select rocks that fit well together to build up a triangular-shaped wall that is broad at the base. Use the same principles you would when building a rock crib. Be sure to stagger the seams between rocks as you add each layer.

Click on image for
large and descriptive view
Figure 3-55b—Installing a rock checkdam.
Drawings courtesy of Liza
Prunuske (1987).
A more vertical and less beefy rock checkdam may be adequate if water flows have been redirected elsewhere. One of the authors had good success with this approach at White Pass in the Glacier Peak Wilderness of Washington.
A series of several rock walls were built in an eroded trail that was being closed and restored. A drain dip above the site had directed water off the trail.
Soil and vegetation salvaged from a short relocated trail was placed between the checkdams. The vegetation quickly became reestablished.
Five years later, the only real evidence of the project was the lowest checkdam (figure 3-56), which was serving as a small rock retaining wall.

Figure 3-56—Five years later, the only real evidence
of the project
was the lowest checkdam.
Perhaps you successfully redirected water off the trail or gully alignment before building the checkdam. But if you are engineering your installation to handle the continued flow of water, three more components are needed for each checkdam—a spillway, an apron just below the dam that serves to dissipate energy, and a filter behind the dam to prevent soil loss while allowing water to continue to flow.
The spillway is a depression in the center of each checkdam to keep water from eating out the banks. Use table 3-7 to determine the size for each spillway. If your checkdam is constructed of wood, make sure the plank or log is still 4 inches (about 100 millimeters) high at the spillway. Otherwise, the plank or log may break. A rock checkdam should have a dip in the center to function as a spillway.
| Area in acres of gully watershed (hectares) | Depth in inches of a 12-in- (310-mm-) wide spillway (mm) | Depth in inches of an 18-in- (460-mm-) wide spillway (mm) | Depth in inches of a 24-in- (610-mm-) wide spillway (mm) | Depth in inches of a 36-in- (910-mm-) wide spillway (mm) |
|---|---|---|---|---|
| 1 (25.4) | 6 (152.4) | 4 (101.6) | 3 (76.2) | 3 (76.2) |
| 2 (50.8) | 9 (228.6) | 7 (177.8) | 5 (127.0) | 4 (101.6) |
| 3 (76.2) | 12 (304.8) | 8 (203.2) | 7 (177.8) | 5 (127.0) |
| 4 (101.6) | -- | 10 (254.0) | 8 (203.2) | 6 (152.4) |
| 5 (127.0) | -- | 12 (304.8) | 10 (254.0) | 7 (177.8) |
Apron Installation—While the spillway directs the flow of water down the center of the gully, the apron protects the gully and checkdam from the force of the falling water, (figure 3-57). Aprons generally are constructed of rock, but a live fascine (a bundle of live woody stems that will sprout) also could be anchored in the gully. The use of live fascines is explained in the bioengineering section. A filter is laid below the rock apron using techniques described for riprap. Rock is secured across the gully bottom in a low-angle wedge against the downstream side of the checkdam for at least 2 feet (610 millimeters) below the checkdam. If the waterflow is expected to be high velocity, wooden pegs, live stakes, or pieces of ¾-inch (about 19-millimeter) rebar are pounded into the gully bed to pin the lowest course of rock in place.

Figure 3-57—A profile of checkdams with aprons, also called rock
energy dissipators. Drawing courtesy of Liza Prunuske (1987).
Filter Behind the Dam—Unless you anticipate low volumes of water or a large amount of leaf litter is likely to wash downstream, the final step before backfilling is to install a filter upstream from the checkdam. This measure is to prevent soil from washing through any cracks in the dam. A 6-inch (about 150-millimeter) layer of organic leaf litter can form the filter. Or you can install filter fabric. If you use fabric, it should be laid out loosely so that it won't pull out with the force of the water. The upstream side of the fabric is secured to the gully bed and banks by digging a trench, anchoring the fabric with 6-inch (about 150-millimeter) staples, then refilling the trench. The 6-inch (about 150-millimeter) staples also secure the loose fabric on the remainder of the bottom and sides. Refer to figure 3-55a or 3-55b for an installation diagram.
Checkdam Placement—In long gullies, checkdams are placed in a stairstep fashion. Ideally, the top of the downhill dam is as high as the bottom of the next dam upslope. This standard may not be feasible on steeper slopes. Maintain a 3:1 slope between checkdams, if necessary.
Sometimes it is necessary to segment siltbars or checkdams. For instance, if a site has lots of submerged rock, making it difficult to dig a continuous trench, it may be necessary to toe a siltbar into the rock, and then continue on the other side (figures 3-58a and 58b). Use pegs to secure the siltbar near the rock. A mallet or small sledge hammer is the best tool for driving pegs (figures 3-59a and 59b). You may need to use a small block of wood on top of the peg to avoid splitting it while pounding.


Figures 3-58a and 58b—This trail was as wide as a road at Snow
Lake
in the Alpine Lakes Wilderness, WA. A huge mantle of soil had been lost,
making it infeasible to return the swale to its original contour. Instead,
a series of smaller siltbars, comprised of rocks, logs, and split rails,
were
installed (top) wherever they could be toed in successfully. Topsoil was
added
behind each checkdam and seedlings grown in a greenhouse were
planted. Ten
years later (bottom), the erosion had stabilized and
vegetation was thriving.

Figures 3-59a and 59b—Stout pegs are shaped with an ax or
hatchet
(top) and pounded into place with a sledge hammer (bottom).
(This photo was
digitally altered.)
Once all dams have been installed, fill material can be added. If possible, avoid walking on undamaged vegetation. If reconstructing a soil profile as described in the soils section, add the fill material in the correct order, saving the organic layer for last. If you will be adding rock in the bottom of the trench, be sure to mix in finer materials, such as gravel and soil, to prevent water from washing out the fill material. Assume that the fill material will settle some. If your goal is to completely refill an eroded site, keep adding fill until the checkdams or siltbars are no longer visible.
Rather than smoothing out fill, leave rough mounds and a rough soil surface with small depressions, called pitting, to help control erosion and help plants become established. The pits help catch water, improving seedling survival. In addition, the pits provide some protection from wind and sun.
Crimping, also called spiking, incorporates straw or native hay into the soil surface. Crimping helps reduce erosion by slowing and deflecting water. In situations where log or rock checkdams would be inappropriate because of a lack of materials or their unnatural appearance, crimping may be a good option. Crimping also improves water infiltration.
In wilderness, native hay harvested onsite might be an option for material to crimp into the soil. Tall grasses, sedges, or fibrous forbs could be harvested with a scythe. If this is not an option, clean straw, certified weed free or purchased from a known reliable grower, could be used. If available, rice straw is an excellent choice for dry land projects because the water weeds associated with rice culture will not survive on dry land. Rice grown in the Central Valley of California is used extensively for arid land restoration projects.
3.4.9 Bioengineering Applications
Bioengineering offers promise for sites on streambanks, lakeshores, or other wet areas. A bioengineered structure not only will stabilize erosion, but will simultaneously provide living plant material, helping to return the site to a stable, ecologically productive state (figure 3-60). Bioengineering can reduce the need to build structures such as rock gabions, riprap, or terraces that are unattractive and make it difficult to establish vegetation. This guide will provide a few basic bioengineering techniques and concepts that apply to small remote sites. If your project includes extensive or complex riparian habitat, refer to A Soil Bioengineering Guide for Streambank and Lakeshore Stabilization (Eubanks and Meadows 2002), which explains in detail how to plan and implement riparian projects.

Figure 3-60—A live post, installed where there is adequate
soil
moisture, will root and sprout to become a tree or shrub
(Eubanks and Meadows
2002).
Bioengineering applies many of the principles of restoration discussed elsewhere in this guide, such as how to assess slope stability, how to choose and handle plant species, and how to work with soil. A few considerations more specific to successful bioengineering applications are outlined here (Potash and Aubry 1997).
Remember to have a clear understanding of the situation you are treating in wilderness. Bioengineering generally is used to address slope and bank failures, often due to human disturbances such as impoundments. Bioengineering applications can be integrated into the construction of trail crib walls to strengthen the trail. Wilderness restoration projects rarely seek to restore a natural slope failure unless private property values are at risk.
Geology, Soils, and Hydrology
The hydrologist, geologist, or geomorphologist on your team should help with the site assessment and project design. Geologic history, types of sediment deposits, evidence of past slides, and soil type and depth are taken into consideration.
Excess water needs to be drained or diverted away from the project. Drainage patterns are noted and the possibilities for redirecting the flow of water are assessed.
Backfill material must allow for free drainage; coarse-grained granular material is best. It should have enough fines and organic material to support the selected plant species. However, the system's design also must take structural strength into account.
A bioengineering treatment will fail unless the cause of the damage has been addressed. For example, a steep undercut or a slumping bank requires earthwork to remove the slope overhang and round the slope for stability. With bank erosion, the toe of the slope is often compromised. Treatment methods must anchor the toe of the structure with rock, root wads, or rolled mat logs.
Vegetation Used for Bioengineering
Limit the removal of existing vegetation at the project site. Tree and shrubby plant species used for bioengineering are selected for their ability to resprout from cuttings, develop strong root systems, and survive in a riparian environment with floods, slides, and erosion. Selecting plants with a variety of root structures will help stabilize slopes (see section 3.10.2, Plant Selection for Restoration Projects). Table 3-8 lists a number of plant species well suited to bioengineering applications in the Western United States, based on the criteria that they root readily.
| Scientific name | Common name | Root structure |
|---|---|---|
| Acer circinatum | Vine maple | Fibrous, rooting at nodes |
| Baccharis glutinosa | Seepwillow | Deep and wide spreading, fibrous |
| Baccharis pilularis | Coyote brush | Fibrous |
| Baccharis salicifolia | Water wally | Deep and wide spreading, fibrous |
| Baccharis viminea | Mulefat baccharis | Fibrous |
| Cephalanthus occidentalis | Button bush | |
| Cornus sericea ssp. sericea | Redosier dogwood | Shallow |
| Lonicera involucrata | Black twinberry | Fibrous and shallow |
| Physocarpus capitatus | Pacific ninebark | Shallow, lateral |
| Populus angustifolia | Narrowleaf cottonwood | Shallow |
| Populus balsamifera | Balsam popular | Deep, fibrous |
| Populus deltoides | Eastern cottonwood | Shallow, fibrous, suckering |
| Populus fremontii | Fremont dogwood | Shallow, fibrous |
| Populus trichocarpa | Black cottonwood | Deep and wide spreading, fibrous |
| Rosa gymnocarpa | Baldhip rose | |
| Rosa nutkana | Nootka rose | |
| Rubus idaeus ssp. | strigosus Red raspberry | Fibrous |
| Rubus spectabilis | Salmonberry | Fibrous |
| Salix ssp. | Willow species | |
| Sambucus cerulea ssp. mexicana | Mexican elder | |
| Sambucus racemosa | Red elderberry | |
| Spirea douglasii | Douglas spirea | Fibrous, suckering |
| Symphoricarpos albus | Snowberry | Shallow, fibrous, freely suckering |
| Viburnum lentago | Nannyberry |
Generally, the plant materials used to build structures are gathered as cuttings from local sources (see section 3.10.1, Genetic Considerations for Restoration Projects). Take advantage of any opportunities to salvage plant material from nearby projects, such as trail relocations. Cuttings are best collected in the fall at the onset of plant dormancy, in the winter as long as the ground remains unfrozen, or in the early spring before dormancy is broken. Refer to the section on plant propagation techniques for proper handling of cuttings. Additional plants, such as sedges or forbs, may be incorporated into plantings. Often, these plantings are grown ahead of time in a greenhouse. The use of transplanted wildlings or direct seeding also may be incorporated into plantings.
Ideally, the project will be implemented during the fall, winter, or spring when the plant material can be collected fresh in its dormant stage. If this timing is not feasible, it may be necessary to use rooted cuttings, raising project costs.
3.4.9a Selecting and Installing Bioengineered Structures
The structures included in this section are just a small sample of those that are available. These structures were chosen for their appropriateness and ease of application in the wilderness setting. Their descriptions were excerpted from A Soil Bioengineering Guide for Streambank and Lakeshore Stabilization (Eubanks and Meadows 2002). That report describes 24 structures that can be used alone or in combinations to address a wide variety of impacts. Refer to their report if your project involves a complex situation. The information excerpted in this guide is for treating small problems. The final structure included in this section, the woven checkdam, is from Groundwork: A Handbook for Erosion Control in Northern Coastal California (1987), by Liza Prunuske.
- Loppers (to cut plant stems)
- Hand pruners (to trim branches)
- Pruning saws (to cut live posts)
- Untreated twine (to tie cuttings into bundles)
- Burlap bags moistened and lined with wet leaves or mulch (to protect
cuttings)
- Grub hoe (to dig trenches or reshape slopes)
- McLeod rake (to grub, reshape, or rake)
- Shovel (to dig holes and salvage plants)
- Small sledgehammer or mallet (to drive stakes)
- Small blocks of wood (to protect the top of live stakes when they are
being pounded)
- 36-inch (about 910-millimeter)
- pieces of rebar (to drive pilot holes)
- Chisel-tipped pry bar (to open a pilot hole in softer soils)
- Dead stout stakes (to secure structures, figure 3-61 and table
3-9)
- Crosscut saw or chain saw (to construct live cribwall)
- Spikes (to secure cribwall members)
- Erosion-control blankets, such as coconut-fiber matting (to build structures
or cover loose slopes)
- Come-along and chokers (to manipulate large logs)
- Log carriers (to transport smaller logs)
- Seed spreader (to distribute native seed)

Figure 3-61—Dead stout stakes, cut from 2 by 4s
(about 50 by
100 millimeters), are used in many soil
bioengineering techniques to anchor
branches or erosion
control blankets, and to anchor erosion control blanket
logs to the bank. (Eubanks and Meadows 2002).
| Soil type | Stake Length | |
|---|---|---|
| Feet | Meters | |
| Clay | 2.5 | 0.76 |
| Silt | 3.0 | 0.91 |
| Sand | 4.0 | 1.22 |
| Loam | 2.5 | 0.76 |
Live Stakes
Live stakes (figure 3-62) create a living root mat that stabilizes the soil by reinforcing it and extracting excess moisture. Most willow species develop roots rapidly and begin drying out excessively wet banks soon after the willows have been planted. Live, vegetative cuttings that can be rooted are inserted or tamped into the ground. If a live stake is prepared, handled, and placed correctly, it will root and grow.

Click on image for
large and descriptive view
Figure 3-62—Live stakes create a living root mat (Eubanks and
Meadows
2002).
OHW stands for ordinary high water.
Applications for Live Stakes
Use stakes in the wetted zone of banks or where precipitation is likely to keep the soil moist during growing seasons.
Live stakes can:
- Be
used where site conditions are uncomplicated,
construction time is limited, and an inexpensive method of stabilization
is needed.
- Repair small earth slips and slumps that get wet frequently.
- Enhance
the performance of geotextile fabric by serving as pegs to hold the fabric
down.
- Enhance conditions for natural colonization of vegetation from
the surrounding plant community.
- Produce streamside habitat.
- Be used with other bioengineering techniques, such as live fascines (long bundles of branch cuttings).
Materials for Live Stakes
The stakes generally are 1 to 2 inches (about 25 to 51 millimeters) in diameter and 2 to 3 feet (610 to 910 millimeters) long. The specific site requirements and available sources of cuttings will determine the sizes.
- Remove the side branches, leaving the bark intact.
- Cut
the basal ends at an angle or a point so they can be inserted into
the soil easily. The top should be cut square.
- Install materials the same day
that they are prepared.
- Place stakes in locations that are appropriate for the particular species. For example, along many western streams, tree-type willow species are placed on the inside curves of point bars where they are likely to be inundated, while shrub-type willow species are planted on the outside curves of point bars where they are not likely to be inundated as long.
Installing Live Stakes
- Insert stakes with the buds up.
- Install
live stakes 2 to 3 feet (610 to 910 millimeters) apart, using triangular
spacing. The density of the installation will range from two to four
stakes per square yard. Site variations may require slightly different
spacing. The spacing pattern should allow for a fluctuating water level.
The installation may be started
at any
point on the slope face.
- Install four-fifths of the length
of the live stake into the ground and firmly pack the soil around
the stake after installation.
- Remove
and replace any stakes that split during installation.
- In
firm soil, use an iron bar to make a pilot hole (Hoag and others
2001).
- Dig in
live stakes unless the soil is fine and loose. Tamped-in stakes are
likely to split or have their bark damaged by hammering or by the
hard, rocky soils
they're driven into.
- Install the live stake at an angle
slightly downstream.
- Tamp the stake into the ground with a
dead-blow hammer (head is filled with shot or sand).
- Install
geotextile fabric (optional) on slopes subject to erosion. Install
the stakes through the fabric.
- Plant stakes on banks that will be moist during the growing season or install longer stakes that will reach the water level during the dry season.
Live stakes do not increase soil stability until they begin rooting. Over time, they provide excellent soil reinforcement. To reduce the possibility that a bank might fail before the roots establish themselves, cover installations with a layer of long straw mulch topped with jute mesh or, in more critical areas, a geotextile fabric.
Live Posts
Live posts (figure 3-63) form a permeable revetment (retaining wall). They reduce stream velocities, allowing sediment to be deposited in the treated area. Their roots help to stabilize the bank. Dormant posts are made of large cuttings installed in streambanks in square or triangular patterns (see figure 3-60). Posts at spacings of about 4 feet (1.2 meters) also can provide some benefits by deflecting higher streamflows and trapping sediment, even if the posts do not root successfully.

Click on image for
large and descriptive view
Figure 3-63—Live posts reduce stream velocities, allowing
sediment
to be deposited (Eubanks and Meadows 2002).
OHW stands for ordinary high water.
Applications for Live Posts
Live posts:
- Are well-suited to smaller streams
that do not have a lot of gravel. If high flows and ice are a problem,
posts can be cut low to the ground
- Can be used with other soil bioengineering
techniques.
- Can be installed by a variety of methods, including using a waterjet stinger (Hoag and others 2001) to form planting holes or by driving the posts directly with machine-mounted rams. Place a metal cap on top of the post when it is being pounded into the ground.
Effectiveness of Live Posts
Live posts:
- Quickly reestablish riparian
vegetation.
- Enhance conditions for colonization by native species.
- Repair themselves. For example, posts damaged by beavers often develop multiple stems.
Materials for Live Posts
Live posts can be from 7 to 20 feet (2 to 6 meters) long and from 3 to 6 inches (about 76 to 152 millimeters) in diameter. Avoid overharvesting posts from one plant or one area. Select a plant species that will root readily and that is appropriate to the site conditions. Willow and poplar posts have been successful.
Installing Live Posts
- Taper the bottom
end of the post so it will be easier to insert into the ground.
- Trim
off all the side branches and the apical (top) bud.
- Dip the top end of the post into a mixture of equal parts of water and white latex paint. The paint helps mark the end that goes up and helps retain moisture in the post after it has been installed.
Brush Layering
Brush layering is the technique of laying cuttings on horizontal benches that follow the contour of an existing or filled bank (slope). Brush layers provide shallow stability for slopes.
The cuttings are oriented more or less perpendicular to the slope face as shown in figures 3-64, 3-65, and 3-66. The portion of the brush that protrudes from the slope face helps slow runoff and reduce surface erosion. When brush layering is used on a fill slope, it is similar to the use of vegetated geogrids without the geotextile fabric.

Figure 3-64—With brush layering, live branches are inserted
into
trenches roughly perpendicular to the slope. Normally, dormant
branches are
used. They are shown here with leaves so it is clear
how the branches are oriented
(Eubanks and Meadows 2002).

Click on image for
large and descriptive view
Figure 3-65—This cutaway view shows branches laid into trenches
that contour the slope (Eubanks and Meadows 2002). OHW
stands for ordinary
high water.

Figure 3-66—Brush layering can be used to repair
an alcove
where
the bank has washed away
(Eubanks and Meadows 2002).
Brush layering does not work on the outside of bends and may direct current between the brush layers, washing out the soil there.
Applications for Brush Layering and Their Effectiveness
Brush layering:
- Breaks
up the slope into a series of shorter slopes separated by rows of brush
layers.
- Dries
excessively wet sites.
- Works where the toe of the slope is not disturbed.
- Works on a slump and as a patch.
- Reinforces the soil with the unrooted
branch stems.
- Reinforces the soil as roots develop, adding significant
resistance to prevent the soil from sliding or experiencing shear displacement.
- Traps
debris on the slope.
- Aids infiltration on dry sites.
- Adjusts
the site's microclimate, aiding seed germination and natural regeneration.
- Can be used to treat a gully (figure 3-67).

Figure 3-67—A gully can be treated with brush layering.
Drawings
courtesy
of Lisa Lewis (Lewis and Ogg 1996).
Installing Brush Layering
Brush layering can be installed on an existing or filled slope. On an existing slope, a bench is cut 2 to 3 feet (610 to 910 millimeters) deep and angled slightly down into the slope. On a fillslope, brush layers are laid into the bank as it is filled.
Live Cribwalls
A live cribwall is used to rebuild a bank that is nearly vertical (figure 3-68). The cribwall consists of a boxlike interlocking arrangement of untreated log or timber members. The structure is filled with rock at the bottom and with soil beginning at the ordinary high-water mark or water level when the stream is bankfull. Layers of live branch cuttings root inside the crib structure and extend into the slope. Once the live cuttings root and become established, vegetation gradually takes over the structural functions of the wood members. Live cribwalls should be tilted back if the system is built on an evenly sloped surface.

Click on image for
large and descriptive view
Figure 3-68—Installing live cribwalls (Eubanks and Meadows 2002).
OHW stands for ordinary high water.
Applications for Live Cribwalls
Live cribwalls are:
- Appropriate at the base of a slope
where a low wall may be required to stabilize the toe of the slope and
to reduce its steepness.
- Appropriate above and below the water level where stable
streambeds exist.
- Useful where space is limited and a more vertical
structure is required.
- Useful in maintaining a natural streambank appearance.
- Useful for controlling bank erosion on fast-flowing streams.
Effectiveness of Live Cribwalls
Live cribwalls are:
- Complex and expensive.
- Effective
on the outside bends of streams where currents are strong.
- Effective
in locations where an eroding bank may eventually form a split channel.
- An
excellent way of providing habitat.
- A way of providing long-term stability and immediate protection from erosion.
Live Materials for Cribwalls
Live branch cuttings should be from 0.5 to 2.5 inches (13 to 64 millimeters) in diameter and long enough to reach the back of the wooden crib structure.
Inert Materials for Cribwalls
- Logs or untreated timbers should range from 4 to 6 inches
(100 to 150 millimeters) in diameter. Lengths will vary with the size
of the crib structure.
- Large nails or reinforcement bars are required
to tie the logs or timbers together.
- Fill rock should be 6 inches (150 millimeters) in diameter.
Installing Live Cribwalls
- Excavate the
base of the streambank from 2 to 3 feet (610 to 910 millimeters) below
the existing streambed, creating a stable foundation from 5 to 6 feet (1.5
to
1.8 meters) wide.
- Excavate the back of the stable foundation closest
to the slope from 6 to 12 inches (150 to 310 millimeters) lower than
the front of the foundation to make the structure more stable.
- Place the
first course of logs or timbers at the front and back of the excavated
foundation, about 4 to 5 feet (1.2 to 1.5 meters) apart and parallel to the
slope.
- Place
the next course of logs or timbers at right angles (perpendicular
to the slope) on top of the previous course, overhanging the front and back
of the
previous course by 3 to 6 inches (about 80 to 150 millimeters). Each
course of the live cribwall is placed in the same manner and secured to the
preceding
course with nails or reinforcement bars.
- Place rock fill in
the openings in the bottom of the crib structure until it reaches
the existing
elevation
of the streambed. In some cases, rocks need to be placed in front
of the structure for added toe support, especially in outside stream meanders.
A
log revetment may be an alternative
to a rock toe.
- Place the first layer of cuttings on top of the
rock material at the base-flow water level. Change the rock fill
to soil fill at this point. Ensure that the basal ends of some of the cuttings
contact undisturbed soil at the back of the cribwall.
- Place live
branch cuttings at each course with their buds oriented toward
the stream. Place the basal ends of the live branch cuttings so that they
reach undisturbed
soil at the back of the cribwall with the growing tips protruding
slightly past the front of the cribwall. Cover the cuttings with soil and
compact
the soil. Wet each soil layer.
- Use an engineering analysis to
determine the appropriate dimensions. The live cribwall structure,
including the section below the streambed, should not be more than 7 feet
high
(about 2 meters).
- Do not make a single constructed unit any longer than 20 feet (about 6 meters).
Live Fascines or Wattles
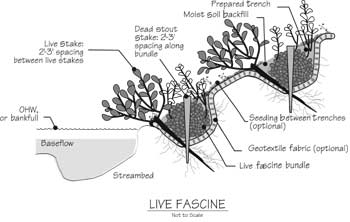
A fascine is a long bundle of branch cuttings bound together to form a cylindrical structure. Live fascines (figures 3-69a and 69b) help control surface erosion. Roots from sprouted fascines help stabilize the bank. Fascines should be placed in a shallow contour trench on a dry slope and at an angle on a wet slope to reduce erosion and shallow sliding.
Click on image for
large and descriptive view
Figure 3-69a—Installing live fascines (Eubanks and Meadows 2002).
OHW stands for ordinary high water.

Figure 3-69b—The fascines are long bundles of branch cuttings.
Drawing courtesy of Lisa Lewis (Lewis and Ogg 1996).
Applications for Live Fascines
- Install fascines above the ordinary
high-water (OHW) mark or the water level when the stream is bankfull,
except along small drainage areas (less than 2,000 acres, or about 809 hectares).
- Install fascines between the high- and low-water marks on the bank in arid climates.
Effectiveness of Fascines
Fascines:
- Trap and hold soil on a streambank using small
dam-like structures to create a series of short slopes.
- Protect slopes
from shallow slides up to 1 or 2 feet (300 to 610 millimeters) deep.
- Require
soil moisture or regular precipitation during the growing season.
- Cause
minimal site disturbances when properly installed.
- Offer immediate protection
from surface erosion.
- Enhance conditions for colonization of native
vegetation by stabilizing the surface and creating a microclimate conductive
to plant growth.
- Serve to facilitate drainage when installed at an angle.
Live Materials for Live Fascines
Cuttings must be from species (such as young willows or shrub dogwoods) that root easily and have long, straight branches.
- Tie
cuttings that are ½ to 1½ inches (13 to 38 millimeters) in diameter
together to form live fascine bundles that are 5 to 10 feet (1.5 to 3.1 meters)
long or longer, depending on site conditions and handling limitations.
- Stagger
the cuttings in the bundle so that the tops are evenly distributed throughout
the length of the live fascine. The completed bundles should be 6 to 8
inches (about 150 to 200 millimeters) in diameter.
- Ensure that the live stakes
anchoring the fascine are at least 2½ feet (760 millimeters) long.
- Table 3-10 has spacing recommendations for live fascines.
Inert Materials for Live Fascines
- Use untreated twine to tie the fascines.
- Use dead stakes. Make stout, dead stakes from ½- to 4-foot- (0.15- to 1.22-meter-) long, sound, untreated, 2- by 4-inch- (50- by 100-millimeter-) lumber. Cut each board diagonally across the 4-inch (100-millimeter) face to make two stakes. Use only sound lumber. Discard any stakes that shatter when they are installed.
Installing Live Fascines
- Prepare the live fascine bundle and live stakes immediately
before installation. If possible, have a fascine-tying team, a digging
team, and a fascine-laying team. Team members can do double duty; all members
must
know their roles ahead of time.
- Jam the ends of fascines together,
for longer fascines, before placing them into the trench.
- Begin
at the base of the slope, marking contours before digging.
- Excavate
a trench on the contour about 10 inches (about 250 millimeters) wide
and 10 inches (about 250 millimeters) deep.
- Excavate trenches up the slope at 3- to 5-foot (0.9- to 1.5-meter) intervals. Where possible, place one or two rows of fascines over the top of the slope to break up sheet runoff.
Erosion-Control Blanket Logs
Make your own logs out of erosion-control blankets. These logs can reinforce a streambank without much site disturbance. Each log is 1 to 2 feet (310 to 610 millimeters) in diameter and made out of erosion-control blankets or jute, straw, and lengths of branch cuttings (figure 3-70). The logs are placed along streambanks to armor them. They can be from a few feet long up to 100 feet (31 meters) long.

Figure 3-70—Live fascines rolled into erosion-control blankets
can be used as "logs" to stabilize erosion along streambanks
(Eubanks
and Meadows
2002).
Applications for Erosion-Control Blanket Logs
- Make logs in the field
(figure 3-71) to meet needs on the site.
- Apply logs at the ordinary
high-water mark or the water level when the stream is bankfull.
- Stack
logs to cover more of the bank; on smaller streams a single string of logs
may suffice.
- String logs together along the banks, overlapping
logs and molding them to the curvature of the streambank.
- Plant logs with rooted stock, sedges, and other plants between the logs and the bank.

Figure 3-71—Erosion-control blanket logs are prepared
by
rolling
out the erosion-control blanket, adding a layer of
loose straw, and rolling
a live fascine into the blanket.
Effectiveness of Erosion-Control Blanket Logs
Erosion-control blanket logs:
- Armor
the toe of the bank effectively while plants take root.
- Protect
slopes from shallow slides or from being undermined, while trapping sediment
that
encourages
plant growth within and behind the log.
- Retain moisture in the
log, which aids vegetative
growth.
- Provide an inexpensive method for stabilizing banks.
Live Materials for Erosion-Control Blanket Logs
- Collect straight branch cuttings, 0.5
to 1 inch (13 to 25 millimeters) in diameter and from 4 to 7 feet (1.2
to 2.1 meters) long, from species that root easily from cuttings (such as
willow,
dogwood, and cottonwood).
- Use live stakes.
Inert Materials for Erosion-Control Blanket Logs
Inert materials that will be needed to install erosion-control blanket logs include:
- Straw.
- Untreated twine to tie the logs
as they are made.
- Cable and duckbill anchors.
- 5/16-inch (8-millimeter)
cable and cable clips.
- Coconut and jute mat—sold by the square foot in rolls 8 feet (2.4 meters) wide and up to 1,000 feet (304 meters) long. Mesh with openings of 3/8 to ½ inch (10 to 13 millimeters) has been used successfully.
Use stout, dead stakes to secure the log. Make stout, dead stakes from sound, untreated, 2- by 4-inch (50- by 100-millimeter) lumber that is 2½ to 4 feet (about 0.8 to 1.2 meters) long. Cut each stake diagonally across the 4-inch (100-millimeter) face to make two stakes. Use only new, sound lumber. Discard any stakes that shatter when they are being installed.
Installing Erosion-Control Blanket Logs
- Cut the mat to the length required for each segment plus
2 feet (610 millimeters). The mat will be 8 feet (2.4 meters) wide.
- Lay
the mat flat and cover it with a layer of straw, leaving 1 foot (310 millimeters)
of mat at each end of the 8-foot (2.4-meter) edge uncovered.
- Place the cuttings lengthwise along one long edge, three to four stems
together.
- Fold
the empty edges inward, along the 8-foot (2.4-meter) border, onto the straw.
- Roll
up the mat, starting at the edge opposite the cuttings.
- Tie the roll
in several places to secure its shape. Use twine or loose coconut strands
from the matting as ties.
- Place the log in position on the streambank at
the average water level with the cuttings against the bank.
- Start at
the downstream end of a section of logs. Place the first log and overlap
it with the next one by 1½ feet (460 millimeters). Overlap the logs so
that
the new log is on the stream side of the original log. One log about 70
to 100 feet (21 to 31 meters) long is stronger than several shorter logs.
- Secure
the log with cable spaced every 2 to 2½ feet (610 to 760 millimeters).
Wrap the cable around the log and secure the cable by driving a duckbill into
the bank. Be sure the anchor is in firm soil.
- Drive live stakes through
the log to help anchor it and to add more plant material.
- Use stout,
dead stakes, if desired, to anchor the log in placid settings.
- Key in the upstream and downstream ends.
Trench Packs
Trench packs act to break the force of moving water and to trap sediment. They are deciduous branch cuttings placed vertically in trenches or holes (figure 3-72). Plant cuttings should be selected from the same zone in which they will be planted, such as at the stream's edge, on the bank, or on the floodplain.

Click on image for
large and descriptive view
Figure 3-72—Installing trench packs (Eubanks and Meadows 2002).
OHW stands for ordinary high water.
Applications for Trench Packs
- Install
trench packs at the ordinary high-water mark or the level of the water
when the stream is bankfull to stabilize the toe of slopes and to provide
good
fish habitat.
- Use trench packs on lakeshores to reduce erosion caused by
wind and waves.
- Use trench packs in gullies to catch sediment.
Effectiveness of Trench Packs
Trench packs:
- Trap sediment.
- Reduce
the velocity of wind and water.
- Provide a good barrier for rooted stock.
- Dry
excessively wet sites through evapotranspiration
(pumping water through the roots to the leaves and into the air).
- Reinforce
soil with unrooted branch cuttings. Deep roots help keep the soil from
sliding and help keep the bank from sloughing.
- Enhance conditions for colonization of native vegetation by creating a stable surface and a microclimate conducive to plant growth.
Live Materials for Trench Packs
Use live deciduous material about 1 to 1½ inches (25 to 38 millimeters) in diameter, known for its good rooting structure. Leave side branches attached. Mix different species, if appropriate.
Use cuttings that are long enough to reach the water level during the dry season.
For fall planting, branches should extend 2 to 3 feet (610 to 910 millimeters) above the ground to provide immediate bank protection. The following spring, trim the branches back to two buds above the ground, stimulating root growth.
For spring planting, branches should not extend more than 12 inches (305 millimeters) above the ground and branches should not have more than two buds.
Inert Materials for Trench Packs
- Augment the pack with dead material, such as conifer
branches, if live plants will not provide enough structural stability
before they root.
- Plant branches 3 to 4 feet (0.91 to 1.22 meters) deep if the planting is subjected to moving, erosive water. In other situations, at least one-half the length of the cutting should be in the ground.
Installing Trench Packs
- Dig a hole or trench 12 to 24 inches (305 to 610 millimeters) wide to the water level of the stream or lake during the dry season. Although the trench can be of any length, the ends of the trench must be tied into something solid or keyed into the bank.
Woven Checkdams
Woven checkdams are constructed of woody stem material that will sprout and form a live structure (figure 3-73). The ends of each stem are toed into the channel bottom and banks (Prunuske 1987).

Click on image for
large and descriptive view
Figure 3-73—Installing woven checkdams.
Drawing courtesy of Susan
Pinkerton (Prunuske 1987).
Applications for Woven Checkdams
Checkdams:
- Allow water to move through
the checkdam.
- Are used for gullies where storm flows have been diverted.
- Are used for gullies where the channel is cut deeper than needed for extreme storm flows.
Effectiveness of Woven Checkdams
Checkdams:
- Trap sediment.
- Slow
water and wind.
- Enhance conditions for colonization of native vegetation by creating a stable surface and a microclimate conducive to plant growth.
Live Materials for Woven Checkdams
- Use live, dormant deciduous material known
for its good rooting structure.
- Install materials the same day that
they are prepared.
- Vertical stakes should be at least 3 inches (76 millimeters)
in diameter (larger for a tall dam), and 2½ times longer than the desired
height of the checkdam. Use cuttings long enough to reach the water level during
the dry season. Cut the basal ends at an angle or point so they can be inserted
into the soil easily. The top should be cut square.
- Horizontal cuttings should be at least ¼ inch (6 millimeters) in diameter and 12 inches (305 millimeters) longer than the width of gully being repaired.
Installing Woven Checkdams
- Excavate a key 6 to 8 inches (150 to 200 millimeters)
deep into the sides of the gully.
- Strip the vertical stakes of all their
side branches.
- Drive vertical stakes into the gully bottom with 60 to
80 percent of each stake anchored underground.
- Weave horizontal cuttings between the vertical stakes, inserting 6 inches
(150 millimeters) of the horizontal stakes at either end into the key.
- Fill
the key with compacted soil after the stakes have been woven.
- Because water will flow through the dam, structures to dissipate energy are not needed. Add an apron if substantial flow is anticipated.