
Practicing the Craft
- Working With Logs
- Cutting Planks With Chain Saw Mills
- Working With Timbers
- Working With Treated Wood
- Tread Surface
- Working With Rock, Stone, and Gravel
Working With Logs
You learn some time- and labor-saving procedures after working with logs a few times. Here are some tricks that can make your work easier.
Felling
Trees needed for log construction should be felled during the growing season, mid-April to early September in most regions. The bark is easier to remove from trees cut during this season.
Ideally, fell trees uphill from the construction site, and out of sight of trail users. Select straight trees free of obvious defects. Often defects are not noticeable until the tree is down, but outward signs of decay, fungus growth, and insect attack indicate a tree to be avoided. Special training and agency certification are required for fallers, a very hazardous occupation.
Bucking and Seasoning
After felling, the tree is bucked, or cut, into log lengths. The logs can be peeled, which will reduce their weight and permit them to dry out, or season. Leaving the bark on the logs will protect the surfaces when the logs are moved, especially if the logs are dragged. Whether the logs are peeled or not, they should be stacked off the ground on two or three stringers of low-quality logs. Stickers should be used between layers of usable logs to allow uniform seasoning. Stickers can be 2 by 4s or small-diameter logs placed across a layer of logs at the ends and midpoints of a layer (figure 91).

Figure 91—Stickers placed between layers of logs
help the logs dry
faster and reduce decay.
Moving Logs
Logs are heavy. Footing is uneven and often slippery. Accidents can happen easily, and the emergency room is far away. When logs are carried by hand, the tendency is to pick up the logs and carry them on the shoulder or at the waist. If workers holding the log slip, the log will come down on them. The result can be a serious injury to the ribs, hip, ankle, or foot.
To avoid or reduce the severity of this type of injury, use two or more log carriers. Log carriers are large steel tongs mounted in the center of a 2- to 3-inch-diameter wooden handle that is 4 feet long. Two workers can use one log carrier to drag a log. At least two carriers are needed to lift a log, one carrier at each end. Each carrier requires one worker on each side of the log.
Log carriers are awkward to pack, heavy, and serve only one purpose. The teeth of log carriers indent the wood half an inch or so on each side of the log. The indentations mar the appearance of the log and provide a place for decay to begin.
A cheaper and lighter method for moving a log is to use rope slings and the removable handles of mattocks or adzes (or small-diameter logs that are 3 to 4 feet long). The slings are made by taking 6 feet of 1,000-pound-test nylon rope and tying a fisherman's knot, double fisherman's knot, or a grapevine knot at the ends, forming a loop.
Roll the log onto the slings and slip the handles over the log and through the loops of the slings. With one worker on each end of the handles (four workers total), lift the log off the ground. The log should be about ankle high. If anyone slips and drops the log, the most serious injury will be to the ankle or foot, and the log will not have fallen far enough to develop much force (figure 92).
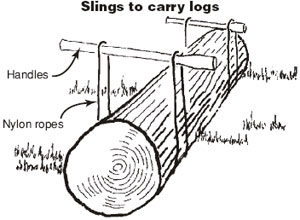
Figure 92—Slings are a good way to move logs and timbers,
bundles of steel bars, wheelbarrows that must be carried
over
soft
ground, or bags of cement carried on plywood.
Peeling
Peeling is a tedious process. There is little reason to peel the bark off a log if you plan to hew or plane it, unless the bark is dirty and likely to dull your cutting tools. Pine, fir, and other evergreen trees may develop pitch pockets just under the bark. On freshly cut trees, pitch may be runny rather than thick or sticky. The cutting edge of a drawknife is never more than an arm's length from a worker's face, and the drawknife is pulled toward the worker's body. Cutting into a pitch pocket splatters pitch on the worker. A drop of pitch in an eye results in the same burning effect as a drop of turpentine. Wear safety glasses or goggles when peeling logs of most evergreen species.
Squaring a Log
It is not easy to cut a uniform plane surface on a log. That difficulty plus the desirability of using treated timbers for longevity is the reason less work is being done with native logs on site. However, if you are determined to use logs because of their availability and their rustic appearance, here is how to do so. The first step is to place the log on nearly level ground and roll it over to determine which face is easiest to work with. Avoid areas with many knots or large knots. The crook of the log, if any, should be in the direction that will cause the least problem when the construction is completed. Roll the log until the best face is up and in a roughly horizontal position (figure 93).
Determine the width of the plane surface that is needed. Put a carpenter's or mason's level in a horizontal position against the end of the log. Use a measuring tape or framing square to measure the distance between the solid wood and the inside of the bark at the edge of the level. By trial and error, move the level up or down until its upper edge is level and on a line that measures the dimension needed. Draw a line across the end of the log on the edge of the level. Without moving the log, use the same process to draw a line across the other end.
Drive a nail into the bark where each horizontal line meets the bark. Stretch a chalkline or stringline between the two nails on one side of the log. If the bark is thin or has been removed, a chalkline can be used and snapped, leaving a chalk mark to work to. A chalkline will not leave an accurate or discernible mark on thick, deeply furrowed bark or on a log with an inch or more of crook. In this situation, drive nails to hold the string every 2 feet or so along the line of the string. Repeat the process on the other side of the log.
After scoring parallel cuts down to the chalkline with a chain saw or ax, use an adz to remove the wood from the top of the log down to the chalklines. Use small-diameter logs, 2 by 4s, or log dogs to hold small logs in place while doing the adz work. To control how much wood is removed, cut with the grain of the wood. This technique reduces the likelihood of breaking out deep chips of wood. The direction of the grain will be obvious after the first few cuts.

Figure 93—Steps to square a log.
A chain saw will do the work much faster. A helper is needed to make sure the sawyer doesn't cut below the chalkline on the far side of the log (which the sawyer cannot see). Otherwise, you will end up with a wavy surface. If the wavy surface is used as a tread, it will cause hikers to slip and fall when the tread is wet or frosty.
If you are not using a chain saw, the technique described above is practical only on small logs. The adz is considered a finishing tool for surfaces that have already been hewed to size. If a lot of wood must be removed and power equipment is not available, hewing with a broad ax is more common and more efficient. The process starts out much like that described for adz work, but instead of horizontal cuts, broad ax cuts are made vertically, for the length of the log along the chalkline. This technique is spelled out in more detail in An Ax to Grind: A Practical Ax Manual (Weisgerber and Vachowski 1999).
Check the surface with a straightedge, a framing square, or a long level. Check across the log and also along its length. Mark any high spots and remove them. It is easier to detect high spots by kneeling on the side of the straightedge in shadow and looking between the straightedge and the wood (figure 94).

Figure 94—Use a long level to find high
spots that need to be
removed.
After the first surface is complete, a second surface can be marked and cut. If the second surface is perpendicular to the first, a framing square can be used to mark the ends of the log. Repeat the marking procedure with the chalkline or stringline and nails. The log can be rolled over so that the second surface is horizontal and can be adzed, or the log can be left in place so the second surface can be shaped with a broad ax. This method is suitable for making log puncheon that must be two logs wide (figure 95).
If the second surface needs to be parallel to the first, place the log with its ends resting on two other logs with the first surface facing up and the log level (figure 96). Determine either the thickness of the log needed, or the width of the second surface needed. Using the level, mark a line along the log's edge parallel with the first surface. Roll the log until the first surface is facing down and repeat the chalkline or stringline procedure for the second surface. Use an adz or saw to level the second surface. This technique is suitable for situations where one surface must be level for a tread and the bottom at each end must rest on log or stone piers.

Figure 95—Use a framing square to
mark a perpendicular cut.

Figure 96—Use this procedure when a second
flat surface must be
parallel to the first.
Cutting Planks With Chain Saw Mills
Where chain saws are allowed, native logs are available, and distance or other factors preclude hauling in treated timbers, consider using an Alaskan sawmill (figure 97). This is about the only way to effectively channel the power of the saw to create uniform, square planks. Several sizes of mills are available. A basic mill costs less than $200. You also need a powerful chain saw, one equipped with ripper teeth.
Working With Timbers
Rough-sawn timbers are splintery, and some species of wood are more prone to splinter than others. To avoid a handful of splinters, wear good-quality, heavy work gloves.
Timbers to be used in a horizontal plane, (ledgers, stringers, and culvert inverts) should be checked for camber, a slight bend in the length of a piece of wood. Although camber usually is slight—less than ½ inch per 10-foot length—it should be used to your advantage.
Camber can usually be determined by sighting along all the surfaces of the timber from one end. Sometimes a stringline held to each end of the timber helps to identify camber. Many timbers will not have any camber.
If camber is present, the convex face should be placed up and the concave face placed down, even if this contradicts the "green-side up" general rule of placing growth rings down to reduce cupping. Weight on a timber will cause the timber to deflect or sag. With the convex surface up, deflection will act to straighten the timber. If camber is ignored and the timber is installed with the concave surface up, it is already sagging. Additional weight will cause the timber to sag even more.

Figure 97—An Alaskan sawmill works great for creating
planks from native
logs. The mill requires a powerful
chain saw (at least 3.8 cubic inches
of displacement,
more is better) and a special ripping chain.
Working With Treated Wood
At a preservative treatment plant, freshly treated wood is stacked on areas of concrete where excess preservative drips from the stack and is collected and recycled. The treated wood is air dried, which works well in a dry climate. However, the wood is sometimes dry at the surface but wet below the surface when it is shipped. This wood will weigh more because of the moisture. You need to consider this factor when transporting the wood to remote locations. The high moisture content of newly treated wood will also cause tools to bind and tear the wood. This is not intended to deter you from using treated wood, but it is something you need to be aware of.
Treated wood may be kiln dried if that process is specified. Kiln drying to 19-percent humidity can be required. However, the minimum order for large plants may be a truckload. Most small local plants probably cannot do this at all. Kiln drying does cost more.
Pinning Logs and Timbers
Driftpins (usually ½-inch-diameter steel reinforcing bars, also called #4 deformed rebar) are used to pin logs and timbers. Some trail crews prefer to use driftpins cut from ½-inch-inside-diameter galvanized steel pipe. The length of the driftpins will vary. When driftpins are used to anchor a log or timber to the ground, about 12 to 18 inches of the driftpin should be in the ground. If rock or boulders are encountered before the driftpin is driven its full length, it will have to be cut off with a hacksaw. When pinning one log or timber to another, the driftpins should be long enough to go through the upper piece and all the way through the lower piece, or at least 12 inches into it.
First, drill holes in the wood 1/16 inch smaller than the diameter of the rebar. Before driving the driftpins, dip the end of the driftpin in heavy automobile grease. The lubricant will make it easier to drive the driftpins, will protect the driftpin from the weather, and will provide a thin, protective film between the steel and the copper in treated wood. Driving the driftpins is much easier if you make a striking plate out of a short piece of pipe with a 2- to 3-inch round plate welded to one end.
The top of the driftpin should be countersunk (figure 98). Countersinking can be done neatly by placing a 4- to 6-inch piece of steel pipe around the driftpin and a 12-inch piece of a smaller diameter rebar inside the pipe. With the pipe resting on the log or timber and the smaller diameter rebar resting on the driftpin, hit the rebar with a sledge hammer until the top of the driftpin is below the surface of the wood. This depression can be filled with grease to protect the steel from rusting. Wipe any surplus lubricant off of the wood.

Figure 98—Countersinking the driftpin is a good practice easily
accomplished by striking a short piece of rebar inside an
even
shorter piece of pipe.
Tread Surface
Slippery Wooden Treads
We are frequently asked how to correct a slippery wooden tread. Often, the surface is not the source of the problem. The slippery surface usually is the result of overlooking factors such as trail grade, cross slope, or soil conditions.
Trail Grade
If the grade of the trail surface is too steep, there is little that can be put on the tread to eliminate slipperiness. A wooden surface that has been installed at an 8-percent grade will be slippery with only a heavy dew. Pedestrians will find a wooden surface built at 5-percent grade slippery with frost or light rain. Shaded and north-facing sites aggravate the problem. The maximum grade for a trail with a wooden surface should be 2 percent (¼ inch per foot).
Cross Slope
Another cause of a slippery tread is a cross slope that is too steep. To prevent excessive cross slope on a trail, use a simple carpenter's, mason's, or torpedo level to identify any difference in elevation between parallel stringers, the notch in sleepers, and ledgers attached to the piles. To eliminate or reduce cross slope, shim up the stringers or ledgers, excavate the high end of the sleepers, redrill the bolt holes, or replace the ledgers (figure 99).
It is much cheaper to build the foundation correctly than to try to correct problems later through maintenance.

Figure 99—Eliminate cross slope with shims, by excavating the high
side of sleepers, or by drilling new bolt holes on the ledgers.
Soil Conditions
Another factor that can create a slippery tread is settlement, a problem that occurs when soil settles after a trail has been constructed. The trail may have been built properly, but all or part of the trail may have settled over time. Perhaps sleepers or a bent on end-bearing piles were used instead of a bent on friction piles. That part of the foundation settled over time, causing the trail to sag. The result is that one or both sections of trail on each side of the sag are steeper than intended.
One part of a trail support may settle. For example, one end of a sleeper may settle and the other end may not, or one pile in a bent may settle and the other may not. Both piles may settle, but one may settle more than the other. This type of settling will affect cross slope.
Cross slope of ¼ inch per foot (2 percent) is common for concrete and asphalt surfaces, but is excessive for wood. The cross slope should be level or 1/8 inch or less per foot (0 to 1 percent). Settlement can be corrected by shimming the low side, notching the high side, or a little of each. This is extremely difficult to do after construction and can be avoided to a degree by taking ample rod soundings and digging a number of test holes during the design phase. During construction, the crew should be alert for changes in soil conditions and should take remedial actions when necessary.
Surface Treatments
If the hazard of a slippery tread cannot be corrected by shimming, notching, or adding steps, a few surface treatments can be applied. These treatments will require maintenance.
Latex Paint
A nonskid latex paint is made for boat decks. This paint is opaque, unlike a clear wood stain, but it can be tinted. As with all painted surfaces, peeling, scraping, and periodic repainting must be expected.
Walnut Chips
Walnut chips are a hard, angular material produced in various sizes. The number 4 size is suitable for nonslip surfaces. Walnut chips can be applied to a wooden surface by sand painting (using chips and paint mixed at the factory), using chips mixed into the paint at the site, or by painting the wood and sprinkling on chips while the paint is wet.
Mineral Products
Nonslip products are also made from pumice and aluminum oxide. Some are premixed. Others are sold as a gritty powder that is mixed with paint.
Nonslip Gratings and Grit-Treated Mats
Another method for correcting a slippery trail tread is to replace a wooden plank tread with nonslip gratings or to apply grit-treated fiberglass mats to the planks.
Working With Rock, Stone, and Gravel
The construction industry recognizes differences between rock, stone, and gravel. It helps to understand the differences in the materials so you will know what to specify or order.
Rock
Rock is the parent material in and under the ground. Sometimes it is called bedrock or ledgerock. Moving rock usually requires drilling and the use of explosives.
Stone
When rock is broken or crushed, the pieces are referred to as stone. Stone, when used in construction, describes usable pieces of what once had been rock. Stone may be large enough to use for walls, or it may be small pieces that have been through a rock crusher for use as aggregate in concrete or as a base course in a road. Stone is angular on all sides. Among the byproducts of rock-crushing operations are "crusher fines," screened material smaller than 1/4 inch that is not suitable for most crushed stone contracts. This material is often sold at a discount at crusher operations and makes a fine trail surface when it is wetted and compacted.
Gravel
Small pieces of rock that have broken naturally and have been subject to glacial action or tumbled in a river or creek are called gravel. The glacial action or the effect of water has rounded and removed all the corners of the original piece of rock.
Uses of Stone and Gravel
Rock is rarely found in a wetland. Stone can be brought to the site for use as riprap. Crushed stone can be used for walking surfaces. Because crushed stone is angular, when it is compacted it will knit together to form a solid mass. Gravel cannot be compacted to produce a solid mass. Gravel's rounded shape is useful because water can move through the spaces between the gravel particles. Crushed stone should not be used for drainage (around perforated pipe or to carry water from one point to another). Use gravel for drainage (figure 100).
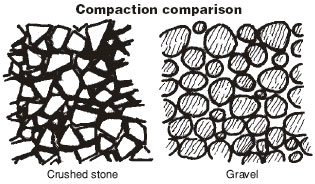
Figure 100—Crushed stone has angular edges and compacts well.
It is good for tread surfacing. Gravel does not make good surfacing
because it has rounded edges. Gravel is good for subsurface
drainage because water flows freely through it.