
Chapter 4—Designing Trail Elements—Continued
Tread Surface
The choice of tread surface treatment affects the speed at which horses and mules can travel. For example, fine aggregate and dry woodchips provide relatively good traction and are conducive to safe cantering. Hard surfaces, such as large flat rocks, offer poor traction, and for safety reasons, limit travel to a walk. Consult Chapter 6—Choosing Horse-Friendly Surface Materials for more information.
Tread Obstacles
Tread obstacles, including tree roots, waterbars, holes, or projecting objects, present tripping hazards and should be removed. Whenever possible, construct edges flush on either side of the trail tread without rocks, curbs, or other delineating materials. Stock may encounter curbs and other low objects, especially in highly developed areas. Most horses and mules navigate them successfully, but it is better to avoid them when possible. If curb cuts and grades are designed to meet accessibility guidelines and are at least as wide as the trail tread, the curbs usually are passable.
Alignment
Alignment is a major consideration when locating trails. Alignment—horizontal and vertical—affects trail users' satisfaction and the trail's longevity. Alignment also affects sight distance and the speed at which trail users travel. The ideal trail matches the route to the ground, following the contours of the land and providing the best view (figure 4–8). The most enjoyable trails take advantage of natural features, such as drainages, winding around trees and rocks.

Figure 4–8—Elevation on contour trails
remains relatively
constant. Trail users
appreciate contour trails because they are
easier to travel and frequently offer great views.
Horizontal alignment is the way the trail looks from above, as on a map. The best horizontal alignment includes simple curves rather than straight sections with sharp turns. Vertical alignment is the way the trail climbs and descends slopes. The vertical alignment determines not only how steep the trail is, but also how it channels water. Erosion from runoff is one of the most destructive forces affecting a trail. For information regarding trail alignment, refer to Appendix B—Trail Libraries, Trail Organizations, and Funding Resources and Appendix C—Helpful Resources.
Grade
Steepness—or grade—determines how challenging a trail is. In the English measurement system, grade is the amount of rise in 100 feet (30.5 meters) expressed as a percentage. A trail that climbs 5 feet (1.5 meters) over a distance of 100 feet has a 5-percent grade. Grade directly affects how a trail needs to be designed, constructed, and maintained to establish and retain solid tread.
Generally it is easier for stock to maintain their balance when they are traveling uphill rather than downhill. This is because most of their weight is over their forelegs. Descents require stock to shift more weight to the forelegs. Table 4–3 shows suggested design grades for horse trails. Surface water runoff can be controlled on all of the grades listed in the table. On grades nearing 50 percent, erosion cannot be controlled.
The best contour trails have grades, slopes, and turns that are comfortable for all trail users, not just horses and mules. Following contours helps reduce erosion and minimize trail maintenance. Keep trail segments between slope breaks—or running grades—as short as possible. Do so by following land contours, as opposed to cutting across or going straight up and down contours. Incorporate periodic short grade reversals as needed to remove surface water from the trail. Because water gains speed as it runs downhill, the potential for erosion increases greatly as the running grade becomes longer.
Horses and mules easily can master steady grades steeper than 10 percent—even 20 percent. However, as the grade increases, so does the potential for runoff to harm the trail's surface. In areas where grades are steeper than 10 percent, consider using one or more switchbacks to gain elevation (figure 4–9). Refer to Trail Switchbacks in this chapter for more information.
On running grades steeper than 5 percent, add 6 to 12 inches (152 to 305 millimeters) of extra tread width as a safety margin where possible. This helps a trail animal regain its footing if it accidentally steps off the downhill side of the trail. Benches or trail sections that are at least 100 feet (30.5 meters) long without a running grade can serve as resting areas for stock that are out of condition, large groups, and packstock. The larger, relatively flat area means an entire group can rest together at one time.
Trail Talk
Making the Grade
In the United Kingdom, equestrian routes are available to bicyclists, and are subject to bicycle grade recommendations of 3 to 5 percent, with occasional steeper pitches. The preferred maximum grade on routes limited to equestrian use is 20 percent (The Highways Agency 2005b). The British Horse Society (2005b), an advocacy group, recommends a maximum grade of 8.3 percent for routes that include equestrians.

Figure 4–9—A trail with segments separated
by switchbacks is
easier to travel
than a single, steep trail.
Steps
In areas where grades exceed 10 percent, trail steps are common (figure 4–10). Most horses and mules navigate steps successfully, but steps sized for humans may present difficulties for stock. Some stock hesitate at steps, and some riders don't like the jostling that occurs when they're forced to navigate steps on horseback. Figure 4–11 shows a ford that incorporates a step up to the trail. The landing is too small, causing some stock to balk. Soils at the approach and landing areas of steps or staircases may erode quickly, leaving a gap that can catch an animal's hoof. Stock can negotiate steps with risers that are 16 inches (406 millimeters) high or higher, but many riders prefer steps with risers that are no higher than 12 inches (305 millimeters).

Figure 4–10—Experienced trail stock readily
travel these steps
to a bridge crossing. The
risers
are 8 to 12 inches tall, and the
landings
are 6 to 8 feet deep. The trail tread is about 3 feet
wide.
Trees and rocks along the sides direct stock
onto the bridge.
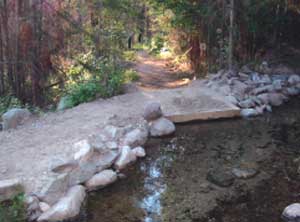
Figure 4–11—After fording the irrigation
ditch, stock must step
up about
12 inches. Because the landing is only
4 feet square,
some untrained stock balk
at the step.
Trail Talk
Stepping Up
Steps on horse trails should be used with caution.
- In the United Kingdom, neither The Highways
Agency (2005b) nor the British Horse Society
(2005b) recommends steps for equestrian
routes. In cases where steps are unavoidable,
the British Horse Society recommends a step
length (landing) of 9.5 feet (2.9 meters) to allow stock
to stand with all four feet on a single step. The
recommended height for risers is 5.9 inches
(150 millimeters). The step may slope slightly
downward to make use of limited space.
- The Student Conservation Association avoids building steps on trails used by stock (Birkby 2006). When there is no alternative, they require landings at least 4 feet (1.2 meters) deep, but prefer them to be 5 feet (1.5 meters) deep. Stones form the front and sides of the step—the crib. For crib fill, SCA uses crushed rock or other durable material that is not easily kicked loose or eroded by hoofs. SCA also recommends using visual barriers alongside steps to encourage stock to stay on the tread. Sometimes, rocks placed randomly alongside the trail serve this purpose.
Outslopes
Flowing water follows the path of least resistance, which may be directly down a poorly constructed trail. An outslope—also known as a cross slope— helps shed water from the trail (figure 4–12). Grading with an outslope leaves the outside edges of a hillside trail slightly lower than the inside edge. Table 4–4 shows suggested slope ranges for outslopes for horse trails.
| Low
development (percent) |
Moderate
development (percent) |
High
development (percent) |
|---|---|---|
| 5 to 10 | 5 | 2 to 5 |

Figure 4–12—An outsloped section of trail
directs water off the
tread,
reducing
erosion damage.
Grades, Outslopes, and Drift
Over time, trails tend to drift downhill as trail users step to the tread's outside edge and wear it away. As running grades increase and outslopes become extreme, stock may find it difficult to maintain their balance and stay in the center of the tread. To protect the edges of the trail, make trails wider as the outslope becomes steeper. When trails have outslopes of 4 to 5 percent, widening the trail an additional 6 to 12 inches (152 to 305 millimeters) helps stock stay in the center. An alternative is to create wide spots where obstacles might force riders and packstock to the outer edge of a trail. Berms sometimes build up on the edges of trails, preventing water from flowing off the tread. Proper maintenance is needed to remove these berms, preventing erosion.
Slopes With Hard Surfaces
Trail animals can slip on smooth, hard surfaces, especially if they are outsloped. Where trails intersect solid rock ledges, asphalt, concrete, or other hard surfaces, keep the outslope to 5 percent or less to reduce the possibility of slipping. Add texture to hard surfaces at trail crossings. Evaluate surface treatments carefully where trails make a transition to pavement—loose material may end up on the hard surface and reduce traction further. Consult Chapter 6—Choosing Horse-Friendly Surface Materials for additional information.
Trailbed Construction
On hillsides, excavate the trailbed into the hill to provide a slightly outsloped travel path. Figure 4–13 shows cross sections of a trail with a relatively flat trailbed, full-bench construction, ¾-bench construction, and a balanced section. Full-bench construction is preferred because it produces a more durable trail that requires less maintenance. During full-bench construction, excavated soil from the hill is cast as far as possible from the trail since it is not needed for fill (figure 4–14). Partial-bench construction incorporates part of the cut material in a process known as sliver fill. Because it is difficult to compact the fill evenly, the trail may be prone to failure, especially on the downhill side. If a slope needs to be filled, reinforce it with retaining walls or use step cuts and fills (see figure 4–13) to key the fill material into the slope.

Figure 4–13—Trail typical cross sections. Full bench
construction gives
the fewest problems, especially
on steep slopes.

Figure 4–14—When constructing hillside
trails
in steep terrain,
excavated soil is
cast downhill.
Trail Drainage
Proper drainage is vital on trails because it reduces erosion from runoff and boggy conditions from water pooling in flat areas. Poor drainage increases tread damage by all trail users. Figure 4–15 shows an advanced case of poor trail drainage on a popular shared-use trail. For further information on trail drainage, refer to Appendix B—Trail Libraries, Trail Organizations, and Funding Resources.

Figure 4–15—Running or standing water
can cause extensive damage.
Crowned Tread
One way to avoid water damage on relatively flat or level ground is to crown the tread—make it higher in the center than on the edges. Usually, treads are crowned 2 to 5 percent. Soil composition, texture, type, and the trail's use determine how often crowned tread needs to be maintained. Tread quickly becomes trenched on trails that are not maintained or that have significant traffic. Turnpikes are structures with a crowned tread that are sometimes used when trails cross boggy areas. Don't crown short sections of trail paved with asphalt or cement.
Waterbars
Although waterbars are common on trails, they often work poorly and require substantial maintenance. In theory, water running down the trail is deflected by the waterbar and runs off the trail's lower edge. In reality, waterbars fill in with sediment, wash out, dislodge, or deteriorate over time. In the process, the anchors holding waterbars in place may become exposed, creating a significant tripping hazard. Wildlife often go around waterbars, which also is the natural inclination for horses and mules. These unwelcome detours widen treads. When waterbars on horse trails are unavoidable, construct them of rock or wood.
Rock—or armored—waterbars are occasionally used where the trail grade is less than 5 percent (figure 4–16). On steeper grades—15 to 20 percent—waterbars are likely to clog if the waterbar is set at an angle of less than 45 degrees to the trail. When grades are steeper than 20 percent, waterbars are ineffective. At such steep grades, there is a fine line between clogging the waterbar and eroding it away.
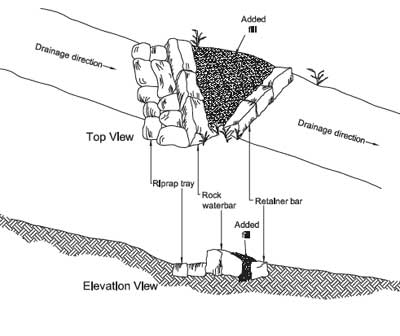
Figure 4–16—A reinforced or armored waterbar. Set the waterbar
at 45
to 60 degrees to the trail where grades are less than 15 percent.
Grade Reversals, Knicks, and Rolling Grade Dips
Grade reversals are used on new outsloped trails to shed water from the tread. In a grade reversal, the vertical tread alignment levels out and then drops subtly for 10 to 50 linear feet (3 to 15.2 meters) before rising again. Water flows down the drop, running off at the low spot before the water gains significant momentum or volume. Contour trails with grade reversals are often referred to as rolling contour trails. Retrofitted trails generally incorporate knicks or rolling grade dips. A knick is appropriate for draining puddles on relatively flat ground. A knick (figure 4–17) consists of a subtle, semicircular depression in the trail, about 5 to 10 feet (1.5 to 3 meters) long. The depression is angled about 15 percent so water runs off the edge of the trail. A rolling grade dip (figure 4–18) is similar to a knick. A rolling grade dip has an outsloped depression with a ramp built from the removed soil. The ramp is outsloped like normal tread, up to 5 percent. Rolling grade dips are 15 to 30 feet (4.6 to 9.1 meters) long and are more suitable than knicks for relatively steep trails. Stock tolerate grade reversals, knicks, and rolling grade dips well. Grade reversals, knicks, and rolling grade dips are preferred over waterbars in nearly all situations.

Figure 4–17—A trail knick directs water off
relatively flat areas.

Figure 4–18—A trail with a grade reversal
handles water more
effectively than
a trail with a waterbar. A grade
reversal also
requires
less maintenance.
Trail Talk
Grade Dip or Waterbar?
For existing trails with water issues, Woody Hesselbarth, Brian Vachowski, and Mary Ann Davies (2007) encourage the use of rolling grade dips or knicks instead of waterbars. This is "...because by design, water hits the waterbar and is turned. The water slows down and sediment drops in the drain. Waterbars commonly fail when sediment fills the drain. Water tops the waterbar and continues down the tread. The waterbar becomes useless. You can build a rolling grade dip quicker than you can install a waterbar, and a rolling grade dip works better."
Culverts
Where running water crosses the trail, culverts may be needed. Construct culverts of rock (figure 4–19), treated timbers, plastic, concrete, or metal, and surface them with at least 6 inches (152 millimeters) of suitable tread material. Bare culverts are slippery and have other undesirable features. The hollow sound of horseshoes hitting a bare culvert and the metal's bright reflections or odd contrast can spook stock. Consider using tapered end sections (figure 4–20), painting the culvert ends, or screening the edges with rock or timber for safety and esthetics. The tread surface over culverts has a tendency to erode and needs to be replaced regularly.

Figure 4–19—A rock culvert. Stones may also be
laid along
the bottom of the culvert.
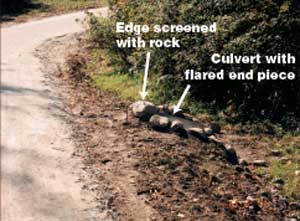
Figure 4–20—This trail culvert has a flared
end piece that is
partially concealed
with rock. It is attractive, durable,
conforms
to the slope, and improves waterflow.
Culverts with flared or
covered ends are more
horse-friendly than exposed culverts
because
they look more natural and there is
no exposed
metal
to make noise when a
horse steps on it.
—Courtesy of Kandee
Haertel.
Grates
Any grates should be strong enough to support the weight of stock safely. Grate patterns should not catch horseshoes. Small grates placed to the side of the tread are better than grates that encroach on the center of the trail. Long, narrow grates are more likely to be accepted by stock than large square ones. Horses and mules often avoid grates because their surface does not appear solid and they make noise when stock step on them.
Curves, Turns, Passing Areas, and Switchbacks
The large size of stock and their loads requires plenty of maneuvering space. While curves and switchbacks designed to accommodate riders are usable by many recreationists, the design parameters are slightly different than those for other users, such as bicyclists. Refer to Chapter 1—Understanding Horses and Mules for the design dimensions of horses.
Curves and Turns
On trail curves and turns, the minimum comfortable radius is 5 feet (1.5 meters). When turns are any tighter, stock may stumble over their own legs. Turns with a radius of 6 to 8 feet (1.8 to 2.4 meters) are more comfortable for both animal and rider.
Table 4–5 shows the minimum suggested turning radius on horse trails with different levels of development. Wider turns are preferred. In addition to handling increased traffic volume and being more comfortable, wider turns may better suit tread width, site conditions, and trail users' experience levels. Allow additional clearance for packstock equipped with side panniers or for stock that are pulling carts.
Passing Areas
When trails are in steep terrain, other trail users can find it challenging to move aside for stock. Incorporate passing areas on narrow trails, particularly those on steep hillsides. A space 5 feet (1.5 meters) wide by 10 feet (3 meters) long will allow a single trail animal to pull off the tread. Locate passing areas in natural openings if possible. Larger passing areas, where large groups or packstrings may move off the trail while another group goes by, are sometimes needed. Plan these areas to handle the expected traffic volume and group sizes.
Switchbacks
Switchbacks reduce the grade on a trail by incorporating sharp turns on one or more trail segments. Several switchbacks may be needed to traverse a steep area effectively. Switchbacks consist of an upper and lower approach, guide structures, a landing—or turn platform—and a drain for the upper approach and landing. Figure 4–21 illustrates suggested guidelines for trail switchbacks on horse trails.
Trail Talk
Rounding the Curve
The Pennsylvania Trail Program (1980) recommends switchback landings be at least 8 feet (2.4 meters) wide. On horse trails, the Pitkin County, CO, Open Space and Trails Program (Parker 1994) specifies a minimum switchback radius of 10 feet (3 meters) and a minimum trail curve radius of 12 feet (3.6 meters) elsewhere.

Figure 4–21—A switchback with a retaining wall. For long description
click here.
Trail Talk
Shortcuts
Inexperienced or inattentive riders frequently cut across switchbacks. Packstock do too, but for a different reason. As the lead horse or mule completes its turn, the towrope tightens and prevents the following animal from making a wide turn. The effect continues down the line as each animal follows the one ahead. If the packstring is traveling too fast, stock cut the curve of the switchback.
Design trail switchbacks with as long a curve radius as possible, generally with a radius of at least 5 feet (1.5 meters). To discourage shortcutting, design grades of 10 percent or steeper for 100 feet (30.5 meters) leading to and away from switchbacks. Consider using a boulder or log barrier for 15 to 30 feet (4.6 to 9.1 meters) back from the turning point, on the inside of the curve. Placing natural barriers at the inside of the curve is another approach to prevent shortcutting (figure 4–22).

Figure 4–22—This newly reconstructed
switchback
includes
a landing reinforced
with a retaining wall. A boulder placed
at the inside of the turn prevents shortcutting.
Climbing Turns
Where appropriate, climbing turns are an alternative to switchbacks and are easier for packstock to negotiate. A climbing turn (figure 4–23) follows the natural slope. When the tread turns, it climbs at the same rate as the slope. The advantage of climbing turns is that a larger radius turn is easier to construct. Construction is much less expensive because less excavation is required and fill is not needed. The minimum suggested radius for a climbing turn is 20 feet (6.1 meters). Climbing turns work best when built on slopes of 15 percent or less. In steeper areas, switchbacks are a better choice.

Figure 4–23—Several stumps
discourage trail users
from
cutting
across this
climbing turn.