
Chapter 5—Designing Trail Crossings and Structures
Some of the most complex elements on trails are crossings and structures. Trails intercept roads, highways, railroad rights-of-way, wetlands, and waterways. Trails can pass over, under, or across such obstacles. Constructing even the simplest at-grade road or stream crossing means evaluating safety issues, trail user needs, design parameters, environmental concerns, and cost. Solutions range from simple to complex, and they require input from engineers and scientists representing many disciplines, as well as trail designers, legal experts, and local riders. This guidebook provides only a basic overview for trail crossings and structures. Consult governing authorities and qualified professionals for requirements, laws, standards, and guidelines.
At-Grade Road Crossings
Horse trails often cross roads or highways at grade—on the same elevation as the road. Ideally, the amount of motorized traffic in such areas is low, or the intersection has a traffic light with a push-button signal actuator that the rider can easily reach. Push-button signal actuators allow users to control the traffic light. When horse trails intersect with roads, safety is the most important factor. Road crossings must conform to legal requirements, and they require the expertise of transportation engineers. When designing trail crossings, it is wise to consult a designer familiar with the special requirements of riders and stock.
Crossing Locations
Where trails cross roads, the trail should be perpendicular to the road. The crossing generally should be on a straight segment of road. Locations where motorists might expect an intersection are good sites for trail crossings. Consistency in the placement and design of intersections allows all users to identify them more readily. Federal, State, or local regulations usually affect trails that intersect roads.
Appropriate tread surfaces at road crossings are critical to rider safety. Most asphalt and concrete road surfaces don't provide enough texture or traction for a horse or mule. These surfaces can be as slippery to stock as compacted snow and ice are to pedestrians. For more information, see Chapter 6—Choosing Horse-Friendly Surface Materials.
Trail Talk
Dogleg Approaches
The Haney Horsemen in British Columbia, Canada, sometimes advocate the use of T- or L-shaped trail jogs just before intersections with roads (Archibald, personal communication). The jog allows riders to slow down before they reach the road. When nearby vegetation is cleared appropriately, the added turns allow trail users and drivers to see each other in advance. Trails that approach an intersection by an S-shaped or zigzag path also allow trail users to see vehicles in several directions as they approach the road. Circuitous routes have another benefit—they can force stock to observe traffic, instead of blindly following the animal in front. When using dogleg approaches, provide adequate sight distance for both road and trail users, and make sure the immediate approach and crossing are perpendicular to the road.
The use of warning signs, decreased speed limits, road markings, narrowed travel lanes, and other traffic control devices can enhance the safety of riders and other users at road crossings. On public roads, signs and other traffic control devices must conform to the Manual on Uniform Traffic Control Devices (MUTCD).
Resource Roundup
Intersection and Road Crossing Guides
Shared-use trails may intersect with roads or have segments that need to meet Federal, State, or local requirements. Many agencies adopt the standard references listed below as part of their own requirements. The references listed are updated frequently—consult the latest edition.
- A Policy on Geometric Design of Highways
and Streets (AASHTO 2001a) can be ordered
from the AASHTO online bookstore at https://bookstore.transportation.org/item_details.aspx?ID=110.
- Guidelines for Geometric Design of Very Low-Volume Local Roads (ADT ≤ 400 ) (AASHTO
2001b) can be ordered from the AASHTO
online bookstore at https://bookstore.transportation.org/item_details.aspx?ID=157.
- Roadside Design Guide (AASHTO 2002)
can be ordered from the AASHTO online
bookstore at https://bookstore.transportation.org/item_details.aspx?ID=148
- Manual on Uniform Traffic Control Devices (FHWA 2004a) is available at http://mutcd.fhwa.dot.gov.
- MUTCD Standard Highway Signs (FHWA 2004b), a companion document to the MUTCD, is available at http://mutcd.fhwa.dot.gov/ser-shs_millennium.htm.
Crossing Sight Triangles and Visibility
Riders need to see the road before they approach an intersection or a crossing that has rapidly moving traffic. To each side of the trail, vehicles need to see the approaching stock. These sight distances, sometimes called the sight triangle, allow sufficient time for everyone to stop safely once they have seen each other.
The required sight distances vary with the speed of the traffic involved and the eye height of the travelers. Refer to the appropriate AASHTO geometric design guidelines when calculating sight triangles for bicyclists and motorists on roads that intersect horse trails. Refer to the Trail Sight Distance discussion in Chapter 4—Designing Trail Elements for more information regarding riders' needs.
Many riders recreate after sundown and during evening hours, particularly in warmer climates. While lighting at rural or wildland crossings generally is not feasible, in areas with high levels of development, crossing lights may be advisable.
Trail Talk
Trails Crossing Roads
Where shared-use trails approach road crossings, Baughman and Serres (2006) recommend adding " …a tight turn, ridges and dips in the tread, and/or narrowing the clearing width to slow down trail users. On the final approach the trail must be at a right angle (90 degrees) to the road, nearly level, and have a sight distance adequate for trail users to see the oncoming road in time to stop." They also recommend expanding the clearing width or thinning forest trees to provide good visibility from the trail to the road.
Waiting Areas at Crossings
Riders generally ride in pairs or groups. When a trail group comes to a road crossing, riders may have difficulty keeping stock off the road. Solutions include trimming vegetation to provide a clear view farther from the road or providing a waiting area that allows stock to stand back from traffic until it is safe to cross. Consider expanding the width of the trail surface before it meets the road, forming a rectangular or fan-shaped waiting area.
Trail Talk
Waiting to Go
In the United Kingdom, rider waiting areas— also called refuges—are required where equestrian routes cross roads at grade (figure 5–1). The Geometric Design of Pedestrian, Cycle and Equestrian Routes (The Highways Agency 2005b) specifies a grassy area measuring 16.4 by 32.8 feet (5 meters by 10 meters). Two L-shaped fences or barriers are set opposite each other to create a dogleg in the bridle path, slowing trail traffic before it reaches the waiting area. Fence segments guide riders and their stock and make the refuge more noticeable to other users. When reviewing this design, keep in mind that traffic in the United Kingdom travels on the left-hand side of the road. U-turns are usually prohibited near rider refuge areas. When refuges are necessary in medians between multiple lanes of traffic, the designated size is 16.4 feet wide by 9.8 feet long (5 by 3 meters). Structures associated with equestrian routes, such as bridle gates or horse stiles, must be placed at least 13.1 feet (4 meters) from the road.
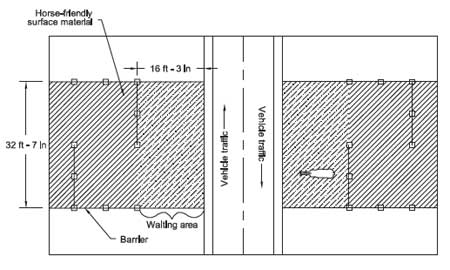
Figure 5–1—A bridleway crossing with waiting area in the United Kingdom.
—Courtesy of The Highways Agency. The original figure was
edited for clarity.
Road Signs and Traffic Signals
Road signs are critical for the safety of riders and other trail users where trails cross roads. Consider standard equestrian crossing signs for all at-grade road crossings used by horses and mules. Chapter 12—Providing Signs and Public Information has more information regarding road signs.
Most push-button signal actuators are installed too low for riders to reach without dismounting. To solve the problem, install a second push button for riders. Most seated riders can operate a push button that is between 5 and 6 feet (1.5 and 1.8 meters) above the ground (figure 5–2). Set the post far enough back from the road to keep stock out of the traffic lane.
Trail Talk
Push-Button Signal Actuators
Equestrian Crossings (The Highways Agency 2003) discusses crossings with and without traffic signals in the United Kingdom. The Highways Agency places push-button signal actuators in a position that encourages riders to first check the nearest approaching traffic. They also recommend placing push buttons at least 6.6 feet (2 meters) from the road edge so the animal's head does not encroach on traffic. The leaflet is available at http://www.dft.gov.uk/pgr/roads/tpm/tal/signsandsignals/equestriancrossings.pdf.

Figure 5–2—Two push-button signal
actuators serve pedestrians
and riders. The push button for
equestrians is about 70 inches
above the trail's surface.
—Courtesy of Forest Preserve District
of DuPage County, IL.
Road Intersections
Trail intersections with roads require site-specific engineering studies and must comply with the MUTCD standards, AASHTO guidelines, and other applicable requirements for signs, push-button signal actuators, and related elements. Figures 5–3 and 5–4 illustrate two concepts for shared-use trails that intersect with roads. Figure 5–3 illustrates a concept for an at-grade road crossing with traffic signals, curbs, and sidewalks. Figure 5–4 illustrates a concept for an at-grade trail crossing without signals. According to the MUTCD (2003), nonvehicular signs with symbols may be used to alert road users in advance of locations where unexpected entries may occur.
Resource Roundup
Early Warning
Usually, when there is no electricity, traffic warning lights can't be used. This presents problems when recreation trails cross roads or when crossing sight distance is poor. One solution is the Cross Alert System, a motionactivated, solar-powered, warning light. Activity on the trail triggers a radio-controlled amber warning beacon, alerting motorized traffic that trail users are at or near the intersection. The self-contained system handles rough conditions and senses many users, including pedestrians, bicyclists, and equestrians. A wide detection zone can be set up to monitor dual parallel treads, and early warning signs can be placed as far away as 500 feet (152.4 meters). Options include an integrated counter. More information is available at http://www.crossalert.com.

Figure 5–3—An at-grade trail crossing (with signals) for equestrians.
For long description click here.
—Adapted from the Manual on Uniform Traffic Control Devices (FHWA 2003).

Figure 5–4—An at-grade trail crossing (without signals) for equestrians.
For long description click here.
—Adapted from the Manual on Uniform Traffic Control Devices (FHWA 2003).
In highly developed areas, horse trails sometimes cross driveways leading into private property, or intersect with road entrances into commercial areas. Two scenarios are common when an unpaved trail crosses a driveway—the unpaved tread continues across the drive, or the unpaved drive continues across the tread. If a paved surface is required, roughen it to improve traction, or choose material that is horse-friendly. Consult Chapter 6—Choosing Horse-Friendly Surface Materials for information regarding options. Figure 5–5 is an example of an unpaved trail that crosses a private driveway.

Figure 5–5—Unpaved trails that continue
across driveways are
more comfortable
for riders than trails that are interrupted
with
pavement. The Murphy Bridle Path
in North
Central Phoenix,
AZ, was established in
1895 and preserved as an unpaved trail in
the heart of a modern community. Unpaved trail
sections across
driveways may not be suitable
in all regions of the country.
Trail Talk
Crossing the Street
Town of Queen Creek Parks, Trails and Open Space Master Plan (HDR and others 2005) lists the following design considerations for shared-use, enhanced at-grade crossings in Queen Creek, AZ.
- Crosswalks and curb ramps at right angles to
moving traffic, ladder crosswalk markings,
curb extensions with landscaping, detectable
warnings, and accessible pedestrian signals.
Where the trail crosses, surface the crosswalk
with washed concrete or incise grooves in the
concrete perpendicular to the direction of trail
travel.
- Adequate sight distances that consider time,
visibility, amenities, warning signs, and lighting.
- Gathering spaces [waiting areas], large enough
for riders, at each crossing corner.
- Push-button signal actuators where trails cross.
Locate one button at 6 feet (1.8 meters) above the tread for riders and another push button at
pedestrian height. Allow maneuvering space
around actuator posts.
- A crossing island or median (raised or flush)
safe zone with curb ramps or cut-throughs the
same width or greater than the trail or path.
- Traffic calming techniques.
- Fences or barriers to separate the trail from
paths, adjoining property, and similar situations.
- Optional lighting scaled for pedestrians and riders.
The elements are variable at corners and crosswalks, depending on how trails converge at the site. Complex intersections require engineering to meet safety and legal requirements. Consult the MUTCD and AASHTO publications for more information.
Continuing an unpaved tread across a driveway in snow country frequently is impractical because winter plowing can disturb the surface materials. Consult governing authorities for requirements regarding construction, signs, traffic patterns, and applicable accessibility requirements.
Railway Corridors and Crossings
Routing horse trails along active railroad corridors generally is ill-advised. Most riders don't want to ride on a trail adjacent to active rail tracks. Train speeds, sounds, vibrations, and size are threatening to stock that are not familiar with them. Controlled crossings with crossing bells, sirens, horns, lights, or traffic gates can frighten stock and cause them to become uncontrollable. However, in limited circumstances horse trails or crossings in railroad corridors may be unavoidable (figure 5–6).

Figure 5–6—The sights and sounds of a
moving train frequently
frighten
animals. Trails in rail corridors are
subject to many
safety and
legal requirements.
—Courtesy of Anne M. O'Dell.
For safety reasons, most railroad companies are reluctant to allow other uses within their rights-of-way. Railroad rights-of-way are private property—walking or riding there without explicit authorization from the railroad company is trespassing.
Arrangements to use railroad corridors or crossings require extensive negotiation between trail developers, governing jurisdictions, and property owners. Safety arrangements have to be negotiated in areas where proposed equestrian trails will be close to railroads.
Locating horse trails or crossings in active railroad corridors is a lengthy and costly process. Permits, easements, or rights-of-way are an absolute necessity. In addition, stringent safety and liability issues must be addressed. When at-grade railroad crossings intersect highways, they also are subject to the governing highway authority. Frequently, the highway authority pays to install crossing signs and signals on highways, and the railroad maintains them.
Lingo Lasso
Rails, Tracks, Railways, and Railroads
Operation Lifesaver (Hall, personal communication) explains easily confused railroad terms:
- Rails—The steel strips
- Tracks—The pair of rails with ties holding
them together
- Railways and railroads—Generally, the
companies that own the tracks
- Highway-rail grade crossings—The intersections where roads and railroad tracks meet
Trails parallel to active railroad tracks are called rails-with-trails (RWTs). Don't mistake RWTs for rails-to-trails, which follow former—or inactive— rail lines. Safety is the most important factor when designing RWTs that include riders. According to Rails-with-Trails: Lessons Learned (Alta Planning and Design 2002): "Trail width is an overriding design issue when considering equestrian use on RWTs. RWTs designed to accommodate equestrian use should provide separate treads for multiple users. Narrow rights-of-way that afford width for only a single paved trail, or that provide inadequate shy distance for a horse frightened by near or oncoming trains are not appropriate candidates for accommodation of equestrian use. Trestles and bridges require additional considerations. Many horses are frightened by bridges and other elevated environments, particularly lattice or perforated bridges and trestles that allow the animal a view of the ground substantially below the bridge deck. Most horses are not accustomed to this environment and will respond unpredictably with potentially negative consequences."
Because there are no national planning standards or guidelines for trail setback distances parallel to active railroads, guidance must be pieced together from relevant standards for shared-use trails, pedestrian facilities, railroad facilities, and/or railroad crossings or railroad rights-of-way. Consider these factors (Alta Planning and Design 2002) during trail feasibility studies:
- Type, speed, and frequency of trains in the trail corridor
- Maintenance needs
- Applicable State standards
- Separation techniques
- Historical problems
- Track curvature
- Topography
- Engineering judgment
Because every case is different, determine the setback distance and other considerations on a case-by-case basis after engineering analysis and consideration of liability concerns.
Resource Roundup
Rail and Trail Information
Visit these online resources for more information regarding railway crossings:
- Federal Railroad Administration at http://www.fra.dot.gov.
- Operation Lifesaver at http://www.oli.org.
Generally, horses and mules can maneuver over railroad tracks that intersect trails when the crossing is wide enough and has solid, level footing—at the approach, between the rails, and on the opposite side of the railroad track. Trails, roads, or sidewalks should approach a railroad crossing perpendicular to the direction of train travel. Build the tread surface level with the top rail flange, filling in the gap (figure 5–7) as specified by railroad regulations. Materials commonly used to fill the gap include concrete, asphalt, hardened rubber, wood planks, gravel, or other durable materials. Rubber or concrete lasts longer than wood or asphalt and requires less maintenance. When trails cross abandoned tracks, consider removing the rails and ties.

Figure 5–7—Building a horse trail in an
active railroad corridor
requires
extensive
negotiation to address
safety
and liability
concerns for trail users and railroad personnel.
If trails must cross
tracks, the tread should be
level and the gaps filled according to
railroad
requirements. Trails also must approach
tracks at a 90-
degree angle.
Railcars overhang the tracks by 3 feet (0.9 meter) on each side, and trains need a dynamic operating space for loose loads or straps and thrown debris. To reduce the hazards associated with stock waiting for a train to pass through a crossing, a waiting area may be appropriate. Locate waiting areas back and away from rails as required at each site to meet the needs of trail users and railroad personnel.
Resource Roundup
Train and Trail Laws
Rails-with-Trails: Lessons Learned (Alta Planning and Design 2002) has valuable information regarding setbacks, separation distance, and other considerations dealing with trails and rail corridors, including sample legal agreements and a useful matrix of State laws regarding railroads and trails.
- The entire document is available at http://www.fhwa.dot.gov/environment/rectrails/rwt.
- Appendix B: State-by-State Matrix of Applicable Laws and Statutes is available at http://www.fhwa.dot.gov/environment/rectrails/rwt/appendixb.htm.
Water and Wet Area Crossings
Recreation trails generally cross water at grade or above. Constructing a crossing over or through water generally requires authorization from the governing authority and may require special construction techniques or environmental considerations. Horse trails may incorporate bridges or culverts to maximize habitat protection and reduce trail maintenance. Sometimes fording a stream is the best option.
Shallow Stream Fords
Locate fords in an area where the stream is straight and shallow, avoiding areas that are deeper than 2 feet (0.6 meter) during most of the use season. Avoid locations where the stream turns, because water undercuts the outside bank. Routing the trail to a good natural ford is better than building a new ford. When constructing a ford across a shallow stream, stabilize banks to prevent sedimentation, if necessary. Figure 5–8 shows a ford that crosses a fish ladder. Where suitable, angle trail approaches upstream to protect the bank from erosion caused by rising water. To block rising water from running down the main trail, construct approaches so they climb a short distance above the usual high water line (figure 5–9). Options for stabilizing banks include the use of geotextiles in combination with riprap. Figure 5–10 shows installation of soil-filled geocell layers to stabilize a bridge approach. Articulating and interlocking concrete pavers are other options for stabilizing streambeds. Pavers with voids for soil or plant material are less likely to be a slip hazard. Figure 5–11 shows interlocking hard pavers used to stabilize a bridge approach.

Figure 5–8—This fish ladder includes a ford
for trail users while
still allowing trout
to move up the creek. The steps have
big
landings—about 8 to 10 feet long—and
stock tolerate them. The
rocks alongside
the ford keep stock on the desired path.

Figure 5–9—This ford has a rock
step up
to a landing. The trail
approach
rises to
keep the stream from flowing down the
tread.
Rocks on the side of the ford
guide stock to the step.
Caution: large, wet rocks can be hazardous for all trail users.
Figure 5–10—Workers have compacted soil
into
layers of geocell
to provide stability
at a bridge approach. The top layer will bring
the tread level even with the deck level.

Figure 5–11—The approach to this trail bridge
is reinforced with
interlocking pavers
to withstand wear from off-highway vehicle
use. The pavers may not offer enough traction for
horses and
mules. A similar approach using
horse-friendly pavers could be
used on equestrian bridges.
Provide solid footing, such as medium-sized gravel or a stabilized surface. Place it at a consistent depth from one bank to the other (figure 5–12). Choose the surface materials carefully—hardened surfaces reduce sedimentation and stream erosion, but can be slippery when wet.
Curbs that run across treads and smooth, hardened tread edges at water crossings are trip hazards and are not appropriate for horse trails. Natural rocks and crushed gravel can help sustain the edges of stream crossings when stabilization is necessary (figure 5–13). Do not include fines that will wash away. To prevent steep dropoffs, gradually transition from the tread to stream bottom. The underwater portion of the tread may need to be wider than the rest of the trail to accommodate stock that step to the side. On Forest Service horse trails, fords have a trail base that is at least 3 feet (0.9 meter) wide. Consult an engineer or hydrologist for additional techniques to stabilize fords and areas nearby. Figure 5–14 shows a concept for an urban channel crossing at grade. Geosynthetics stabilize the banks.
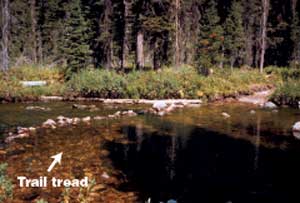
Figure 5–12—A stable tread surface is
essential for shallow
stream
crossings. Stepping stones for pedestrians
should be
placed on the upstream
side of the tread.
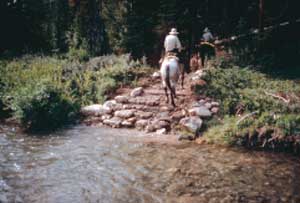
Figure 5–13—Rocks and gravel can be used
to reduce erosion
along waterways,
but medium and large rocks can be
slippery
when wet. These riders chose the side
of the tread with the best
horse
footing—small rocks and gravel.

Figure 5–14—A channel crossing using geosynthetics to
stabilize the
banks.
This example is suitable for areas
with high levels of
development.
Fords get the most use when flows are low to moderate and are not intended for use during high runoff. Where fords traverse water with a strong current, the downstream side should be free of dangerous objects. Place pedestrian bridges or stepping stones on the upstream side of the equestrian bridge to prevent fallen stock from being swept into other trail users or pinned against structures.
Resource Roundup
Treading Water
These Forest Service references provide trail construction information regarding fords and wetlands:
- Trail Construction and Maintenance
Notebook: 2007 Edition (Hesselbarth,
Vachowski, and Davies 2007) is available
at http://www.fs.fed.us/t-d/pubs/htmlpubs/htm07232806. This Web site requires a
username and password. (Username: t-d,
Password: t-d)
- Wetland Trail Design and Construction (Steinholz and Vachowski 2007) available at http://www.fs.fed.us/t-d/pubs/htmlpubs/htm07232804. This Web site requires a username and password. (Username: t-d, Password: t-d)
Wet Area Trail Structures
In areas where at-grade stream crossings are not suitable, consider elevating the tread. Causeways, turnpikes, boardwalks, and puncheon bridges are construction methods that minimize damage to wet areas. These techniques often are used in combination with rock, fill, and geosynthetics, where permitted. Determine the type of support and drainage systems that will safely withstand the weight of stock on elevated trail treads.
Turnpikes
Turnpikes incorporate fill material taken from parallel side ditches and from offsite to build the trail base higher than the surrounding water table on wet or boggy ground (figure 5–15). Turnpikes are practical in areas with a trail grade up to 10 percent and in flat areas with 0- to 20-percent sideslopes. Use turnpike construction to provide a stable trail base in areas with a high water table and fair- to well-drained soils.
To build a turnpike, ditch both sides of the trail to lower the water table. Next, install geotextile, or other geosynthetic materials, and retainer logs or rocks. Place the geotextile under any retainers. Lay the geotextile over the ground with no excavation, and then add high-quality fill.
The two most important considerations when constructing a turnpike are lowering the water level below the trail base and carrying the water under and away from the trail at frequent intervals. Turnpikes require some degree of drainage. A turnpike is easier and cheaper to build than puncheon and may last longer. Use puncheon when the ground is so wet that drainage is impossible and grading is precluded.

Figure 5–15—A turnpike elevates the trail in
boggy or wet areas.
Ditches provide drainage. This
turnpike has log stringers filled
with coarse,
well-drained rock.
Turnpikes Without Ditches
A more environmentally friendly relative of the turnpike is one without side ditches. Sometimes turnpikes without ditches are called causeways. In the Sierra Nevada, causeways filled with crushed rock create elevated, hardened treads across seasonally wet alpine meadows. A single causeway often replaces multiple, unwanted parallel treads. These causeways create less environmental impact than turnpikes, because they lack ditches and don't lower the water table. The risk is that turnpikes without ditches could sink into highly saturated soils, a problem mitigated by geotextiles. The encapsulation technique sometimes works well on causeways.
Horse Sense
Encapsulation: The Sand Sausage
Encapsulation, an alternative method of building tread in a turnpike, provides separation between good fill and clay and keeps a layer of soil drier than the muck beneath. To encapsulate—or create a sand sausage—excavate 10 to 12 inches (254 to 305 millimeters) of muck from the middle of the turnpike. Lay a roll of geotextile the length of the turnpike, wide enough to fold back over the top with a 12-inch (305-millimeter) overlap. Place 6 inches (152 millimeters) of crushed stone, gravel, or broken stone on top of the single layer of geotextile, then fold the geotextile back over the top and continue to fill the turnpike with tread material.
Puncheon
Puncheon is a wood walkway used to cross bogs or deep muskeg, to bridge boulder fields, or to cross small streams (figure 5–16). Puncheon can be constructed where uneven terrain or inadequate tread material makes turnpike construction impractical. It is easier to support puncheon on muddy surfaces than to construct a turnpike.
Puncheon resembles a short log-stringer trail bridge that has a deck made of native logs or sawn, treated timber. The deck of surface puncheon is placed on stringers to elevate the trail across wet, difficult-to-drain areas. The Student Conservation Association (Birkby 2006) constructs puncheon for horse trails using log stringers that are at least 10 inches (254 millimeters) in diameter and decking that is at least 4 inches (102 millimeters) thick. The puncheon is 48 inches (1,219 millimeters) wide.
Subsurface puncheon is placed flush with the wetland surface. Creating subsurface puncheon involves constructing mudsills, stringers, and decking under the surface. This design depends on continual water saturation for preservation. To improve traction, cover the surface between the curb logs with a layer of gravel, wood chips, or soil.

Figure 5–16—Puncheon walkways can be
level with
the surface
or lie below it. Log
stringers support this deck.
In areas with deep mud, sometimes trail users find it difficult to see and follow the trail on subsurface puncheon. Once an animal steps off the tread, it can severely damage the area when attempting to regain solid footing. If the animal becomes trapped in muck, it may be very difficult or impossible to get it out alive.
Boardwalks
Boardwalks have multiple pilings, and are essentially a series of connected bridges. Horse trails rarely have boardwalks.
Retaining Curbs
Install longitudinal edging—retaining curbs—to delineate the edges on elevated treads or puncheon (see figures 5–15 and 5–16). Treat elevated treads, such as boardwalks, as if they were a bridge and use the guidelines for equestrian bridge designs.