
Chapter 7—Planning Recreation Sites—Continued
Wash Racks
Wash racks are optional amenities appreciated by riders to clean and cool their stock after a ride. Figure 7–17 shows a wash rack that accommodates four tethered trail animals. Some premanufactured wash racks have a chain that latches behind the animal to prevent it from backing out. A clear, somewhat level area at the entrance to the rack allows the handler to maneuver the animal (figure 7–18). Wash racks can be purchased prefabricated, or they can be custom built. When providing wash racks, locate them around the perimeter of parking areas, in landscape islands, or along the outside edge of loop roads (see figure 7–6).

Figure 7–17—Metal rails separate four stalls in this wash rack. A
single hydrant and hose in the center serve all four stalls.
Regardless of the wash rack configuration, the water source must be installed in a clear area that has a wearing surface—material, such as crushed gravel, that reduces mud. Some agencies provide a hose at the wash rack. If hoses are stolen frequently, they can be stored in a secure location accessible only by the camp or site host. Riders sometimes carry hoses in their horse trailers.

Figure 7–18—A single-horse wash rack.
Drainage Overflow
Provide proper drainage for overflow and spills at water hydrants, water troughs, and wash racks to minimize maintenance and avoid problems. Standing water quickly becomes a muddy mess. If the water is stagnant, it can attract insects, such as mosquitoes. Design drainage systems to prevent runoff into nearby waterways, particularly with wash racks, because they produce lots of runoff that often contains soap.
Wet-Area Wearing Surfaces
Surfacing the area around water hydrants, troughs, and wash racks reduces maintenance. Suitable materials include pea gravel, crushed rock without fines, sand, or a combination of aggregate and sand. Sand is generally not recommended for horse areas because horses and mules will get sick if they eat sand and it builds up in their digestive system. Horses and mules rarely are fed or left unattended near water devices, so sand can be used for drainage there. Use edging to contain loose surface materials. Suitable edging materials include concrete curbs, steel, wood timbers, or recycled plastic. An example of edging is shown in figure 7–19.
Figure 7–19—Timber edging detail for a hydrant or trough.
Concrete forms a durable wearing surface that is firm and stable. However, smooth concrete gets slippery when wet. Apply a heavy, rough-broom finish when installing concrete. This safety precaution is especially important at wash racks. In areas where vandalism is not an issue, heavy rubber mats placed on top of the concrete may be suitable.
Regardless of the material used, the wearing surface must be sloped away from the water source to handle runoff. Include a drain if the wearing surface is concrete.
Power and Lighting
Before installing exterior lighting, consider the drawbacks of artificial light in a natural setting. Exterior and interior safety lighting should be provided at toilet and shower buildings, if lighting is suitable for the level of development. Reserve additional area lighting strictly for recreation sites with a high level of development. Lights may be helpful at information stations and group gathering areas. If trailhead facilities—such as arenas or round pens—are open at night, site lights are an option. User-activated or timed lighting controls (figure 7–20) reduce the overall effect of light at the site. Figure 7–21 shows one recommended lighting fixture for trailhead parking areas, arenas, and round pens. Follow applicable local and State regulations for lighting systems.
Added utility options for equestrian campgrounds include access to electricity, full-service hookups, and a sanitary dump station. Many recreationists appreciate electrical outlets near the serving table in a group gathering area. These options are only appropriate in a large campground with a high level of development.

Figure 7–20—Timing mechanisms are convenient and
reduce light pollution.

Figure 7–21—Fixtures that direct light downward
reduce light pollution.
Resource Roundup
Night Light
The mission of the International Dark-Sky Association is to preserve and protect the nighttime environment and our heritage of dark skies through quality outdoor lighting. Information regarding the effects of light pollution and possible solutions is available at http://www.darksky.org.
Structures
An architectural theme is highly desirable for structures at a recreation site. Match form, materials, textures, colors, and finishes of toilet buildings, shower buildings, and shelters. In general, avoid bright colors and select materials and finishes that blend with the setting and climate, such as earthtoned hues.
The services of a qualified engineer or architect are required if toilets, shower buildings, or shelters are custom designed. Structure design must comply with applicable Federal, State, and local building regulations and codes. All buildings constructed or altered by a Federal agency since 1968, or by a State or local government since 1991, also must comply with applicable accessibility guidelines.
When designing structures, keep the safety of horses and mules in mind. Even where equestrian routes and human facilities are separated, escaped stock may find their way to areas with structures. Avoid sharp corners, projections, or tight spaces, and don't design small openings that attract bees and wasps. Horses and mules are very susceptible to bee stings. They may react violently when stung.
Resource Roundup
By Design: BEIG
Although developed for use on Forest Service lands, the Built Environment Image Guide for the National Forests and Grasslands (U.S. Department of Agriculture, Forest Service 2001) may be a useful model for other locations. Known as the BEIG, the guide provides design guidance for toilet buildings, site furnishings, wayside structures, and signs—or the built environment. Eight architectural character types are defined by geographic location. The designs project the overall Forest Service image while echoing local values, heritage, and culture. Following the BEIG facilitates an integrated approach to planning and design, including early collaboration among planners, designers, specialists, managers, and maintenance personnel. It ensures that facilities fit their natural and cultural settings. Buildings and other constructed features should incorporate the principles of sustainability and accessibility as an integral part of their architectural character. The text of the BEIG is available at http://www.fs.fed.us/recreation/programs/beig.
Eye for Color: VRM
The BLM's Visual Resource Management system addresses more than location issues and surface disturbance. VRM also looks at design elements—form, line, color, and texture. Strategies include color selection, earthwork, vegetative manipulation, and reclamation and restoration. These techniques are used in conjunction with a visual resource contrast rating process. More information about BLM design techniques is available at http://www.blm.gov/nstc/VRM/destech.html.
Material Standards
ASTM International is one of the largest voluntary standards development organizations in the world, producing technical standards for materials, products, systems, and services. More information is available at http://www.astm.org.
Toilet Buildings
Prefabricated toilet buildings are commonly available and generally cost less than a customized structure. Designs appropriate for recreation sites generally accommodate one, two, or four people. If pressurized water is available at the site, provide riders with a washbasin where they can clean up after a ride. Toilet buildings may include storage areas for maintenance equipment, wheelbarrows, rakes, and shovels used for manure disposal.
The three most common toilet systems available for recreation sites are vault, composting, and flush. The proper system for a particular site depends on the level of development and the availability of water. Proper sanitation requires strict compliance with all applicable laws, ordinances, and regulatory provisions.
Resource Roundup
Sweet Smelling Toilets
The Forest Service's Technology and Development Program has produced several practical reports for designing, choosing, constructing, and locating toilet and shower buildings. The reports are available at http://www.fs.fed.us/t-d/pubs. Search the site using the keywords toilet and shower. This site requires a password. (Username: t-d, Password: t-d)
Louisiana State University Ag Center and Research Extension has construction plans for a Campground Comfort Station (1969). The structure is constructed of concrete block and has toilets, showers, and washbasins. The electronic document is available at http://www.lsuagcenter.com/en/our_offices/departments/Biological_Ag_Engineering/Features/Extension/Building_Plans/recreation/equipment/Campground+Comfort+Station.htm.
A vault toilet has a belowground storage chamber that requires regular pumping, usually performed by a commercial operator. When placed properly, built correctly, and maintained regularly, vault toilets do not smell. Fans may be needed for ventilation—solar fans are an option in areas with no electricity. Composting systems are environmentally friendly and odorless, but require substantial maintenance. Because many users prefer flush toilets, they may be the best option where water is available and the level of development is suitable. Table 7–4 summarizes toilet system characteristics. Figures 7–22, 7–23, and 7–24 show toilet buildings appropriate for low, moderate, and high levels of development. Figure 7–22 is a premanufactured building commonly used at Federal recreation sites.

Figure 7–22—This prefabricated toilet building is a
style commonly used at Federal recreation sites. It
is suitable for areas with low to moderate levels of
development.

Figure 7–23—This toilet building is suitable for recreation sites
with moderate levels of development.

Figure 7–24—This combination toilet and shower building is
suitable for some recreation sites with high levels of development.
Shower Buildings
Although showers are not a necessity, riders appreciate the convenience of a shower building at the campground after long rides. Shower buildings require maintenance, water, heat, and grey water disposal. Before planning shower buildings at recreation sites, consider whether they are appropriate for the level of development. Thoroughly evaluate and weigh the drawbacks against the benefits. If providing a shower building is economically feasible, include one—the campground will be popular with riders.
Shower buildings usually are custom designed and follow two basic layouts. The first layout has individual shower stalls, each with its own exterior door. The stalls may be unisex or gender specific. The second layout has a single large room with numerous stalls and is gender specific. A shared shower room is more cost effective than individual stalls, but offers less privacy.
Shelters
Shelters provide protection from the elements, offer convenience, and can add an attractive touch to a recreation site. Incorporate shelters in heavily used areas—camp units, picnic units, group gathering areas, and information stations. The size of shelters for camping or picnicking depends on the number of tables that are needed. Table 7–5 shows recommended shelter sizes for one to six picnic tables. Often, it's less expensive to purchase a premanufactured shelter than to construct a custom shelter. Figure 7–25 shows a camp or picnic unit shelter. Figure 7–26 shows an information station with a shelter.

Figure 7–25—An effective shelter can have a simple design.

Figure 7–26—Information stations often incorporate a
shelter. Install a hitch rail nearby for equestrians.
Structure Locations
For ease of construction and maintenance, locate toilet, shower, and shelter structures in an area with well-drained soil and little hard rock. Pick open areas to reduce the vegetation that must be removed. Make sure that structures are a safe distance from dropoffs and water bodies. Solar collectors should be placed where they will not be shaded during the day.
Although it may seem logical to locate toilets and shower buildings in the center of a loop road, this arrangement has problems. A toilet building located in the loop center does reduce the travel distance from camp units, but it also requires many trails for users (figure 7–27). Campers will make their own routes if there are no trails—to the detriment of vegetation along the way. A centrally located building also means campers are disturbed when others walk past or through their parking pad. This is especially true if the passerby is on a horse or mule.
The preferred location for a toilet or shower building is along the outside edge of a loop road or at a road intersection. The road serves as a pedestrian passageway. It also helps preserve the vegetation buffer in the center of the loop. Locate toilet buildings near trail access points so riders can use facilities before and after a ride. Place toilet and shower buildings around the perimeter of trailhead and group camp parking areas or in landscape islands (see figures 7–6, 7–7, and 7–8). For user satisfaction, place toilet buildings at least 75 feet (22.9 meters) from camp units, picnic units, and horse trailers, and no more than 500 feet (152.4 meters) away.

Figure 7–27—Campers create informal paths when toilet buildings are in the center
of a campground loop. Placing toilet buildings along
the outside of campground loop roads reduces problems caused by shortcuts.
Manure Disposal
Horses and mules produce lots of manure. The manure can attract insects and it's probably smelly. The appropriate manure disposal system for a recreation site depends on the site's proximity to solid waste disposal facilities, the costs of disposal, and applicable health regulations. In some areas of the country, especially in remote areas, manure cleanup may not be customary. Some land managers suggest scattering manure in vegetation around the recreation site. Many places prohibit this practice because it encourages the growth and spread of weeds.
In recreation sites where it is not feasible to arrange for manure disposal, land managers often institute a pack it in, pack it out policy—requiring riders to pick up the manure and take it home with them, a practice that can be difficult to enforce. To encourage compliance, site hosts, entry station personnel, or a self-service dispenser could supply plastic garbage bags.
Hauling manure may be the best option for sites near a community that will dispose of solid waste or when the managing agency has its own garbage truck. A temporary manure storage bin is used by some agencies (figure 7–28). The bin has walls on three sides, and the fourth side has an opening that is wide enough for maintenance equipment. A concrete bottom makes it easy to remove manure. Proper drainage is critical to prevent rainwater or snowmelt from pooling in the bin or flowing out of the manure disposal bin into nearby waterways.

Figure 7–28—When manure disposal units are convenient, riders
are more likely to clean up after their stock. Proper drainage is
essential.
Some agencies provide dumpsters with lids to minimize flies and odors. A concrete dumpster pad provides a sturdy surface for garbage trucks. See figures 7–6, 7–7, and 7–8 for suggested placement of manure bins. For user satisfaction, place manure disposal units at least 75 feet (22.9 meters) from camp units, picnic units, and horse trailers, and no farther than 300 feet (91.4 meters) away.
The easier it is for riders to dispose of manure, the more likely they will do so. To make cleanup easy, provide tools—wheelbarrows, manure rakes, and shovels (figure 7–29). If the site is prone to vandalism, have the site host store the tools. If this is not feasible, encourage recreationists to carry rakes and shovels in their horse trailers. Determine whether manure and other waste may be mixed. If manure must be disposed of in different containers than other waste, install signs that explain the rules. Figure 7–30 shows a simple sign for manure disposal. See Chapter 13—Reducing Environmental and Health Concerns for more information.

Figure 7–29—Riders are more likely to clean up after their stock
when tools and containers are provided.

Figure 7–30—Signs encourage riders to dispose of manure
properly.
Mounting Blocks and Ramps
Other convenient—and greatly appreciated— equestrian amenities include mounting blocks, mounting ramps, and in some areas, stock loading ramps for trucks or trailers with elevated beds. These amenities serve a broad range of riders.
Installing mounting blocks or ramps in areas where riders normally dismount and mount can increase usage of trails, trailheads, or campgrounds. Many riders have difficulty getting on and off a horse or mule. Young children, small or older riders, and people who are not athletic may find it a long reach to get a foot in a stirrup without assistance. Many riders in this situation search out large rocks, stumps, or mounds to give themselves a boost. Such objects can be unstable or slippery. Provide a mounting block or ramp instead.
Mounting Blocks
Riders of all abilities and ages can use mounting blocks. A mounting block resembles a short staircase that ends in midair (figure 7–31). The rider climbs the stairs to reach the saddled animal standing at the elevated end. Mounting blocks may be made of wood, steel, concrete, plastic, fiberglass, or a combination of these materials (table 7–6). Structures that are more permanent, for example those made of concrete or steel, are most suitable at trailheads or campgrounds that have easy access for construction equipment. Permanent structures also discourage theft. Structures made from wood, fiberglass, or plastic are easier to transport, install, and place along trails.

Figure 7–31—Riders may have trouble using this mounting block,
because the handrails limit the maneuvering space. Options
include removable or foldable handrails and rails that don't extend
all the way to the end of the platform.
To meet accessibility requirements, the treads on mounting blocks must be at least 11 inches (about 279 millimeters) deep and 36 inches (about 914 millimeters) wide (figure 7–32). Risers should be uniform and measure between 4 and 7 inches (about 102 and 178 millimeters) high. Mounting blocks with an overall height of 16 to 28 inches (about 406 to 711 millimeters) are common. The need for handrails is under debate. While handrails keep users from falling off platforms, the animal, rider, assistants, or equipment can be caught or squeezed against the handrails.
Riders usually mount from the left side of the animal, passing their right leg over the horse's back. Handrails on the right-hand side of the stair may interfere with the rider's leg movement. This makes a compelling case for leaving handrails off mounting blocks, or for installing handrails that stop before the top step. To meet the ADA/ABAAG requirements, when handrails are used they must have extensions—also called returns—at the top and bottom. In this case, returns extending into the animal's space are not appropriate.

Figure 7–32—An equestrian mounting block
that meets
guidelines.
Horse Sense
A Leg Up
Mounting a horse or mule successfully requires considerable coordination. The rider must grasp the saddle, reins, and sometimes a riding whip; step into the stirrup; raise up; lift a leg over the animal's back; sit down; get the loose foot in the stirrup; and find balance—all while maintaining control of the animal. Problems or serious injuries can occur if the animal moves before the rider is settled solidly in the saddle (figure 7–33).
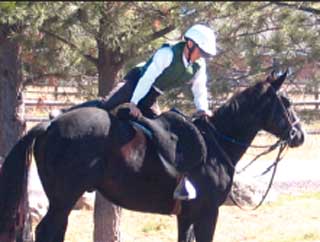
Figure 7–33—Riders are not safely seated until both feet are
firmly planted in the stirrups and the animal is under control.
Locate mounting blocks 8 to 10 feet (2.4 to 3 meters) from trail treads and fence gates (figure 7–34). Farther may be better in heavily used areas. Position mounting blocks at least 3 feet (0.9 meter) away from fences—completely avoiding fences with barbed wire. Situate the mounting block parallel to the trail tread or fence line, with the steps facing the fence. This arrangement provides the most space for maneuvering horses and mules. The space on both sides of the animal must be free of obstacles.
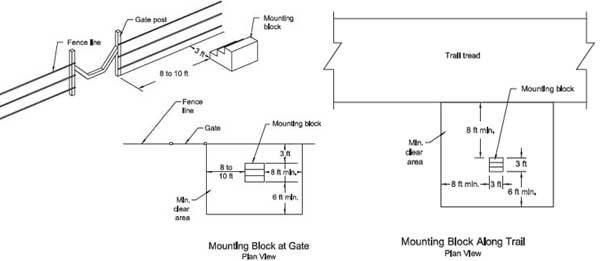
Figure 7–34—Suggested placement for equestrian mounting blocks. The trail gate shown is not accessible to people with disabilities if
the bar across the opening is higher than 2 inches from the ground. For long description click here.
See figures 7–6, 7–7, and 7–8 for some suggested locations for mounting blocks in recreation sites.
Mounting and Loading Ramps
Some riders require more assistance than afforded by a mounting block. They appreciate mounting ramps—gradual inclines leading to an elevated platform. Mounting ramps elevate the rider to the height of a saddled animal or waiting carriage. Some riders using mounting ramps also require the help of assistants (figure 7–35).

Figure 7–35—This mounting ramp has offside steps and a horse
chute in the middle. Assistants can stand on both sides and in front
of the horse and rider. Caution: at this site, handrails and railings
were not included to leave space for assistants. Safety must be
the overriding factor when deciding how to place railings on
mounting ramps.
A variety of types, sizes, and inclines are suitable for mounting ramps, depending on the space available, natural grade, and potential use. Wood and grasscovered slopes are often used for ramps in low development areas with sloped terrain (figure 7–36). Mounting ramps in flat terrain that has moderate to high development often are constructed with manmade materials, such as concrete or steel. No matter what the setting or level of site development, the approach to the ramp must have a firm and stable surface to meet accessibility requirements.

Figure 7–36—Access to this mounting ramp is from an accessible
path behind and to the left of the grassy surface. The horse stands
in the chute at the right. When the ramp is not in use, removable
rails block the open end.
When access routes are steeper than 5 percent, the routes must meet accessibility guidelines for ramps. Ramps that rise more than 6 inches (152 millimeters) above the ground require handrails and an edge protector—a curb or other barrier that extends at least 4 inches (102 millimeters) above the ramp edge. Ramps with a rise of more than 6 inches must have handrails with extensions. Accessible ramps must be at least 36 inches (914.4 millimeters) wide between the handrails, with space at the bottom and the elevated end for a 60-inch (1,524-millimeter) turning radius. At any change of ramp direction, there must be a level landing with a 60-inch turning radius. Figure 7–37 shows a sturdy mounting ramp. Although this mounting ramp gives access for all users, to meet accessibility guidelines for ramps, handrails with extensions and curbs would be required. Building codes and safety standards require intermediate rails.

Figure 7–37—Although this mounting ramp allows access for all
users, to meet accessibility guidelines it needs curbs, handrails
with extensions, and closely spaced rails. Ramps must meet
accessibility requirements if they are part of a travel route that
is required to be accessible by Section 206 of the ADA/ABA
Accessibility Guidelines.
Ramps with a dropoff that is more than 30 inches (762 millimeters) must have a guardrail that is 42 inches (1,067 millimeters) high with intermediate rails or fence material that won't allow passage of a 4-inch (101-millimeter) sphere through the openings in the railing. Guardrails are required for a simple and obvious reason—to keep people from falling off the platform. Make the rails removable on the side facing the animal. Figure 7–38 shows an accessible mounting ramp with a platform where an assistant could stand. Figures 7–39 and 7–40 show a simple mounting ramp on sloped terrain in the Hoosier National Forest.
Mounting ramps can serve dual purposes—to help riders mount and to unload animals from stock trucks (figure 7–41). Figure 7–42 shows a combination ramp that serves people with disabilities and stock.
A startled animal can bolt or hurt a rider who is not in position to fully control the situation. Loading ramps should be in areas that are quiet, away from areas with high activity, such as arenas or popular round pens (see figures 7–6, 7–7, and 7–8). Provide enough space around the mounting ramp for several people to stand and move while assisting the rider.

Figure 7–38—An accessible mounting ramp with a platform where an assistant could stand.

Figure 7–39—This ramp has a firm and stable surface on the
mounting side, allowing access by people who use wheelchairs.
The chain serves as a safety device that can be unhooked before
mounting the horse or mule.

Figure 7–40—The horse stands between the ramp and the trees
on the left, facing the viewer.
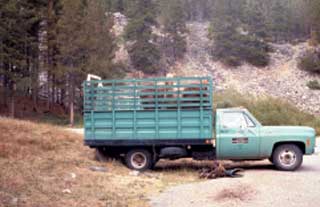
Figure 7–41—Stock trucks usually have a drop-down panel or
slide-out deck for unloading. If a stock ramp is not available, the
truck can be backed up to a slope and the drop-down panel can
bridge the gap between the tailgate and the ground.

Figure 7–42—A combination ramp with wheelchair and stock-loading access.
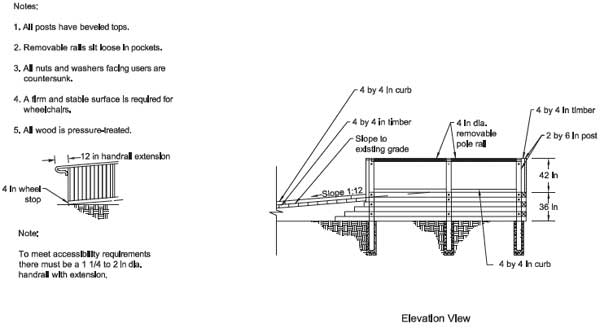
Figure 7–42—(continued)
For long description click here.
Figure 7–43 shows a mounting ramp at Hidden Horse Campground in the Klamath National Forest. Designers evaluated accessibility requirements and safety. The design considers the needs of riders with a range of disabilities, as well as stock of many sizes. The important features of the ramp are:
- A wheelchair-accessible platform that is tall
enough to allow mounting without the use of
stirrups.
- Firm and stable surfaces on the platform and
path—in this case, hard rubber mats.
- A multipurpose platform for assistants that
- Keeps the animal straight and in position.
- Can be used by assistants.
- Serves as a mounting block for more able riders.
- Steps on two sides of the assistant's platform and
the wheelchair-accessible platform allow assistants
to walk alongside as the animal departs.
- Access to the chute from both sides so the animal
can be mounted from either direction.
- Beveled edges to avoid injuries to animal and rider
or snagged stirrups.
- No railings, gates, walls, or fences near the chute to spook the animal or injure people.
Some designers would make a case for having handrails on the steps and platform, on the side away from the horse chute. This would prevent an assistant from accidentally falling off.

Figure 7–43—The horse stands in the chute between the wheelchair accessible
platform and the platform for assistants. Users approach from
the path on the left. Assistants can stand on either platform. Caution:
At this site, handrails and railings were not included to leave space for
assistants. Safety must be the overriding factor when deciding how to
place railings on mounting ramps.
